Ace of Spades Exotic - Cache & Stash Locations Destiny 2
Ace of Spades is an exotic hand cannon in Destiny 2 Forsaken. It belonged to Cayde-6, and you’ll get the opportunity to take it and restore it to its former glory. There’s a whole quest around it, and it involves a lot of precision kills and finding some hidden caches. If you need help finding the cache locations and completing the quest, keep reading our Destiny 2 Ace of Spades exotic hand cannon guide.
How to get Ace of Spades in Destiny 2?
You’ll first need to get the Cayde’s Will quest from the gunsmith. It becomes available after the Prison Break main story mission. Then you’ll need to complete the game, as the next step requires you to get the gun from Uldren Sov, the main baddie. Talk to the gunsmith again, and he’ll tell you he can fix the gun if you perform some menial labor for him.
Your first task will be to get five invasion kills in Gambit with a hand cannon. Many people thing you have to be the invader to complete this part, but that’s not true. The quickest way to do this is to just go to a stage where the enemy team has a constantly open portal, so they can invade you constantly. A good place for doing this is the Taken Primeval part.
The next step requires you to kill 250 in strikes, using a hand cannon. Any strike will do, but it’s probably best to look for one with a lot of weaker enemies you can farm. Afterwards, it’s off to the Crucible, where you’ll need to get 25 precision kills with a hand cannon.
Cayde’s secret cache locations
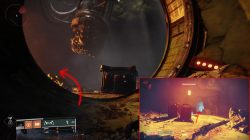
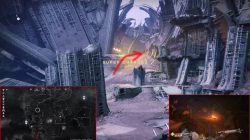
Now comes the tricky part. You’ll need to find four of Cayde’s secret personal caches – one each on Io, Nessus, the Tangled Shore and EDZ. The one on Io is in the north of the map, in the Wraith Mines. Land at Giant’s Scar and head north into Terrabase Charon. Enter the bunker door on the left, the one with the green emblem above it. Follow the tunnel until you’re in the mines. Head left in the room with the first drill, then right in the one with the blue glow. Go up the tunnel, and you’ll end up in a large hall. Hug the right wall, and you’ll end up in front of the upper part of a drill. The cache will be on a tiny ledge behind it.

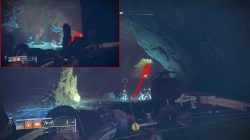

The next one is on Nessus. It’s in the Sunken Cavern. To get there, you’ll need to land at Artifact’s Edge, then head east to the Hallows. Jump into the big well and go left, following the orange light. It will lead you into a tunnel that ends in the Sunken Cavern. Jump down the floating boulders until the path starts to fork. Follow the one that goes up and to the left. Enter the round arena, and go to the right. You’ll find the cache in a recess in the brightly illuminated ledge.
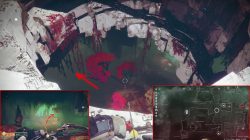

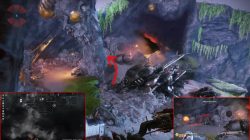
The one in the Tangled Shore is in Hellrise Canyone, a Fallen lair in the south. Land at the Thieves’ Landing, then head west to Jetsam of Saturn. Go to the appendix-like are in the south, and you’ll find the entrance to the lair. Just keep heading downhill, and the tunnels will lead you to a large open are with a crashed ship. Hug the left wall, and you’ll find the cache tucked in between an orange glowing egg and a round hole.
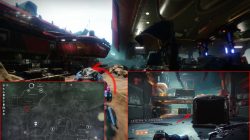
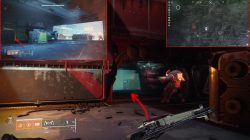
The on at EDZ is in the Legion’s Anchor. In order to get it, you’ll have to land at Sunken Isles, head towards the giant spaceship and enter the tunnels under it (the ones leading south). Follow the tunnel until you reach a large hall with a blue glow. Look for a passage on the opposite side of the hall, on the same level. It will lead you into a garage with a tank. Look to the left, and you’ll see a yellow shelf. The cache will be under it.
Ace in The Hole stash locations
Once you’ve picked up all four caches, you’ll start the Ace in The Hole quest. It will task you with going to Titan and finding ten of Cayde’s personal stashes. You shouldn’t have much trouble finding them. They’re regular chests with a blue glow that can be seen from orbit. Every time you’re near one, the game will warn you about a “Cayde stash nearby”. Just be careful and look around you thoroughly any time you see the warning.
Once you’re done with that, simply go and talk to the gunsmith once more, and you’ll get your shiny new Ace of Spades exotic weapon.
If you need further help with Destiny 2 Shadowkeep, check out our guides on Dead Ghost Locations, Jade Rabbit Locations, and Eyes on the Moon - How to Start Vex Invasion. If it's Exotic Weapons that you're after, we've got you covered with our Pain And Gain Exotic Quest and Deathbringer Exotic Rocket Launcher - Symphony of Death guides. Going back in time for new players, we can offer you guides like Ikelos Weapons - How to Get SMG, Sniper Rifle, Shotgun, or, if you're playing Forsaken content, guides like Corsair Down & Badge - Dead Body Locations.