Destiny King's Fall Raid Guide
King’s Fall is a brand new Raid in Destiny: The Taken King that went live on Friday, September 18th at 10AM PT. Destiny’s end-game Raid King’s Fall is available when you hit level 40, and access is not gated by any quest.
The recommend Light Level for King’s Fall is 280. In the guide below we compiled all tips and strategies that will help you find all King’s Fall Chest locations and defeat Warpriest, Gorgoloth, Oryx and get the best King’s Fall Raid Loot.
There are two strategies:
Phase 2
Two Guardians must stay behind to shut down the forcefield, one on each plate on left and right. When the other four Guardians are across, two Guardians can step on those plates, left and right, and allow the remaining two Guardians to board the Hive ship and come across.
Take a look where you can find all – KINGS FALL RAID SECRET HIDDEN CHEST LOCATIONS
The encounter leading into the Warpriest room is interesting. Split into two groups of three with even light levels across each group. It’s fine to leave two people in middle to clear adds before joining their allies on the corresponding side. When you walk into the room there is a glowing ball. Walk into the ball, and it activates, and gives you a buff: Brand of the Weaver or Brand of the Unraveler. The buff shields anyone inside it from the constant damage in the side rooms. Whoever has the buff goes to the annihilator Totem, and holds it, the other two follow for the respective sides. The buff lasts for 30 seconds upon which it will be passed to a nearby ally that does not have any stacks of Deathsinger’s Power. The person that just lost the protective bubble will receive 10 stacks of Deathsinger’s Power.
Now begins a relay race, pacing the buffs from one person to another, all trying to charge the Door Room. Whoever has the Death Singer’s Power runs to the middle and stand on the center plate until all the stacks are gone, then waits to pick up Brand of the Weaver buff. As you charge the rune, it will start glowing. After a few iterations of this, the door will be fully charged and will open.
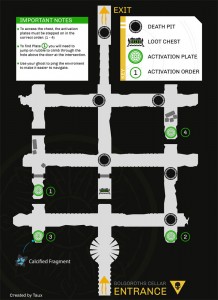 You have to find a way through the Golgoroth’s Cellar Maze. The entire fireteam has to be at the door with the candles to proceed. But before you run through it look for the chest.
Golgoroth’s Cellar Maze Chest
There are 4 symbols that look like leaves, spread in each corner of the maze. You need to jump on them to activate them. Turn on controller vibration to figure out the pattern. Controller vibration will indicate if it’s the right order. One of them is hidden behind a door that can only be accessed if you jump through a small opening above it. This door can be found with your ghost’s outlining feature. Needs at least 4 players. The chest is directly in the middle of the maze, behind the door. 3-4-2-1 and 3-2-1-4 as are the correct combinations, that open the door to the chest. The chest is in the center of the maze. (thanks Taux)
Separate the raid into two groups, two distractors and four damagers. Start the fight by destroying the orb in the center of the ceiling. Golgoroth comes up from the water. When the boss spawns, kill all the adds in the room. The distractors (Gaze Grabbers) should go behind the boss, and start shooting the critical spot on his back to grab the gaze. After gaze is grabbed, the rest of the team should start shooting his stomach. The only places to damage Golgoroth is his back, when his Spider-arms are open, or his stomach when the armor opens.
Distractors have to pass the gaze to each other, and they are given a timer. When one of Distractors grab the gaze, and before the timer is up, the other person needs to grab the gaze.
The rest of the group have to shoot the orbs on the ceiling. These orbs drop a pool, and standing in the pool gives a massive damage buff “Reclaimed Light”. Use the buff to hit his stomach critical spot. All four players can stand in the same buff pool. When it expires, move on to the next one. Cursed Thralls will be spawning all the time, they also damage Golgoroth if they’re close enough.
The boss’ back will stop opening after the 6th gaze for a short time. When the distractors are unable to continue holding his gaze, and adds begin to spawn, clear them and then repeat the process. Use Snipers, Machine Guns for massive damage.
After defeating Golgoroth, you’ll come to a jumping puzzle while completing objective Traverse The Edge. Don’t forget to collect Raid Chest #3!. There’s also a secret room in this area, but its purpose is unknown.
Most simple way I can explain this fight is you need to have people on the 4 pillars around the room summoning the platforms. But you need to do it in the right order. Always start with the platform/pillar directly beneath the relic. Once someone steps on that you have the person who is phased start jumping. When they start jumping, have the person jump on the pillar that is COUNTER CLOCKWISE (both DoO and Oryx require you to build the platforms Counter Clockwise) you will know if you built it wrong because there HAS to be sparks on every platform you jump to.
After the phased person jumps and gets the relic, they jump down to the sister that is NOT channeling the spell. They hold Square/X and steal her giant bubble/shield. You can move around with this. Once you regroup with your team, they HAVE to stay inside the shield and you start burning the sister you STOLE the shield from. Once the shield goes away, just rinse and repeat until you kill them both. (thanks Fallingcow for the clarification)
After your runner collects the relic, they have to run to the front of the room and steal the bubble from a knight called the Vessel of Oryx. Once he gets the bubble, everyone regroup in between the two sisters platforms on the ground. Kill the Vessel and wait for Oryx to start opening his chest. The MOMENT YOU SEE LIGHT from his chest, start shooting him with snipers/MGs/Scout rifles. Weapons of Light is great here because you are probably going to be lacking damage, we were. If you deal enough damage to stagger him, have the 4 people that KILLED THE OGRES, run to the big black balls left behind by the ogre THEY killed. Activate all 4 balls around the same time and book it back to the “Taken” bubble (ha) while everyone is activating the orbs, have the bubble keeper and the extra person keep on shooting Oryxs chest to keep his core exposed. If you do it right, the giant orbs of light when they detonate will deal 25% of his health.
After you damage Oryx, EVERYONE needs to scatter back to an open area in the room. Have the 4 people run back to the pillars they were assigned to and start running laps around the pillars. Have one person run to the back of the room and start running laps up and around the stairs and the last person towards the front to run circle laps around the front of the room. You do this to avoid the death balls that will chase you.
If you fail to damage Oryx, he will create a giant black sphere at the front of the room and will teleport one person randomly into the sphere to fight his Echo (similar to the final mission) He will continue to teleport people into the orb. Have people on the outside control the taken trying to get INTO the orb. Kill the Echo inside in the orb to prevent a wipe.
Repeat the process of grabbing the relic, killing ogres, stunning Oryx, keeping his core exposed, detonating the orbs of light, and running around after and you have Oryx Dead!
The emblem knight (Vessel of Oryx, he drops down from the drop ship) has a immortality bubble around him just like the Deathsingers previously. The starting point from the relic is where Oryx smashes his fist. You have 2 people (the jumper/relic holder and the plate holder) on that plate. The moment they get on that plate and the jumper gets the first small spark, the next person who is COUNTER CLOCKWISE from the starting position jumps and stays on their plate, then the next person COUNTER CLOCKWISE from the 2nd person jumps and stays on theirs and then the 4th person jumps and stays on their plate.
Once the relic holder gets all 6 small sparks and the relic, they steal the bubble from the Vessel of Oryx (the knight) that person then runs back to the middle area of the room between the 2 deathsingers platforms. While you are inside the Brand of Immortality, the only thing that can kill you is Oryxs insta kill move.
After you steal the immortality, you have to stagger Oryx once he opens his chest up. If you don’t he wipes the raid. After you stagger Oryx by putting enough bullets into his chest THAT is when you have the 4 people go to the ogres they killed and activate their bombs. And while the 4 people are doing that, the last 2 people keep on shooting his chest. (thanks Fallingcow for the clarification)
We would like to thank Fallingcow, Steffwiz, PracticallyPetunias and fantasticox for their hard work and sharing the most accurate information with the community.
Opening The Portal
The first encounter of the raid puts you where you’d usually summon the mobs with runes in the ‘Court of Oryx’. The first step is to pick up the orbs and place them in the first statue at the same time. There are a total of six statues. When done correctly, two more will spawn, one to the far left and one to the far right. At least two people need to be sent to retrieve the orbs on both sides and brought back to the middle. Barriers will be placed to slow you down. The non-orb carriers need to destroy them. Then, the orbs need to be placed in the next statue at the same time. Rinse and repeat. You have progressively less and less time each iteration.There are two strategies:
- The first strategy is to split into two even groups of three, for retrieving the orbs on both sides.
- or you can have 2 members stay in the hall way, 2 members go back and to the left side and 2 back and to the right.
Hive Ship Jumping
Phase 1 -Jump from ship to ship to reach the other side.Phase 2
Two Guardians must stay behind to shut down the forcefield, one on each plate on left and right. When the other four Guardians are across, two Guardians can step on those plates, left and right, and allow the remaining two Guardians to board the Hive ship and come across.
Take a look where you can find all – KINGS FALL RAID SECRET HIDDEN CHEST LOCATIONS
The Totem Room
Collect Calcified Fragment XXX – To the right near a pillar.The encounter leading into the Warpriest room is interesting. Split into two groups of three with even light levels across each group. It’s fine to leave two people in middle to clear adds before joining their allies on the corresponding side. When you walk into the room there is a glowing ball. Walk into the ball, and it activates, and gives you a buff: Brand of the Weaver or Brand of the Unraveler. The buff shields anyone inside it from the constant damage in the side rooms. Whoever has the buff goes to the annihilator Totem, and holds it, the other two follow for the respective sides. The buff lasts for 30 seconds upon which it will be passed to a nearby ally that does not have any stacks of Deathsinger’s Power. The person that just lost the protective bubble will receive 10 stacks of Deathsinger’s Power.
Now begins a relay race, pacing the buffs from one person to another, all trying to charge the Door Room. Whoever has the Death Singer’s Power runs to the middle and stand on the center plate until all the stacks are gone, then waits to pick up Brand of the Weaver buff. As you charge the rune, it will start glowing. After a few iterations of this, the door will be fully charged and will open.
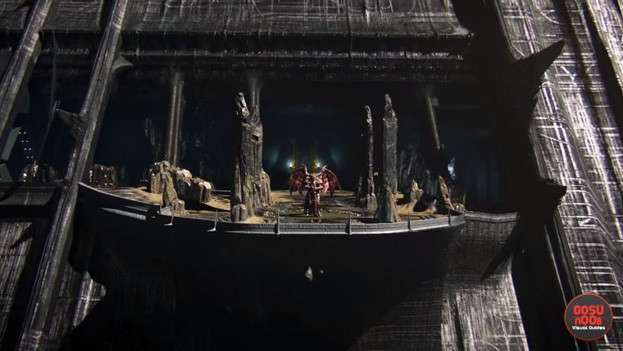
The Warpriest
Activating The Plates- Once the Major Knights die, the corresponding plate is activated
- There are three Knights, one for each plate
- The Knights seem to spawn on a timer
- The sequence is random
- The sequence changes every wipe
- The next plate in the sequence will be highlighted behind the corresponding tombstone with a red pillar of light
- This is a buff that grants you and your allies in close proximity the ability to damage the boss
- Expires in 10 seconds
- Killing adds resets the countdown timer.
- Adds are limited, you need to space out killing them or you will die (kill at 2-3 seconds left)
- If the timer reaches zero, you die
- To survive this you need to be in the shadow of one of the tombstones
- Any tombstones being used will be removed after this phase
- It is critical your fireteam shares one tombstone or you will not beat the soft enrage
Strategy for killing The Warpriest boss
To start the encounter, simply step on all three plates, left, middle, and right. The first step is the glyph sequence. This sequence is random every time you do it. However the light behind the tombstones will tell you which one to step on next. It helps to have someone calling these out. Once you step on a plate, you can not get off it until the sequence is complete or the sequence will fail. Once you finish the sequence, one of the people stepping on the final plate will receive the buff Brand of the Initiate that will allow you, and any allies standing within a few yards the ability to damage the boss.The person providing this buff needs to kill adds or he will die in 10 seconds. Killing adds resets the countdown timer.How to defeat Oculus
When the boss summons the Oculus, you and your fireteam need to hide in the shadow of one of the tombstones. Your entire fireteam must be behind the same tombstone, because any tombstone you are hiding behind will be removed. The tombstones are the soft enrage, if you don’t kill the boss within 4 attempts, you will no longer have any tombstones to hide behind and your fireteam will die. This means you must do at least 25% of his health every iteration. Snipers are your best bet for this fight and any damage increasing debuffs such as void bow or Melting Point.Golgoroth’s Cellar Maze
You have to find a way through the Golgoroth’s Cellar Maze. The entire fireteam has to be at the door with the candles to proceed. But before you run through it look for the chest. Golgoroth’s Cellar Maze Chest
There are 4 symbols that look like leaves, spread in each corner of the maze. You need to jump on them to activate them. Turn on controller vibration to figure out the pattern. Controller vibration will indicate if it’s the right order. One of them is hidden behind a door that can only be accessed if you jump through a small opening above it. This door can be found with your ghost’s outlining feature. Needs at least 4 players. The chest is directly in the middle of the maze, behind the door. 3-4-2-1 and 3-2-1-4 as are the correct combinations, that open the door to the chest. The chest is in the center of the maze. (thanks Taux)
How to defeat Golgoroth
- After six deaths, all fireteam members are blinded and the fireteam will wipe
- The orbs in the ceiling drop a pool that buffs damage against the boss by 10x
- Shooting his back critical spot gets his gaze for 15 seconds
Separate the raid into two groups, two distractors and four damagers. Start the fight by destroying the orb in the center of the ceiling. Golgoroth comes up from the water. When the boss spawns, kill all the adds in the room. The distractors (Gaze Grabbers) should go behind the boss, and start shooting the critical spot on his back to grab the gaze. After gaze is grabbed, the rest of the team should start shooting his stomach. The only places to damage Golgoroth is his back, when his Spider-arms are open, or his stomach when the armor opens.
Distractors have to pass the gaze to each other, and they are given a timer. When one of Distractors grab the gaze, and before the timer is up, the other person needs to grab the gaze.
The rest of the group have to shoot the orbs on the ceiling. These orbs drop a pool, and standing in the pool gives a massive damage buff “Reclaimed Light”. Use the buff to hit his stomach critical spot. All four players can stand in the same buff pool. When it expires, move on to the next one. Cursed Thralls will be spawning all the time, they also damage Golgoroth if they’re close enough.
The boss’ back will stop opening after the 6th gaze for a short time. When the distractors are unable to continue holding his gaze, and adds begin to spawn, clear them and then repeat the process. Use Snipers, Machine Guns for massive damage.
After defeating Golgoroth, you’ll come to a jumping puzzle while completing objective Traverse The Edge. Don’t forget to collect Raid Chest #3!. There’s also a secret room in this area, but its purpose is unknown.
Ir Anuk Sisters – Daughters of Oryx
Board the platforms one at a time starting to the left of the spark in the sky going counter clockwise. 4 teammates stay on the platforms while the randomly selected shadow teammate collects the sparks and then slam dunks the black sister and lowers her shields. Everyone gets inside the shadow guys shield and does damage to the sister but do not kill her! Kill add and return to the platforms again boarding them starting from the left of the spark one by one in a counter clockwise pattern. Slam dunk the other sister and repeat this 2 times until both sisters are dead.Most simple way I can explain this fight is you need to have people on the 4 pillars around the room summoning the platforms. But you need to do it in the right order. Always start with the platform/pillar directly beneath the relic. Once someone steps on that you have the person who is phased start jumping. When they start jumping, have the person jump on the pillar that is COUNTER CLOCKWISE (both DoO and Oryx require you to build the platforms Counter Clockwise) you will know if you built it wrong because there HAS to be sparks on every platform you jump to.
After the phased person jumps and gets the relic, they jump down to the sister that is NOT channeling the spell. They hold Square/X and steal her giant bubble/shield. You can move around with this. Once you regroup with your team, they HAVE to stay inside the shield and you start burning the sister you STOLE the shield from. Once the shield goes away, just rinse and repeat until you kill them both. (thanks Fallingcow for the clarification)
How to defeat Oryx
On each round, you will need to do the following- wait for Oryx to slam a platform
- post up on side of a platform and take out as much damage on catty-corner Lighteater Ogre. and each Lighteater Ogre in your own corner ( tethering with void bow is super helpful here )
- jump down and have defender pop a protective sphere in dead center of map
- a person has to jump across the rocks in the air spawned by standing on each of these 4 platforms go get sparks so they can steal the invincibility from the Emblem Knight. Failure to do this entire piece correctly will result in the explosions from the dead ogres killing your raid even if you manage to hurt Oryx.
- take out Emblem Knight
- Make sure all 6 are pointing at Oryx when his chest lights up and blow his ass away
- As soon as he staggers back, have 4 best guardians go explode the bombs generated by the dead ogres
- as soon as he drops away, start a circular run around any of the platforms to avoid light blast from Oryx
- Make sure to keep generating lots of orbs for Defender and Void Bow Ultra Attacks.
- Make sure you are at least LL 295 or greater, or else this is a joke
- Make sure you don’t jump in the middle channel alot, since there are Tomb Ships that phase in and can one-shot you by hitting you
- If any of your team dies and you don’t have a direct 1-2 person backup, just kill your team and start over. You need all 6 people hitting Oryx when his chest lights up to be able to do damage.
After your runner collects the relic, they have to run to the front of the room and steal the bubble from a knight called the Vessel of Oryx. Once he gets the bubble, everyone regroup in between the two sisters platforms on the ground. Kill the Vessel and wait for Oryx to start opening his chest. The MOMENT YOU SEE LIGHT from his chest, start shooting him with snipers/MGs/Scout rifles. Weapons of Light is great here because you are probably going to be lacking damage, we were. If you deal enough damage to stagger him, have the 4 people that KILLED THE OGRES, run to the big black balls left behind by the ogre THEY killed. Activate all 4 balls around the same time and book it back to the “Taken” bubble (ha) while everyone is activating the orbs, have the bubble keeper and the extra person keep on shooting Oryxs chest to keep his core exposed. If you do it right, the giant orbs of light when they detonate will deal 25% of his health.
After you damage Oryx, EVERYONE needs to scatter back to an open area in the room. Have the 4 people run back to the pillars they were assigned to and start running laps around the pillars. Have one person run to the back of the room and start running laps up and around the stairs and the last person towards the front to run circle laps around the front of the room. You do this to avoid the death balls that will chase you.
If you fail to damage Oryx, he will create a giant black sphere at the front of the room and will teleport one person randomly into the sphere to fight his Echo (similar to the final mission) He will continue to teleport people into the orb. Have people on the outside control the taken trying to get INTO the orb. Kill the Echo inside in the orb to prevent a wipe.
Repeat the process of grabbing the relic, killing ogres, stunning Oryx, keeping his core exposed, detonating the orbs of light, and running around after and you have Oryx Dead!
The emblem knight (Vessel of Oryx, he drops down from the drop ship) has a immortality bubble around him just like the Deathsingers previously. The starting point from the relic is where Oryx smashes his fist. You have 2 people (the jumper/relic holder and the plate holder) on that plate. The moment they get on that plate and the jumper gets the first small spark, the next person who is COUNTER CLOCKWISE from the starting position jumps and stays on their plate, then the next person COUNTER CLOCKWISE from the 2nd person jumps and stays on theirs and then the 4th person jumps and stays on their plate.
Once the relic holder gets all 6 small sparks and the relic, they steal the bubble from the Vessel of Oryx (the knight) that person then runs back to the middle area of the room between the 2 deathsingers platforms. While you are inside the Brand of Immortality, the only thing that can kill you is Oryxs insta kill move.
After you steal the immortality, you have to stagger Oryx once he opens his chest up. If you don’t he wipes the raid. After you stagger Oryx by putting enough bullets into his chest THAT is when you have the 4 people go to the ogres they killed and activate their bombs. And while the 4 people are doing that, the last 2 people keep on shooting his chest. (thanks Fallingcow for the clarification)
We would like to thank Fallingcow, Steffwiz, PracticallyPetunias and fantasticox for their hard work and sharing the most accurate information with the community.

I need to learn about oryx challenge
Bonus damage on golgoroth
https://www.bungie.net/en/Forum/Post/158414136
My Fireteam just did this and we had the Plate order of 1-2-3-4… just so you can add this to the guide