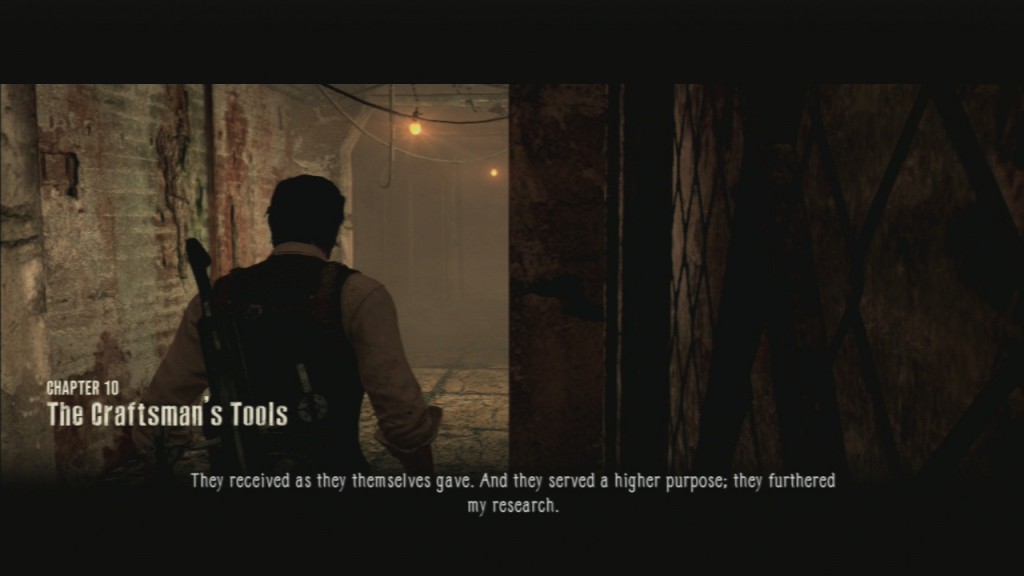
Home » The Evil Within » Evil Within Chapter 10 guide – The Craftsman’s Tools
Chapter 10 – The Craftsman’s Tools is one of the longer chapters. It provides us with more information about the new character that is inside a cell in hospital’s main hub.
▼Article Continues Below▼
Be sure to check out his cell whenever you enter this part of the game. Later on, you come across the same 6 legged hairy creature that you faced in previous chapters. At the end of the chapter a new type of creature creates a new challenge for you to overcome. Chapter continues with telling us the story of the game, but not as much as the previous chapter did.At the start of the chapter there is a door that takes you to the Hospital’s main hub. Next to this door is a white desk with a typewriter on it. On the same table is Document: “Mansion Basement Note”. Go inside a nearby room if you want to find more lore. If you choose to do so visit the nearby hospital’s cell and collect Newspaper: “Car Accident; Two Dead”.
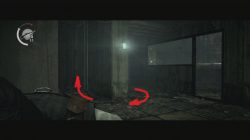
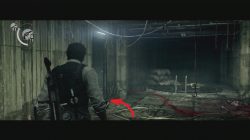
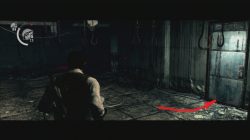
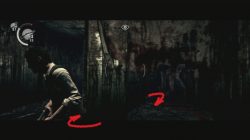
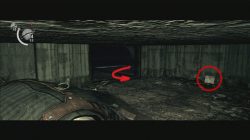
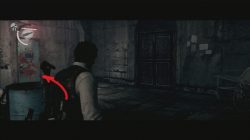
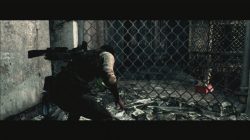
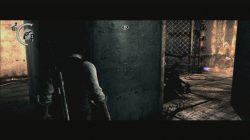
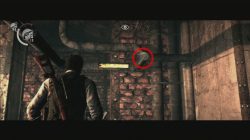
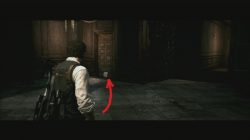
Leave this area and continue further in. As soon as you reach the first trap, turn left into the room. If you activate the trap, room entrance gets blocked. Destroy the wooden boxes inside in order to reveal location of a Key Stone Statue. This is the first key I’ve found in this chapter.
The First “Lore” Door.
Turn left after the first trap.
Break the wooden boxes in here to reveal the statue’s location.
Carousel
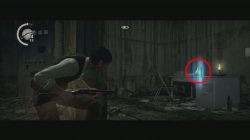
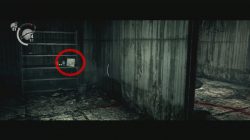
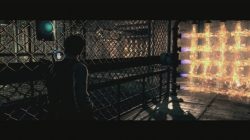
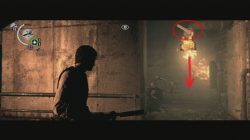
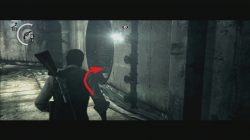
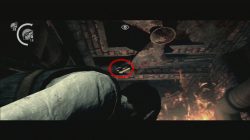
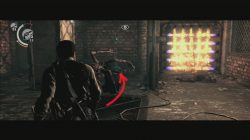
Later on you enter a large room. You’ll recognize this room by small brick walls with barbwire on them. You’ll find a huge carousel inside that has a sharp blade that spins together with the carousel, beheading you in case you do not crouch. I’ve activated the trap and that turned on all the lights as well, drawing some attention from the monsters there. This is actually helpful as you can use the carousel’s blade to kill monsters while you crouch. Keep to your right until you find ladders inside the first side room. Climb to the second floor. At the end of a new room, on a table, there is another Key Item History: “Battery Pack” and a Battery Pack you need to continue the chapter.
Not a carousel you’d enjoy riding.
Use the ladders.
Battery Pack Location.
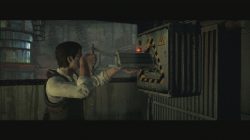
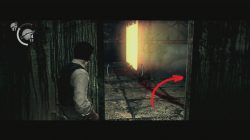
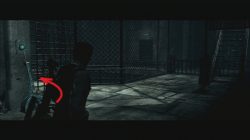
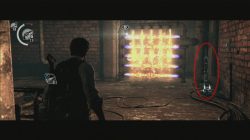
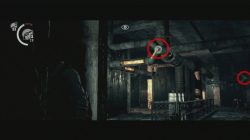
Go back to the carousel room and keep to your right. Inside the next side room to your right is the generator where you should place the Battery Pack. This opens double doors and lets you leave the area.
Keep to your right.
Place the Battery Pack.
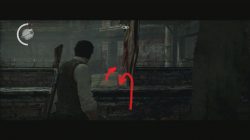
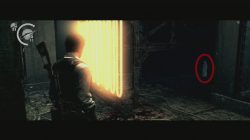
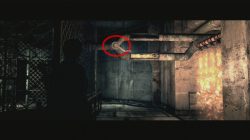
Before you use the ladder in the next room check out the side room. There is a Map Fragment 18 inside it.
Just before the next ladder enter the side room.
Map Fragment 18.
Double Door Switch
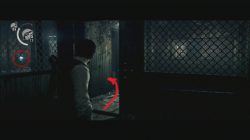
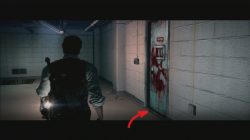
As you go down the stairs a blood trail leads you to a room with a couple of doors. This is where the game automatically saves. Inside this area you can notice a room with a spike trap. Inside that room is another Key Stone Statue. Spike trap has an activation timer. You have just enough time to go get the key and go out. This is why you should shoot the statue before going in.
Turn left to find the room with a spike trap.
Shoot the Stone Statue before going in.
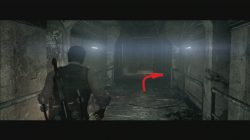
Go through the door next to the spike trap room. As you enter turn left. You can see another Battery Pack in the distance. Grab it and continue further inside the same area. You pass by a couple of traps we never came across before. They are currently not active, but they become active once you reach a hole in the metal fence. Inside the next room is a generator. Insert the battery pack and that opens the double door. This also activates all non active traps and releases new enemies…
Enter this door.
Collect the Battery Pack.
Place it in the Generator.
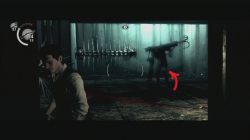
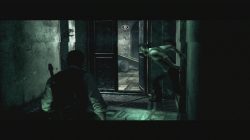
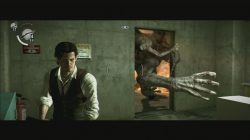
You are introduced to a new type of enemy. He has a large, harpoon like, weapon that he shoots at his target. Luckily for us he is not that fast. There is a portion of the wall where you can kite him around in circles. He comes out of a room where you can use the switch to raise one of the traps in order to escape this area.
Switch is just behind the creature’s spawn point.
Kite it around the wall to avoid its damage.
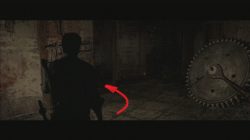
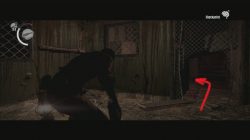
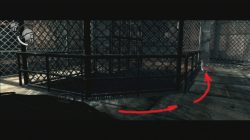
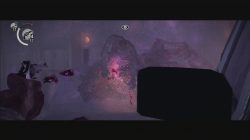
The next Key Stone Statue is located behind a moving heat trap. This trap moves from one wall to the other revealing a hidden place. Shoot at the stone statue and crouch your way to the key. We would like to thank user Steven for additional information.
Key Stone Statue Location.
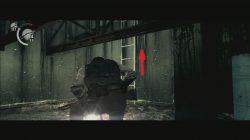
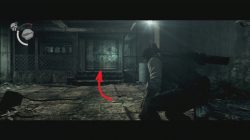
As you continue going past the traps you come in front of a room where a couple of heat panels move from right to left. Instead of going to the door in the other part of the room turn right and use the ladder there. They lead to Map Fragment 19 and a hidden room with two of those harpoon guys. Once they are defeated use the gate switch to leave the room and another switch to raise the final trap. You are back in the room where you found the Key Stone Statue (and a spike trap).
Once the heat panels hit the left wall go behind their previous location.
Use the ladders.
Map Fragment Location.
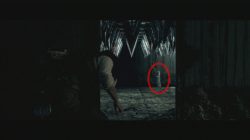
Harpoon brothers.
Use the manual switch.
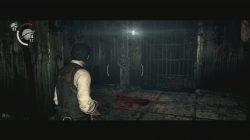
Go through the unlocked double door. Further in you are returned to the asylum. As you leave the tunnel with hospital beds and wheelchairs going up you’ll arrive inside a room with human anatomy pictures. On the bed there is Audio Tape: “Laura”. There are also blood marked door found in that room. Go through them if you want more lore. Lore like Personal Document: “Journal Entry – February 2012” – inside the same room, Newspaper: “Home Destroyed by Fire” and Missing Persons Poster: “Patrick” – inside the Hospital’s Main Hub.
Finally, double doors can be unlocked.
Audio Tape Location.
Another “Lore” Doors.
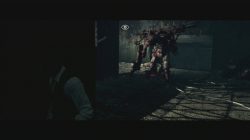
Six Legged Hairy Creature Chase
Going through the next room you’ll arrive at an area where the 6 legged hairy creature walks around the cages in the central part of the room. As you use the first metal gate switch it breaks through the caged area and the chase starts. Don’t wait for the gate to open in full, crouch and go through. Follow the only way out and dodge new creatures that show up.
Once you use this switch the chase starts.
It ends once you go through this door.
Fire Gas passageway
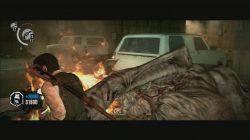
You find that the next passage is blocked with fires that come out of the pipes. If you go left here you can notice bunch of loot behind a metal fence, including another Key Stone Statue. To collect the key next to the elevator you must kill the long haired beast before you reach the tunnel that leads to the elevator (before the cutscene). We’d like to thank user cYcLoNe for this additional information. Use the only nearby switch to turn off the fires from the first fire gate. The next fire blocked passage requires you to shoot a switch on the pipes above. It slowly turns of the fire as it redirect gas flow into another pipe.
This is where you get in contact with the first fire gas blockade.
Left of the first fire gas obstacle there is a metal fence. It blocks the path to the Stone Statue.
Shoot the gas switch to turn off nearby fire wall.
Gosu Notes: Gas Fire Passages get extinguished with the switches positioned next to them or by shooting the pipe switches in the ceiling. Six legged hairy creature kills you instantly if you are in front of it for more than 1 second. The Creature also spawns from dead bodies. Burn them to control its movement. Once it is far away from you the creature usually teleports a short distance. There is a specific sound that follows this action. Shooting toward the wall bomb proximity mines makes them explode. There are couple of gas pipe switches that make the fired pour down once they are shot.
Six legged creature shows up once again in the next room. It follows you through several rooms from there on out. Passing by the room with inactive furnaces you arrive inside a room with active furnaces. There is another passage blocked by fires. In order to turn them off you have to use the metal switch. This is a tricky part as you have the hairy creature on your back at this point. In order to use the switch safely you may want to do a couple of things. The best option is to make the creature go under one pipe with the switch on. Shoot the switch once the creature is underneath the pipe. This stuns it with fire for a couple of seconds giving you enough time to use the metal switch that turns off the gas and extinguishing the fires. Other choices you have is to shoot toward the creature with enough bullets to make it run away. This is a rather expensive method and is not advisable. Third choice is to use your lighting/freeze agony bolts and stun the creature as you turn off the gas.
If you shoot the switch at the right time, the creature gets stunned…
… and you can use the manual switch.
Next room requires you to do pretty much the same thing. As you go through the circle shaped entrance you step into a room-trap. To break away shoot toward the gas switch on the ceiling. It is located just next to the ceiling fan.
The second fire gas wall.
Circle shaped entrance.
Gas switch saver.
Next larger room is where the fun starts (like you didn’t have enough of that). In order to go through the fire passage you have to turn off three gas switches while being chased by the hairy creature. I’ve died here more times than I’m willing to admit. There are no gas pipes from which to pour fire down on the creature in order to stun it.
The first two switches are easy to shoot at.
Third one, located next to the fire wall, leaves you with one way out, and the 6 legged hairy creature is usually nearby .
The last fire passage room has three gas switches and one manual switch. One of the gas switches turns off the fire that blocks entrance to the manual switch. The other two start fires that shoot down on the area bellow them. Sequence you have to follow is this:
turn off the switch that blocks the entrance to the manual switch.
Stun the creature with one of the switches that pour down the fire
If you kill the creature here (before you enter the tunnel and see a cutscene) you will be able to reach the key stone statue that was unreachable (next to the elevator). She is hard to kill, but if you do it you will get achievement Bathed in Flames, 8000 gel points and be able to get the collectible. Whether you kill it or avoid it – escape the area next.
Hallway behind this fire passage leads toward the elevator. This elevator takes us away from this area and the creature.
Shoot this switch.
Manual switch.
If you killed the creature take this path to the collectible.
Statue with the key is behind the elevator (but only if you killed the creature)
Fighting the big creature at the Parking Lot
After a short cutscene you find yourself inside the mansion. Before going inside the only open passage don’t forget to grab Map Fragment 20 to your left.
Map Fragment 20 Location.
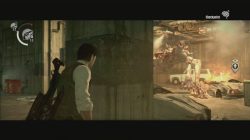
After another cutscene inside the mansion you arrive at the parking lot. Head toward the room behind the blood marked doors for lore like: Missing Person Posters “Marcelo” and Newspaper: “Irregularities at Hospital”. Be sure to check out the mysterious guy at one of the hospital’s main hub cells.
Last “Lore” door in this chapter.
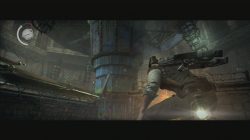
As you reach the final part of this chapter you have to fight with the largest monster you have met so far in The Evil Within. Fight takes place in an appropriately sized area – large parking lot. There are a couple of things you should know about this creature. While he is in close vicinity you can’t hide in rooms or behind stone pillars… You can eventually run away and hide from it, giving yourself a couple of seconds of rest. The Creature is extremely fast. It doesn’t one shot kill you, but it does a lot of damage. Fires above the burning cars might be able to damage it but I can’t know for sure.
Hiding behind stone pillars is a bad idea …
… as well as hiding inside rooms.
After a couple times of me running away from it, a few successful shots and 3+ syringes used, I found a spot in the parking lot where he couldn’t reach me. It is close to the door with the exit sign above, between a car and the wall. Soon it revealed its weak spot, a purple eye that you can shoot at. It goes down rather fast after that. Once it is killed you get achievement/trophy “The First, Not the Last” and 20 000 Green Gel points that you have to collect.
Once it reveals its weak spot take advantage of the situation.
You will have to shoot it several times before it dies.
Spot from where I was able to kill it without problems.
OH man, after 4 months of trying i’ve given up on killing the witch. I did everything you did, Lokesh – burnt her twice on the top floor with matches, burnt her 3 times on the bottom floor with the flames, then unloaded at leat 4 shotgun shots into her. She still got me. Guess my shotgun isn’t upgraded as far as yours. She is tough! So now i’ve just opened the gates and gone through. Very disappointed!
Just thought id mention that if you go through the lore door before the 6 legged creature chase there is a missing poster on the bulletin board to grab. I didnt see it mentioned so i figured id chime in..
I’ve tried killing this click one a dozen times, all different kinds of ways, burgh the hell out of her, shoot the hell out of her, waste all my ammo, grenades, all the bills I have, I even went as far as freezing her in front out of the big door that shoots out flame after shooting the switch.. This bitch just won’t die.. Seriously been at this part all day… Any advice??
About the last boss, the easiest (still sorta hard) thing to do is stay where you are in the beginning, get the sniper rifle, shoot it in the eye (this is the hard part, don’t let it spot you!). Then let it reset, stay where you are and wait for it to pull out the eye again. Do this 4 times (survival difficulty, unupgraded sniper rifle) and it will go phase 2. There is no point hiding anymore, it will just charge straight up at you. What you wanna do instead is get a bit of distance, place the electric crossbow bolt on the ground between you and the monster (safety measure) and try to shoot it in the eye with the sniper rifle again (it’s in the purple of it’s body) which will stun it just as it did before. What I then did was shoot it twice with pistol (pretty upgraded) and then shot an incendiary crossbow bolt in the purple area and it just died.
Sounds like a plan…after 50 or so tries I’m in dire need of some help. Only 1 time I had it down and I thought it was dead but it arose and gobbled me up. I won’t make that mistake again.
For the final boss choose your favorite dark corner and shoot his tail eye with the sniper rifle. wait for him to pull out the tail eye again and shoot it again. do this four times he’ll go purple then pull out your handgun and just start emptying it in the mouth eye, two clips and he’s dead. did this on normal difficulty after trying allot of other tactics this worked first try. Might take less shots to the purple eye if you wait till it’s open but I was done with this guy and determined to kill him. I walked out with more ammo than I came with and full health!
Just finished this level after like 50 attempts on the last boss……quick last boss tip here: USE THE SNIPER….there’s a reason this place is littered with sniper ammo….stay away at all times and use the sniper rifle particularly after the creature goes purple….you will swear a lot through this stage but eventually clear it and feel a sense of triumph only paralleled in Dark Souls….Good Luck…
At the very start of the mission, next to the door marked with blood is a desk with a Mansion Basement Note on it. Not sure if you missed it or actually got it, but forgot to place it in this guide.
You can actually hide behind a pillar or in a room as long as he doesn’t see you AT ALL, then it goes walking around and every once in a while it pulls out an eye on a cord thingemy. Shoot the eye and it stuns for a while, DO NOT shoot it after it’s stunned for it will know where you are. After you’ve repeated this a couple of times the room will change colour and it shows the eye in the middle of it’s body. At this point I found it easiest to freeze it and then spamming shots, freeze it again and spamming shots again. There’s ammo laying all around, also check in the rooms at each end of the lot. Hope this helps.
I found you can trap the first harpoon guy. As soon as his door opens, lure him to the area where you kite him, as close to the entrance of the generator room as possible. Shoot him with a freeze bolt and run towards the door where he came out of and hit the switch that activates the traps. He will get stuck behind or get minced by the rolling spikes in the passageway. For the big boss at the end, I found you can blind him as soon as the battle starts. In that time, stuff him full of explosive arrows(4)(I had them at level 4 or 5). That should be enough to trigger the next stage. With the shotgun, shoot the purple eye, that’ll cause him to go down for a couple of seconds. In that time, grenade him, or hit him with your heaviest weapons until he dies. The plus side about this is that he doesn’t destroy the rooms and you can calmly loot the place after the fight.
Can you be more descriptive on the location for the parking lot boss where he can’t hit you? Like is it to the left or right. A clearer picture would also help. Great guide just some friendly advice.
“It is close to the door with the exit sign above” Unfortunately it doesn’t work for all I guess. Ramon has suggested several awesome tips, be sure to check them out.
Just wanted to let you know, after you defeat te first harpoon guy, after you pull the level and that first orange lighted trap that pushes left and goes bak to the right, there is a key statue behind it to the right!
To collect the key next to the elevator you must kill the long haired beast. You get an achievement for it and you can collect the key because there no cutscene before the elevator.
 At the start of the chapter there is a door that takes you to the Hospital’s main hub. Next to this door is a white desk with a typewriter on it. On the same table is Document: “Mansion Basement Note”. Go inside a nearby room if you want to find more lore. If you choose to do so visit the nearby hospital’s cell and collect Newspaper: “Car Accident; Two Dead”.
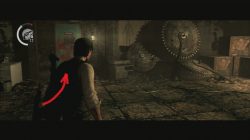


I can’t get into your safe spot. How did you do it?
Wait for the second boss I don’t have any sniper ammo and I can’t seem to find any please list locations
OH man, after 4 months of trying i’ve given up on killing the witch. I did everything you did, Lokesh – burnt her twice on the top floor with matches, burnt her 3 times on the bottom floor with the flames, then unloaded at leat 4 shotgun shots into her. She still got me. Guess my shotgun isn’t upgraded as far as yours. She is tough! So now i’ve just opened the gates and gone through. Very disappointed!
Am I the only one who quite fancies the 6 legged witch?
And i forgot to mention the newspaper on the receptionist counter also.
Just thought id mention that if you go through the lore door before the 6 legged creature chase there is a missing poster on the bulletin board to grab. I didnt see it mentioned so i figured id chime in..
I’ve tried killing this click one a dozen times, all different kinds of ways, burgh the hell out of her, shoot the hell out of her, waste all my ammo, grenades, all the bills I have, I even went as far as freezing her in front out of the big door that shoots out flame after shooting the switch.. This bitch just won’t die.. Seriously been at this part all day… Any advice??
The last boss shoot ALL the heads and he brings out the eye 3-6 shots to the purple glowy eye kills it
About the last boss, the easiest (still sorta hard) thing to do is stay where you are in the beginning, get the sniper rifle, shoot it in the eye (this is the hard part, don’t let it spot you!). Then let it reset, stay where you are and wait for it to pull out the eye again. Do this 4 times (survival difficulty, unupgraded sniper rifle) and it will go phase 2. There is no point hiding anymore, it will just charge straight up at you. What you wanna do instead is get a bit of distance, place the electric crossbow bolt on the ground between you and the monster (safety measure) and try to shoot it in the eye with the sniper rifle again (it’s in the purple of it’s body) which will stun it just as it did before. What I then did was shoot it twice with pistol (pretty upgraded) and then shot an incendiary crossbow bolt in the purple area and it just died.
Sounds like a plan…after 50 or so tries I’m in dire need of some help. Only 1 time I had it down and I thought it was dead but it arose and gobbled me up. I won’t make that mistake again.
10 bullets with 200% rifle kills the last boss.. (in nightmare), standing at the place where it begins..
For the final boss choose your favorite dark corner and shoot his tail eye with the sniper rifle. wait for him to pull out the tail eye again and shoot it again. do this four times he’ll go purple then pull out your handgun and just start emptying it in the mouth eye, two clips and he’s dead. did this on normal difficulty after trying allot of other tactics this worked first try. Might take less shots to the purple eye if you wait till it’s open but I was done with this guy and determined to kill him. I walked out with more ammo than I came with and full health!
Just finished this level after like 50 attempts on the last boss……quick last boss tip here: USE THE SNIPER….there’s a reason this place is littered with sniper ammo….stay away at all times and use the sniper rifle particularly after the creature goes purple….you will swear a lot through this stage but eventually clear it and feel a sense of triumph only paralleled in Dark Souls….Good Luck…
At the very start of the mission, next to the door marked with blood is a desk with a Mansion Basement Note on it. Not sure if you missed it or actually got it, but forgot to place it in this guide.
This game is very annoying!
You can actually hide behind a pillar or in a room as long as he doesn’t see you AT ALL, then it goes walking around and every once in a while it pulls out an eye on a cord thingemy. Shoot the eye and it stuns for a while, DO NOT shoot it after it’s stunned for it will know where you are. After you’ve repeated this a couple of times the room will change colour and it shows the eye in the middle of it’s body. At this point I found it easiest to freeze it and then spamming shots, freeze it again and spamming shots again. There’s ammo laying all around, also check in the rooms at each end of the lot. Hope this helps.
Tried to use the safe spot you suggested against the big guy. Doesn’t seem to work. He is able to get me wherever I go.
I found you can trap the first harpoon guy. As soon as his door opens, lure him to the area where you kite him, as close to the entrance of the generator room as possible. Shoot him with a freeze bolt and run towards the door where he came out of and hit the switch that activates the traps. He will get stuck behind or get minced by the rolling spikes in the passageway. For the big boss at the end, I found you can blind him as soon as the battle starts. In that time, stuff him full of explosive arrows(4)(I had them at level 4 or 5). That should be enough to trigger the next stage. With the shotgun, shoot the purple eye, that’ll cause him to go down for a couple of seconds. In that time, grenade him, or hit him with your heaviest weapons until he dies. The plus side about this is that he doesn’t destroy the rooms and you can calmly loot the place after the fight.
Can you be more descriptive on the location for the parking lot boss where he can’t hit you? Like is it to the left or right. A clearer picture would also help. Great guide just some friendly advice.
“It is close to the door with the exit sign above” Unfortunately it doesn’t work for all I guess. Ramon has suggested several awesome tips, be sure to check them out.
Thank you both for tips!
Just wanted to let you know, after you defeat te first harpoon guy, after you pull the level and that first orange lighted trap that pushes left and goes bak to the right, there is a key statue behind it to the right!
To collect the key next to the elevator you must kill the long haired beast. You get an achievement for it and you can collect the key because there no cutscene before the elevator.