Lost Kingdom Moons Locations - Super Mario Odyssey Power Moons
Power Moons in the Lost Kingdom are not plentiful, but this makes them a sweet target for you Super Mario Odyssey collection needs. There are 25 to be found before you unlock the Moon Rock and 10 more after that. Most of them are an easy find as well. Still, for the sake of those few hard to reach, we are making this Lost Kingdom Power Moons guide with a map of their locations and walkthroughs on how to obtain them. Unlike many other zones you won’t have to kill any bosses or finish a lot of missions. Rescue Cappy from the thieving bird and collect 10 power moons to be able to leave the island.
We will also help you find all the power moons in Cascade, Sand, Lake, Wooded, Lost Kingdom, Metro Kingdom, Snow Kingdom, Seaside Kingdom, Luncheon Kingdom, Bowser’s Kingdom, Moon Kingdom, Mushroom Kingdom and Dark Side.
| Previous: Wooded Power Moon Locations | Next: Metro Kingdom Power Moon Locations | ||
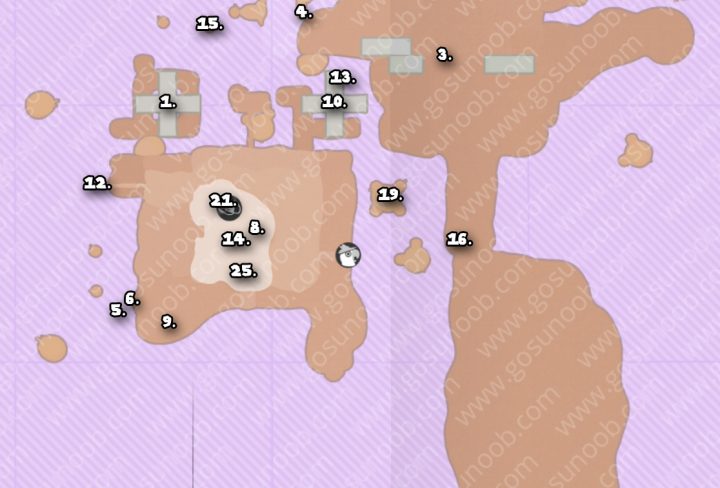
Lost Kingdom Power Moon Locations
For ease of navigation it would be good to unlock fast travel flags first. We’ll reference these throughout the guide bellow, so, to avoid explaining how to reach the flags for each moon explanation, here’s a quick walkthrough on how to find travel points in Lost Kingdom. Head north from the Odyssey. You should come to a rock-face with a yellow stone shaped like stairs. Smash jump onto the high end of the rock and that should raise the lower end and allow you to get to the plateau above. Do the same thing again to reach the Swamp Hill flag. There are Tropical Wiggler that are capturable near the flag. Use them to cross the spinning platforms, going south. You need to bait the Trapeetles to destroy rocks that block your way there. Do this by standing in front of the destroyable rocks and throwing Cappy at them. First rock barrier is a bit extruded from the wall and you can jump on top of the rocks to have Trapeetle charge in your direction and destroy the obstacle. Second rock barrier is destroyed the same, you just have to hange from a small ledge above the rocks. Following the trail around the mountain you should arrive at a big red button. Jump smash into it and rock jump up to the top to find the shop and Rocky Mountain Summit flag. For the last flag go north of Odyssey and turn left after you cross the bridge going over poisonous waters. There should be a Wrigler that. Possess him and keep going east. Turn the corner and you should see the Mountainside Platform flag. This is close to moon #1 location.
#1. Atop a Propeller Pillar
From the Odyssey go north, jump smash yellow stair-like stones to get all the way to the top and Swamp Hill flag. Capture a Wrigler and use him to get to the rotating platform south of the flag. Once on the rotating platform extend the Wriggler east until you get to the second propeller shaped platform and your first moon.
#2. Below the Cliff’s Edge
Go to the spot marked on our map above. There is a small platform over the western edge holding the moon.#3. Inside the Stone Cage
North of the odyssey, half way toward Swamp Hill, you should see a moon behind a stone cage. To reach it get up on top of the plateau above and smash jump into the tall yellow pillar shown on the picture and marked with number 2. That should lower it and open the entrance into the stone cage.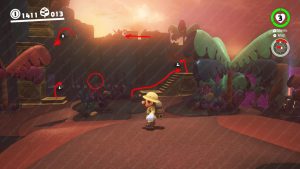
#4. On a Tree in the Swamp
Capture a Wriggler at Swamp Hill. Go with it along the north edge there and get on top of the yellow brick stairs. Smash the ground to raise them next to a tree. Use Wriggler’s special ability to extend yourself around the tree and into the moon.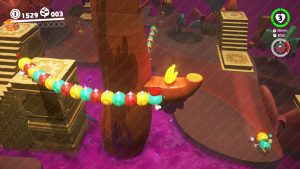
#5. Over the Fuzzies, Above the Swamp
Bellow moon #1 go around the corner of the hillside to Mountainside Platform flag. You should see this moon on a yellow platform, past the Fuzzies coming out of the wall.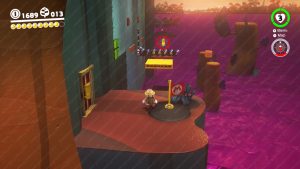
#6. Avoiding Fuzzies Inside the Wall
Next to the Mountainside Platform flag is the door that takes you inside the 2D platforming level you can see on the side of the cliff. Jump across the moving platforms to get the moon.#7. Inside the Rising Stone Pillar
Back at the Swamp Hill flag go to the lower plateau east. There is a yellow stone step-like thing there made out of 4 stones you can smash jump on to make one of its ends move down. Have the side closer to Swamp Hill go up and you will find the moon tucked inside.
#8. Enjoying the View of Forgotten Isle
Reach Rocky Mountain Summit, where the shop is (highest peak on the island). Tree next to the shop hides the collectible.#9. On the Mountain Road
On your way from Swamp Hill flag towards Rocky Mountain Summit flag you’ll see a bunch of flowers in the corner and they’re glowing. (from swamp hill go across the rotating platform and follow the path). Jump smash into the glowing spot to uncover the moon.#10. A Propeller Pillar’s Secret
First propeller pillar, south of Swamp Hill flag, has a bunch of butterflies in the middle. Jump smash into the ground to get the moon hidden there.#11. Wrecked Rock Block
East of Swamp hill flag you’ll see several Trapeetles and several rock cubes grouped together. Trapeetles are enemies that grab Cappy, when you throw it at them, and then home into your location, launching with explosive effects in your general direction. You need to use this mechanic to destroy the stone block that has a strange glow to it. Refer to map location above to know exactly which stones to break.#12. Butterfly’s Treasure
From Rocky Mountain Summit look bellow and to the west. You should see a strange little platform sticking out of the hillside with something at its end. Upon moving closer it’s a butterfly at the end of a strange rock formation extruding over the cliffside. If you get too close the butterfly will fly away. (if this does happen move away from the spot and it will return). You need to slowly approach it, about half way down the rock perch and hit it with Cappy to get the moon.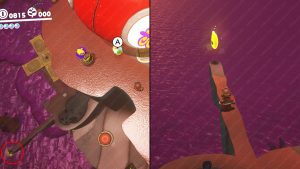
#13. Caught Hopping in the Jungle!
At the same rotating platform where you got Power Moon #10 there’s a hare jumping about. In other zones you would usually hit it with your hat until it dropped the moon. It is difficult to do so here with all the rotation and narrow platform space. Best get a Wriggler and hit the rabbit with its head until it drops the moon.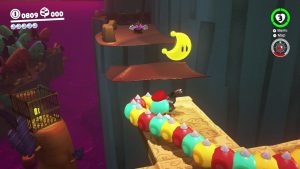
#14. Cave Gardening
There’s a cave directly bellow the shop. To enter it you need to go toward where Talkatoo, the hint parrot, is at. Turn west from Talkatoo and you should be able to find the little entrance in the cliffside. To release the power moon you need to hit all the 16 flowers inside the cave (try a rotating cap throw).#15. Moon Shards in the Jungle
You need to pick up 5 moon shards scattered around the area north of Mountainside Platform flag. Capture a Wiggler and scout around for the shards. Use the screenshot bellow for reference.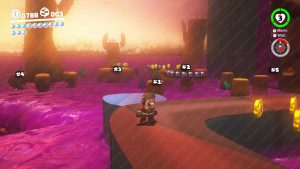
#16. Peeking Out from Under the Bridge
North of Odyssey there is actually a bridge going over the poison river. Moon is on its underside.
#17. Twist ‘n’ Turn-Up Treasure
Try and capture a Tropical Wriggler closest to the Odyssey. (north, across the bridge and immediately to the left).Take it back to the Odyssey and keep going south. You should see a small piece of land bellow the edge with a tree on it and a key lock. Get down there with a Wiggler and extend it to get the key hidden in a small alcove to the right. Refer to the map location shown on the big map above for the exact place this all happens.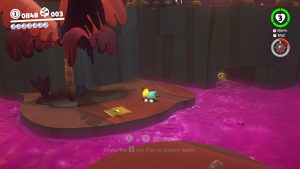
#18. Soaring Over Forgotten Isle!
You should see Glydon on top of Rocky Mountain Summit, next to the shop. Glydon is the dyno-bird looking creature you can capture. Look to the south and you should notice an island, far off-shore, with the Power Moon on it. Posses Glydon and glide all the way to the island.#19. The Caged Gold
This is probably the trickiest moon to get on the island. At the location marked on the big map above is an iron cage with a moon inside it. To break the cage you will have to use Trapeetles. As discussed in other power moon walkthroughs above, Trapeetle captures Cappy and then homes in onto Mario and launches itself as a rocket, exploding on impact. You want to line up the Trapeetle bellow Swamp Hill flag, Mario, and iron cage in the distance. Goal is to have the creature launch itself toward Mario and then you hop out o its way. It continues flying towards the cage, ultimately destroying it. If you were wondering how to get the Power Moon inside the cage in the Lost Kingdom – that is how. It takes couple of tries, but it is doable. Just try and align your camera under the right angle.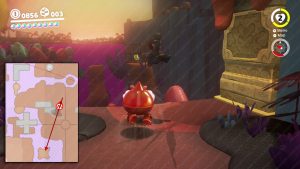
#20. Get Some Rest, Captain Toad
Go to the poison field with small islands and Fuzzies, where you got Power Moon #15. Navigate the small islands with a captured Wriggler and go to the north edge. Around the corner, to the east, you should see a small opening that takes you inside a cave where Captain Toad resides.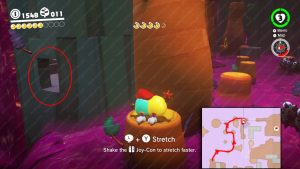
#21. Shopping on Forgotten Isle
Go to the shop and purchase the moon for 100 gold coins.#22. Taxi Flying Through Forgotten Isle
South of the Odyssey are the green binoculars you can capture. With them you can scout around the skies and zoom in. You need to find another airship and zoom in on it until it starts shining and drops the moon. It roams around the skies. I found it in the skies to the far north – northeast of the Odyssey.
#23. I Met a Tropical Wiggler!
There’s a visitor from Cap Kingdom hanging around on a ledge just east of the Swamp Hill flag. He wants to meet a Tropical Wiggler. Capture one near the flag. Descend down the yellow bricks and leave him at the last brick, close to the Bonneter. Smash ground jump the four-column so the Wriggler rises up to the guy and cross over to his location. This should net you a Power Moon.#24. Lost Kingdom Regular Cup
This is one of the harder Cup races in the game. You will need to have full control of Dive Jump and Ground pound jump to be able to win this. Check out the Action controls tutorials in the main menu of the game and practice these until you have them down. The first obstacle is getting from the Odyssey to the Swamp Hill flag without using the yellow blocks to climb the walls. You do this by using a ground jump then throwing Cappy at the very top of your ground pound jump. This should help you grab onto the ledge. Next, you should go from Swamp Hill to Rocky Mountain Summit, but without using Trapeetles to blow up the rocks. Probably the only way to win the race for sure is to jump off the cliff near the rock obstacles and immediately dive jump to the right. This should actually land you behind the rock barrier. The hardest part in this is doing it twice. After the rock wall obstacles you just run along the road and wall jump up to the peak of the mountain. I practiced going around the obstacles and ground pound jumping for at least half an hour before I managed to complete the race.#25. Peach in the Lost Kingdom
For our final moon talk to Princess Peach at the Rocky Mountain Summit flag.Lost Kingdom Moon Rock Power Moons
After you finish the main story of the game, you will get a chance to collect even more Power Moons and unlock further costumes and kingdoms. This is done via Moon Rocks. Previously indestructible, you can now hit them and thus unveil additional moons in each kingdom. There are 10 more Power Moons in the Lost Kingdom for you to find.#26 The Shining Fruit
#27 Jump Down to the Top of a Tree
#28 Line It Up, Blow It Up
#29 Taking Notes: Stretch and Shrink
#30 Lost Kingdom Master Cup
#31 Lost Kingdom Timer Challenge
#32 Stretch and Traverse the Jungle
#33 Aglow in the Jungle
#34 Chasing Klepto
#35 Extremely Hot Bath