Tips & Tricks list we’ve gathered so far is by far the shortest one you’ll have once you get into the game. There are so many things and aspects of the game that we are unaware of.
▼Article Continues Below▼
If you know something that is worth mentioning, and it is not written in the guide, please let us know.
General Tips & Tricks
There is a Day/Night cycle in FFXV. An hour of in-game time passes in 2 real life minutes. During the night more powerful enemies show up.
Experience gained throughout the game must be reclaimed. It means you have to find some sort of a resting place, like a camp or hotel. Once you rest here, the gained experience transfers to the characters.
You can also eat food in these resting places, giving you much needed buffs for the next day. These buffs increases damage done, experience gained, durability to some type of damage and more.
The main menu gives info about: Map, Quest, Gear, Ascension (Talent Tree), Skills, Elemancy, Items, Photos.
The map shows information on various destinations. Quests shows progress of currently undertaken quests. Gear is where you can adjust Noctis’s and his friends’ equipment. Ascension is where you unlock new techniques and abilities for Noctis and his crew. This is known as a FFXV talent tree. Skills is where you check their unique skills. Noctis has a fishing skill (catching fish), Gladiolus survival (exploring the wild), Ignis cooking (cooking at camp), Prompto photography (taking pictures). Elemancy is where you can craft the spells. You do so by using the elemental energy you have collected. To use them, you have to equip magic flasks (spells you’ve created) in the field. Photos is where you can go through the saved photographs.
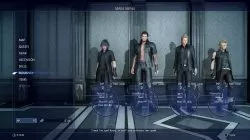
Main menu shows the breakdown of every playable character’s characteristics. Their current level, experience gathered and needed for the next level, currently equipped outfit and more.
Enemy UI consists of the name of the monster, its level and HP bar. You can invest 6 AP into the Analyze skill (Ignis). It automatically scans most enemy weaknesses at the onset of a battle.
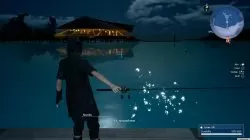
Items that glow bright as you come close to them are ready for picking up. This way you can find all sorts of consumables, items that you can sell for gil… You don’t need to collect all items manually. Gladiolus will do it for you during combat, for example. But in general you want to keep an eye out for them.
All items you get from the creatures can be used as cooking items, magic crafting ingredients, or sold for gil. Some of the items like enemy’s tusks can be obtained only if you hit the enemy on their tusks.
Death of a group of many common enemies found in wilderness is not permanent. You can find them in the same place after a day / night cycle.
Map Tips & Tricks
To see the map, open the main menu. Press the touch pad / start button on your controller. From the main menu you can choose the map.
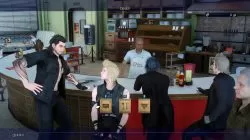
To add POIs to the map you can do several things. Talk to the local bartender and he will reveal many of the ones from the same district. If you get real close to POIs, they remain marked on the map. When you’re traveling by car on long rides, some of the nearby POIs also show up marked for later on.
The most used POIs are the ones for Parking, outposts, procurement points, chocobo stations and others.
Not all POIs are meant to be explorable at the start of the zone you find yourself in. There are some requirements. The most important one is your level. You don’t want to enter the dungeon where the starting enemies are several levels higher than you.
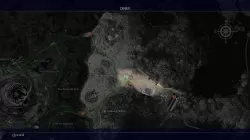
Update your map info in the dinner.
This is probably the starting zone.
Quests Tips & Tricks
Quests are our main guiding star. Beside the main quest, you can complete many of the side quests to earn extra experience, gil and other items.
Only one quest can be tracked at a time. To assign which quest is tracked you have to choose it from the quests menu. Be sure to keep an eye on all quests before accepting any of them. If you want to complete as much of them as you can, you’ll want to complete the closest one first. This all can be done from the quest menu, as it also shows the quest objective location on the map.
Tracking a quest marks the location of the objective on the mini map and in the open map, in plain view of the player.
Main quests are marked with a distinct red color in the quest menu, while the side quests are blue-colored.
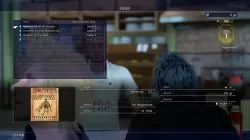
Once accepted, you can review this and all the other given quests in the quest menu. This is where you can see all the taken quests, their recommended level, short info about the quest and the picture of it. There is also info about the client who gave you the quest, experience and rewards given upon completion.
The most famous side quests are the mob hunting ones. You can accept these quests from the local diners. They consist of hunting down various enemies. Each mob hunting quest has different levels of difficulty. Completing each one will you earn stars and increase your hunter rank. The most challenging hunts become available at higher ranks.
Most of the quests can be done during the day only. You can’t complete many of them when night falls.
The hunting quests are mainly there for a boost in gil, to spawn rare enemies and give special rewards. The other non-hunting side quests can give large amounts of gil and/or experience.
Regalia Car Tips & Tricks
Regalia is the name of the car Noctis and his crew use in FFXV. To drive it, you have to interact with the car while standing next to it. Regalia is the fastest transport for traveling throughout the land.
At the start of the game the car is broken and you can’t use it. You have to work your way out to repair it and keep it functional.
Once the Regalia is repaired and you can drive it, try to do it cautiously. You CAN damage the car during the free ride, so you’ll have to repair it even further.
The player doesn’t need to drive the car all the time. There is an automatic mode that lets Ignis drive it. This mode, however, can only be activated during the day, at least at the start of the game. Later on, Auto mode can be activated during the night. Noctis must take over the Regalia’s commands during the night.
The option where you let Ignis drive is called auto. You have to set up the location. Otherwise, who knows where Ignis would drive it. Locations you can choose are some of the previously discovered ones, the quest objective marks, and so on.
During those long drives you can change the camera view of the car, making the experience more enjoyable. There is even a first person camera, getting you behind the wheel of the car.
Regalia can be upgraded up to the point where it can fly! This is the endgame for the car’s story.
You can change the color of the body, interior, wheels and add different schematics of colors called decals. There is also a music score that can be bought and added to the playlist. These items can be bought from many vendors, so be sure to check them out.
There are limitations on where the Regalia can go. Think of it like an invisible tunnel; you can only move on roads, and cannot turn and drive into the wilderness.
Chocobo Tips & Tricks
Unlike the car, you can take Chocobos almost everywhere you want. In general, they are used for traveling short distances.
To use the chocobo, find a chocobo rental station. This is where you can rent them for up to seven days, at the price of 50 gil per day.
Not only can Chocobos walk and run, they can glide, swim, drift and jump and land safely from high areas.
Chocobos are not used for traveling only. You can complete mini races with them earning additional experience, AP and medals.
You can get not only a yellow chocobo, but a white and black and many more. There are color-assigning abilities as well. Winning chocobo races gives them medals that can be attached and used as a showcase of accomplishment.
You can’t call for your chocobo while in combat and they can’t jump over the cars…
Magic Tips & Tricks
To craft spells, bring up the menu with the elemancy tab. You can also do it by choosing the spell tab in the inventory menu. Once the spell is crafted it becomes a magic flask. This magic flask is used in combat to defeat enemies.
You create a spell by adding ingredients you own. Ingredients like fire, ice, lighting and others, like the ones used in cooking.
Adjust the amount of energy or add a catalyst when crafting to increase the spell’s potency or add an effect, such as poison and multicast. You can also review the history to quickly craft more of the same spells.
Magic spells do environmental damage. This is a great AOE effect on the area where it was thrown. If the spell is based on fire, the ground will burn, if it is based on frost, the ground will get frozen – slowing everyone, lightning will electrify the field…
Magic spells have friendly fire. They will make a contact with everyone within their AOE field. Be aware of this fact. Use the spells at the start of the fight, when the friends are away from enemies, or near the end when you are sure it will bring an enemy’s end.
The main source of the Fire, Ice and Lighting resources are the nodes – elemental deposits. These nodes are found all around the map, during the missions and so on. To gather the essence from them, in a term called absorb energy, you have to get close to the nodes and hold the appropriate button. This will fill up the corresponding magic storage. You can’t have an infinite amount of unused resources. The basic limit is 99. There are also elemental-absorbing weapons. These weapons absorb energy during combat.
There is a dedicated Magic Grid Ascension. You can add AP here to increase the amount of absorbed energy, gain AP for using elemency, receive more spells when crafting and more.
To use the spell you have to equip it, like you do with the weapons. In combat you can use it in two ways: manually, for throwing it towards the location where you feel it’s useful, and automatically towards the soft locked target (fast casting).
Ascension Tips & Tricks
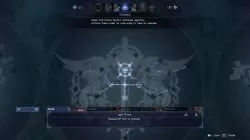
Activating nexuses on the Astralsphere and acquiring new abilities uses the earned Ability Points (AP). You earn AP by leveling up, completing quests and strategic ops, or by impressing friends in conversation.
You can invest your hard-earned Ascension points into several ascension grid ability trees: Magic (boosts everything about spells), Stats (enhances basic parameters independent of behavior), Exploration (renders assistance outside of combat), Combat (boosts Noctis’s technique repertory), Teamwork (boosts your allies’ teamwork), Techniques (enhances and boosts your allies’ techniques), Royal Arms.
Some of the Magic grid abilities are: absorb more energy from elemental deposits, enhance absorption rate of elemental absorbing weapons, enhance potency, gain AP for when crafting spells.
Some of the Stats grid abilities are: increase hp (or vitality, spirit) of each party member, equip two or three accessories.
Some of the Exploration grid abilities are: increase AP gained for making camp, long trips in the car, catching a fish, taking photos, riding chocobos.
Some of the Combat grid abilities are: dodge enemy attacks in midair, recover mp when an aerial attack connects, reduce MP cost of phasing, increase Noctis’s MP, boost warp-strike damage, leave a hologram to divert enemies after warping…
Some of the Teamwork grid abilities are: always deliver a critical hit when link-striking, break limit on link-strike damage, protect Noctis from enemy attacks with a shield, heal an ally with a hidden recover item, automatically scan most enemies weaknesses at the onset of battle…
Some of the Techniques grid abilities are: add to tech bar when Noctis lands attacks, accelerate tech bar replenishment rate, break limit on damage from companions techniques…
Be careful where you place you hard-earned AP. It is currently unknown if there is a point in the game where you can reset them all.
The amount of AP needed for the lowest single cost ability is usually six, eight or ten. Medium cost grid abilities cost from 10, to 16, 18 or even up to 99. The most expensive ones cost 999 AP points and they are the most powerful ones, like the Limit Brake – break limit on damage from companions techniques. But, nevertheless, all these numbers should be taken with a grain of salt, as they went through so many changes, even in the last couple of months before the game is scheduled to be released.
Combat Tips & Tricks
To master the combat you’ll have to master many things. The field where you can progress the most are the linked attacks. These attacks make the crew more powerful and the enemies less resilient to death. Linked attacks happen once certain requirements are met during combat; requirements like the position of Noctis and one of his friends while performing attacks, the number of completed attacks etc.
Noctis regenerates HP and MP while staying at the locations where he has warped onto.
Warping and dodging costs Noctis MP. Navigate how you want to use MP in the most efficient way to maximize damage output.
While in combat, you should take notice of some UI information to help you out. In the lower right corner there are standard HP and MP meters. In the lower left corner there are currently picked weapons (with a highlight on the one you are using). Around them is a blue bar that charges up the armiger arsenal. Above these bars there is another, longer green bar – Tech Bar. It is split into several parts. Each one represents one attack order to companions.
The tech bar starts to fills up (charges up) once you are in the combat area. You maybe don’t want to rush into the combat because of this. You can just wait for a bit until it fills up. You can also boost up its charging by investing 48 AP points to Tech Strike. This ability adds to the tech bar when Noctis lands attacks.
After each fight ends, you receive a Report Card. This tells you all about your Defense, Stealth and Offense attributes ratings. This is where you can gain info needed to improve your combat. Experience gained is one of the most important Report Card aspects.
There are consumables you’ll need to use in combat from time to time. Some of them are: Potions (restores portion of HP), Phoenix Down (brings fallen party members back to life), Elixir (fully restores HP and MP, regenerates half of maximum HP), Superior Restorative, Reflex Enhancer, Magitek Booster, Antidote… Once the consumable is picked, you have to choose the person you want to use it on. You don’t need to use these consumables all the time. There is a buddy system in the game. This system allows your friends to come and pick you up if you are low on HP, giving you a portion of the HP back.
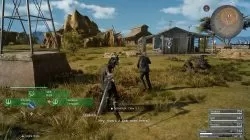
There is a small minimap in the upper right corner of the screen. Once close to the enemy, the red colored area around them appears. Inside this area the combat takes place. If you are about to die, or you want to skip the combat, you just need to leave the red area. As soon as you step away from it, the enemies stop chasing, the combat ends and you are safe.
Different enemies have different abilities. Some of them are as simple as additional damage, charge, AOE cleave, but there is more. For example, Wasps enemies have the ability to mind control. This action confuses Noctis and messes up the controls, reversing them. Goblin enemies can steal potions, and use them to replenish their health when they are low on HP.
If you are on fire, use duck and roll to extinguish it quickly.
When you hit a weak point of any enemy you can do multiplier attacks as well. When you successfully parry you can do a Link-Strike attack.
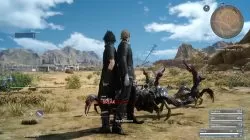
You can call for Gladiolus Tempest move. This move creates a whirlwind and sucks in the scattered enemies into one pile. He attacks them all shortly after. If you do it right, Noctis does an additional attack at the end.
Ignis can perform the Mark move. This move marks all nearby enemies. Afterwards Noctis attacks them all in a sweep warp strike.
Prompto does a Piercer move. This is where Prompto aims and shoots a powerful shot to the single target. This is not just a single target spell. It can penetrate through many enemies on its way to the main target.
Tempest, Mark and Piercer are basic companion abilities. You get them at the start of the game. You can, however, replace them with some new ones. First, you must unlock them through the Techniques Ascension Skill Tree. Now, go to the specific companion’s gear tab. This is where you can change their ability.
When someone in the party reaches 0 HP, and the fight ends, this member will be revived but will gain the same amount of experience, that is, 0 experience.
Enemies like big robots explode once killed. Their explosion blast can kill you, so keep away from them until it is safe.
During combat you might get a special objective. These objectives consists of challenges like: land five attacks, warp to a certain location, inflict x amount of damage and so on. Once completed these objectives give additional AP.


Girly video game ?. .