Shirikoro Peak Relay Stone Puzzles Genshin Impact
The Genshin Impact Shirikoro Peak relay stone puzzles are puzzles you’ll have to solve in order to complete the A Particularly Particular Author quest. On your quest to find the three feathers of the Shirikoro Peak perch, you’ll actually have to solve two of these. Once you figure out the mechanic, it’s not too hard, but it’s very easy to get stuck. That’s why we’ve put together our Shirikoro Peak Relay Stone Puzzles Genshin Impact guide to help you out.
How to Solve Genshin Impact Shirikoro Peak Relay Stone Puzzles
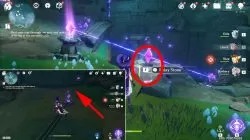
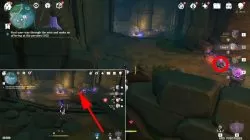
To solve the Shirikoro Peak relay stone puzzles in Genshin Impact, you have to place them in such a way that you lead the line of electricity into the correct crystal. There are two such puzzles you’ll have to figure out. In the first one, as soon as you go through the hole in the wall, pick up the relay stone from the middle on the right. Take it down to the line on the right of the round door, and place it so that it takes electricity from the last crystal receiving the electricity to the crystal on the pedestal.
For the other side of the puzzle, you’ll need two relay stones. The first one is on the side of the staircase leading down, and the other is over on the left of the cavern. Place the two in the way presented in the second screenshot, and if you’ve don everything correctly, you’ll get a chest as your reward, and the door will open. Head into the next room, beat up the monster, and collect the second feather.

Shrikoro Peak Relay Stone Puzzle Solutions Genshin Impact
The second Genshin Impact Shirikoro Peak relay stone puzzle solution requires you to find three Seelies and lead them to the pillars near the center of the room. The first Seelie is on a stone beam near the entrance, the second is in the room up the stairs and opposite from the three pillars, and the third one is behind a rock wall behind the cracked dome. You have to break the wall to get to the Seelie. Activate the cube switch in the center to lower the water level.


Now, drop down to the lower level and collect both relay stones, then pick them up from the top, as well. On the left of the door (left with your back to the door), you have to place one relay stone to connect the two static crystals, as shown in the first screenshot. As for the second one, go back down and place one of the stones to power the crystal jutting out of the wall. Then, go back up and place the last stone to power the final static crystal. Interact with the cube switch next to the door, go inside, and the final feather will be on the right in the next room.