Twinning Isle Puzzle Hymnal Rotating Ring Chest
On Twinning Isle, there are several Hymnal Rotating Ring, which, when you solve their puzzle, unlock a nearby chest. We’ve already covered the Hymnal Rotating Ring puzzles on Minacious Isle, and these function on the same principle. Meaning, you will need to use your Wind-Blessed Harpastum and operate the Rings to get them into the right position. Because these puzzles can take a lot of time to solve (there are many different Ring combinations to try), we present to you our Twinning Isle Puzzle Hymnal Rotating Ring Chest guide. Simply follow all the steps we laid out here and you will be able to solve all of these puzzles in no time.

The First Twinning Isle Rotating Ring Puzzle
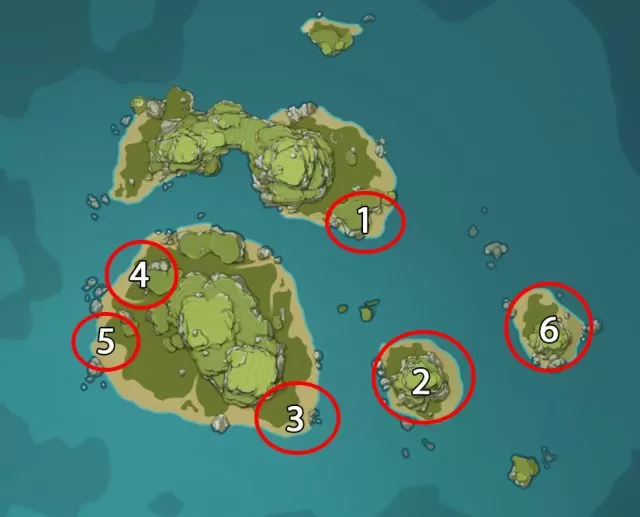
The first puzzle is located on the southeastern part of the upper island. We’ve marked it #1 on the screenshot. Here, you will need to line up the arrows on the four Rings to have the trajectory of the Harpastum hit the target. Approach the second Ring and select the “Move Up” option. Go to the third Ring and select the “Adjust to Position 1” option. Finally, go to the fourth Ring and Adjust it to Position 2. Return to the platform which activates the Rings. Equip your Wind-Blessed Harpastum and throw it at the first Ring (the one closest to the platform). The Harpastum will go through all the Rings and hit the target, which will unlock the chest behind the platform.
The Second Twinning Isle Rotating Ring Puzzle
The second puzzle’s location is on the first small island east of Twinning Isle. It’s marked #2 on the map screenshot. Go there and you will see one Rotating Ring. Stand on the platform to activate it. The Ring will begin to move left and right. Just aim your Harpastum and when the Ring aligns with the target behind it, throw the Harpastum through it. Now the chest to the right is unlocked.
The Third Twinning Isle Rotating Ring Puzzle
The third puzzle is on the southeastern part of the lower Twinning Isle. It’s #3 on our map. This puzzle is made up of three Rings that you will have to properly align. Approach the first Ring and select the “Rotate 90 Degrees” option two times. For the second Ring, select the “Adjust to Position 1” option. Approach the third Ring and select the “Move Up” option. Go to the platform which activates these Rings, aim your Harpastum and chuck it through the first ring. When the ball reaches the target, this will unlock the chest to the right.
The Fourth Twinning Isle Rotating Ring Puzzle
We’ve marked the location of the fourth puzzle on the screenshot below, under #4. This is another puzzle with just one Ring. Approach the platform and activate this Ring. You need to lob the the Harpastum ball so it goes through the hoop. To do this, aim slightly above the ring. Claim the now-unlocked chest.
The Fifth Twinning Isle Rotating Ring Puzzle
The fifth puzzle is a short distance below the previous one and it is marked as #5 on our map. This is a series of Rings, so be prepared for some work. Approach the first Ring and select the “Rotate 90 Degrees Clockwise” two times. On the second Ring, select “Rotate 90 Degrees Clockwise” just once. For the third ring, “Rotate 90 Degrees Clockwise” three times. Finally, on the fourth Ring, select “Adjust to Position 1”. Stand on the platform to activate the rings and throw the Harpastum at the first Ring. The chest near the fourth Ring has been unlocked.
The Sixth Twinning Isle Rotating Ring Puzzle
The sixth and final puzzle is on the second island to the east. We’ve marked this #6 on our map. There are three Rings here and you need to make curve for your Harpastum to travel. Approach the middle Ring and select the “Rotate 90 Degrees Clockwise” option twice. Stand on the platform and throw the Harpastum through the closest Ring. This chest is now unlocked and ready to be looted.
Bonus Twinning Isle Double Rotating Ring Puzzle
After a while, a double ring puzzle will spawn at the same place where the #3 Ring puzzle was. Go here and you will see several rows of Rings. Looking at them directly from near the platform, approach the last green Ring (the one near the blue target) and set it to “Adjust to Position 1.” Move to the last green ring to the left and also set it to “Adjust to Position 1.” Now, go to the purple Ring near the start and set it to “Adjust to Position 1.” Go and stand on the platform to activate the Rings. Throw the Harpastum through the ring closest to you. This should take out both targets and unlock the final chest. We hope that you have found our Twinning Isle Puzzle Hymnal Rotating Ring Chest guide useful. Stay tuned for more Genshin Impact content.


