Ares's Treasury Fortress Mechanism Puzzle Solutions Immortals Fenyx Rising
The mechanism puzzles in Ajax’s Fort in Immortals Fenyx Rising is a series of challenges you’ll have to solve in order to unlock Ares’s Treasury during the Nest Egg main quest. These brain-teasers can get pretty difficult and confusing. We know, because we got stumped several times while playing through. Therefore, we’ve put together our Ares’s Treasury Fortress Mechanism Puzzle Solutions Immortals Fenyx Rising guide to help you figure things out.
How to Solve Ares Treasury Fortress First Mechanism Puzzle in Immortals Fenyx Rising
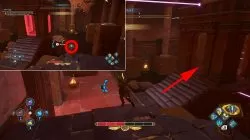
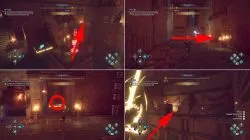
To solve the first mechanism puzzle in Ajax Fortress on your way to Ares’s Treasury in Immortals Fenyx Rising, drop down to the bottom of the chamber, below the locked switch. Pick up the block, stand on the floor switch, and throw it on top of the structure behind the wall of lasers. Then, climb your way up there. Pick the block up again and turn east. Throw the block over the lasers onto the next platform. Make your way over there, and stand on the floor switch to raise the portcullis. Throw the block through, then go around on the right. Place the block on one of the floor switches.
From there, standing on top of the main switch, look to the left. You’ll see a door in the corner, so fly over there. Go through the hallway, and go into the small area on the right. Pick up the block, throw it over the lasers, then climb over yourself. Head out onto the ledge in the main room while carrying the block, and throw it towards the main switch. Place the block on the second floor pad, and then hit the main switch that is now unlocked. Press it, and off we go to the second half of the puzzle.
Ajax Fort Fenyx Rising Mechanism Solution – How to Unlock Ares Treasury
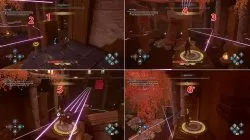
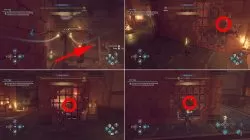
From the previous position, drop down to ground level, and go into the southern chamber. At the very end, you’ll see several cages. First, go to the western side, pick up the block, and drag it towards you. Then go to the left, and drag the same block onto the floor switch. Now, go all the way to the other side of the structure, and drag another block onto the second switch. This will raise the portcullis in the center, so go inside. Move the block from the switch, push the button to open the gate again, and take the block out.
Throw the block on top of the structure, then throw it again, up and to the north, towards the locked main switch. Climb over there, and defeat the enemies. Then, pick up the block and chuck it through the hole above the red barrier. Jump inside, and place the smaller block onto the feather switch. Then, push the larger block onto the anvil switch. Go back for the smaller block, the same way you got it in, and place it onto the feather switch. Then, hit the blue button. Exit up the stairs to the north, go left through the now-open gate, and outside towards another blue switch, which is your actual goal here.
Second Immortals Fenyx Rising Ajax Fort Ares Treasury Mechanism Puzzle Solution
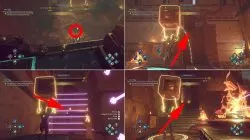
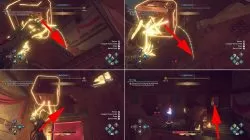
The solution of the second mechanism puzzle in Ajax’s Fort in Immortals Fenyx Rising is to go through the crack in the wall on the right of the main “puzzle chamber.” Maneuver your way through the lasers, and climb up to the higher level when you reach the dead end. From there, grab the block that’s on the floor switch between the lasers. Bring the block back with you into the main chamber by throwing it over the lasers. Now, you have to put the block on top of the tallest standing pillar in the room.
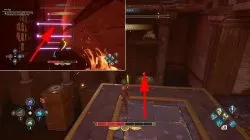
Now, go into the northern corner of the room and press the button. Then, go left, into the little structure. Stand on the floor pad, but don’t touch the button. Instead, go back to the first button, and hop onto the nearest floor pad on the pillar, then onto the one next to that. Your next target is the pad on top of the pillar in the southern corner, and from there, climb to the pad on the top pillar. Mind the lasers. Now, fly over into the western corner, and step onto the pad hidden by leaves. Lastly, jump onto the pad just above, between the two braziers. The portcullis behind you will go up, so go that way. Eventually, you’ll be out in the open, next to the second switch you have to activate.