Depresso Züchten, Standort, Beute und Fähigkeiten | Palworld

Depresso ist ein Schatten Pal in Palworld. Guckt immer mürrisch und hat deshalb kaum Freunde, ist aber in Wahrheit unglaublich nett. Wurde schon dabei beobachtet, wie es Fixy, die von ihrem Rudel getrennt wurden, Futter abgibt.

▼Article Continues Below ▼
Palworld Depresso
Depresso Screenshot von Gosunoob.com ©
Depresso Palworld Paldeck Pal Icon
Paldex-Nr.#017
ElementSchatten Icon
Eignung
  • Handwerk St. 1
  • Bergbau St. 1
  • Transport St. 1
PartnerfähigkeitKoffeinschock
Kann auf Befehl eine bedenkliche Menge an Energydrinks exen, was sein Bewegungstempo für eine bestimmte Zeit beträchtlich erhöht.
Werte
LP70
Angriff70
Verteidigung70
Essensmenge2/10
Nächtlich

Mögliche Beute

Depresso hat 1 fallengelassen. Diese sind normalerweise Handwerksmaterialien. Einige Pals lassen auch Upgrade-Gegenstände oder sogar Waffen fallen.

  • 2-3x Giftdrüse 100%

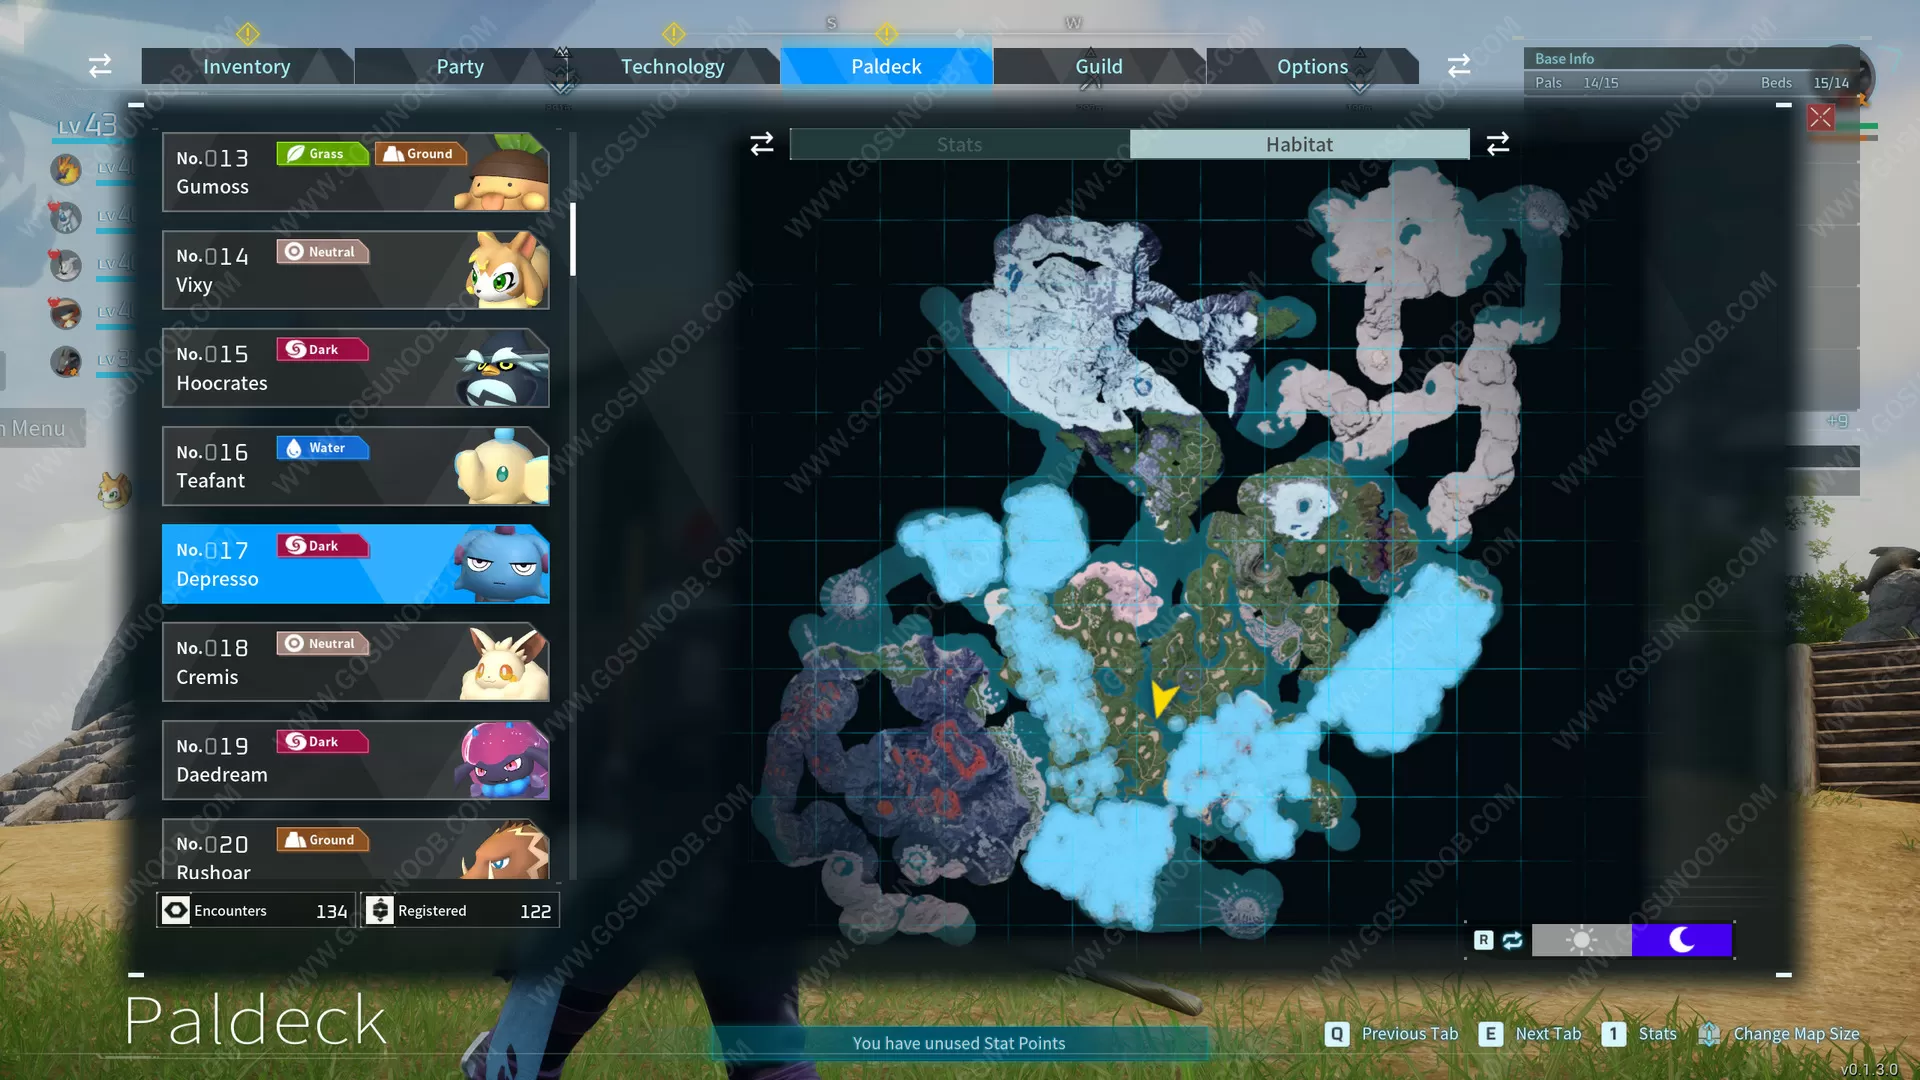
Depresso Standort – Wo finde und fange ich Depresso in Palworld?

Einige Pals können nur nachts gefunden werden. Andere sind nur als Bosse verfügbar. Einige seltene Pals werden nach dem Besiegen als Bosse in Naturschutzgebiet verfügbar. Der Screenshot der Karte unten zeigt orange Punkte für Tagespals, blaue Punkte für Nachtspals und Kartenpositionen für Bosse.

Depresso Standort in Palworld
Screenshot aufgenommen von Gosunoob.com ©

Wie bekomme ich Depresso durch Züchten?

Es gibt 29 Möglichkeiten, Depresso zu züchten. Unten sind die ersten 10 aufgelistet. Die Eltern müssen unterschiedlichen Geschlechts sein und die angegebenen Pals sein.

Elternteil 1Elternteil 2
Lamball Icon#1 LamballKillamari Icon#23 Killamari
Lamball Icon#1 LamballSwee Icon#53 Swee
Cattiva Icon#2 CattivaRibbuny Icon#39 Ribbuny
Cattiva Icon#2 CattivaSwee Icon#53 Swee
Chikipi Icon#3 ChikipiKelpsea Icon#81 Kelpsea
Chikipi Icon#3 ChikipiKelpsea Ignis Icon#81B Kelpsea Ignis
Lifmunk Icon#4 LifmunkFuack Icon#6 Fuack
Lifmunk Icon#4 LifmunkTocotoco Icon#27 Tocotoco
Foxparks Icon#5 FoxparksJolthog Icon#12 Jolthog
Foxparks Icon#5 FoxparksJolthog Cryst Icon#12B Jolthog Cryst
Klicke hier, um die verbleibenden 18 Paarung anzuzeigen
Fuack Icon#6 FuackMau Cryst Icon#24B Mau Cryst
Fuack Icon#6 FuackHangyu Cryst Icon#32B Hangyu Cryst
Sparkit Icon#7 SparkitPengullet Icon#10 Pengullet
Sparkit Icon#7 SparkitJolthog Cryst Icon#12B Jolthog Cryst
Pengullet Icon#10 PengulletHangyu Icon#32 Hangyu
Pengullet Icon#10 PengulletFlambelle Icon#70 Flambelle
Jolthog Icon#12 JolthogHoocrates Icon#15 Hoocrates
Jolthog Cryst Icon#12B Jolthog CrystFlambelle Icon#70 Flambelle
Fixy Icon#14 FixyBristla Icon#30 Bristla
Fixy Icon#14 FixyRibbuny Icon#39 Ribbuny
Teafant Icon#16 TeafantFlopie Icon#28 Flopie
Teafant Icon#16 TeafantKelpsea Ignis Icon#81B Kelpsea Ignis
Cremis Icon#18 CremisRibbuny Icon#39 Ribbuny
Cremis Icon#18 CremisSwee Icon#53 Swee
Killamari Icon#23 KillamariMau Icon#24 Mau
Mau Icon#24 MauFlopie Icon#28 Flopie
Mau Cryst Icon#24B Mau CrystBristla Icon#30 Bristla
Tocotoco Icon#27 TocotocoHangyu Icon#32 Hangyu
Tocotoco Icon#27 TocotocoHangyu Cryst Icon#32B Hangyu Cryst

Depresso Palworld Zucht Liste

Hier ist die Liste aller möglichen Depresso Zucht-Kombinationen. Das bedeutet, wenn du Depresso mit einem der unten aufgeführten Pals kombinierst, erhältst du das angegebene Kind-Pal. Das Geschlecht der Eltern ist unwichtig, solange sie unterschiedliche Geschlechter haben.

Elternteil 1Elternteil 2Kind
Sparkit Icon#7 SparkitDepresso Icon#17 DepressoFoxparks Icon#5 Foxparks
Depresso Icon#17 DepressoHangyu Icon#32 HangyuFoxparks Icon#5 Foxparks
Depresso Icon#17 DepressoHangyu Cryst Icon#32B Hangyu CrystFoxparks Icon#5 Foxparks
Gumoss Icon#13 GumossDepresso Icon#17 DepressoRibbuny Icon#39 Ribbuny
Depresso Icon#17 DepressoMau Cryst Icon#24B Mau CrystSparkit Icon#7 Sparkit
Cattiva Icon#2 CattivaDepresso Icon#17 DepressoHangyu Icon#32 Hangyu
Fixy Icon#14 FixyDepresso Icon#17 DepressoHangyu Icon#32 Hangyu
Depresso Icon#17 DepressoCremis Icon#18 CremisHangyu Icon#32 Hangyu
Depresso Icon#17 DepressoMau Icon#24 MauLifmunk Icon#4 Lifmunk
Depresso Icon#17 DepressoBristla Icon#30 BristlaPengullet Icon#10 Pengullet
Klicke hier, um die verbleibenden 111 Zucht-Kombinationen anzuzeigen
Depresso Icon#17 DepressoDaedream Icon#19 DaedreamSwee Icon#53 Swee
Depresso Icon#17 DepressoFuddler Icon#22 FuddlerSwee Icon#53 Swee
Tanzee Icon#8 TanzeeDepresso Icon#17 DepressoBristla Icon#30 Bristla
Depresso Icon#17 DepressoKelpsea Icon#81 KelpseaBristla Icon#30 Bristla
Depresso Icon#17 DepressoKelpsea Ignis Icon#81B Kelpsea IgnisBristla Icon#30 Bristla
Depresso Icon#17 DepressoKillamari Icon#23 KillamariTocotoco Icon#27 Tocotoco
Depresso Icon#17 DepressoRibbuny Icon#39 RibbunyTocotoco Icon#27 Tocotoco
Depresso Icon#17 DepressoSwee Icon#53 SweeTocotoco Icon#27 Tocotoco
Depresso Icon#17 DepressoLoupmoon Icon#46 LoupmoonVulmag Icon#76 Vulmag
Depresso Icon#17 DepressoLovander Icon#69 LovanderVulmag Icon#76 Vulmag
Depresso Icon#17 DepressoRushoar Icon#20 RushoarKelpsea Icon#81 Kelpsea
Depresso Icon#17 DepressoLeezpunk Ignis Icon#45B Leezpunk IgnisKelpsea Icon#81 Kelpsea
Depresso Icon#17 DepressoMaraith Icon#66 MaraithKelpsea Icon#81 Kelpsea
Lifmunk Icon#4 LifmunkDepresso Icon#17 DepressoFlambelle Icon#70 Flambelle
Pengullet Icon#10 PengulletDepresso Icon#17 DepressoJolthog Icon#12 Jolthog
Jolthog Icon#12 JolthogDepresso Icon#17 DepressoJolthog Icon#12 Jolthog
Jolthog Cryst Icon#12B Jolthog CrystDepresso Icon#17 DepressoJolthog Icon#12 Jolthog
Depresso Icon#17 DepressoRobinquill Terra Icon#48B Robinquill TerraWoolipop Icon#34 Woolipop
Depresso Icon#17 DepressoVerdash Icon#77 VerdashWoolipop Icon#34 Woolipop
Depresso Icon#17 DepressoFelbat Icon#94 FelbatWoolipop Icon#34 Woolipop
Depresso Icon#17 DepressoNox Icon#21 NoxFlopie Icon#28 Flopie
Depresso Icon#17 DepressoWoolipop Icon#34 WoolipopKillamari Icon#23 Killamari
Depresso Icon#17 DepressoDazzi Icon#62 DazziKillamari Icon#23 Killamari
Penking Icon#11 PenkingDepresso Icon#17 DepressoLoupmoon Icon#46 Loupmoon
Depresso Icon#17 DepressoGrintale Icon#52 GrintaleLoupmoon Icon#46 Loupmoon
Depresso Icon#17 DepressoSurfent Terra Icon#65B Surfent TerraLoupmoon Icon#46 Loupmoon
Depresso Icon#17 DepressoElphidran Icon#80 ElphidranLoupmoon Icon#46 Loupmoon
Depresso Icon#17 DepressoElphidran Aqua Icon#80B Elphidran AquaLoupmoon Icon#46 Loupmoon
Depresso Icon#17 DepressoCinnamoth Icon#41 CinnamothCaprity Icon#35 Caprity
Depresso Icon#17 DepressoWumpo Botan Icon#91B Wumpo BotanCaprity Icon#35 Caprity
Depresso Icon#17 DepressoFlopie Icon#28 FlopieFuack Icon#6 Fuack
Depresso Icon#17 DepressoGaleclaw Icon#47 GaleclawDazzi Icon#62 Dazzi
Depresso Icon#17 DepressoRobinquill Icon#48 RobinquillDazzi Icon#62 Dazzi
Depresso Icon#17 DepressoGorirat Icon#49 GoriratDazzi Icon#62 Dazzi
Depresso Icon#17 DepressoVaelet Icon#78 VaeletDazzi Icon#62 Dazzi
Depresso Icon#17 DepressoFenglope Icon#93 FenglopeNox Icon#21 Nox
Foxparks Icon#5 FoxparksDepresso Icon#17 DepressoHoocrates Icon#15 Hoocrates
Depresso Icon#17 DepressoFlambelle Icon#70 FlambelleHoocrates Icon#15 Hoocrates
Depresso Icon#17 DepressoUnivolt Icon#56 UnivoltGaleclaw Icon#47 Galeclaw
Depresso Icon#17 DepressoBlazehowl Noct Icon#84B Blazehowl NoctGaleclaw Icon#47 Galeclaw
Depresso Icon#17 DepressoIncineram Icon#40 IncineramFenglope Icon#93 Fenglope
Depresso Icon#17 DepressoIncineram Noct Icon#40B Incineram NoctFenglope Icon#93 Fenglope
Depresso Icon#17 DepressoSurfent Icon#65 SurfentFenglope Icon#93 Fenglope
Depresso Icon#17 DepressoAnubis Icon#100 AnubisFenglope Icon#93 Fenglope
Depresso Icon#17 DepressoCelaray Icon#25 CelarayRushoar Icon#20 Rushoar
Depresso Icon#17 DepressoMelpaca Icon#36 MelpacaRushoar Icon#20 Rushoar
Depresso Icon#17 DepressoReindrix Icon#59 ReindrixRushoar Icon#20 Rushoar
Rooby Icon#9 RoobyDepresso Icon#17 DepressoKelpsea Ignis Icon#81B Kelpsea Ignis
Depresso Icon#17 DepressoVulmag Icon#76 VulmagKelpsea Ignis Icon#81B Kelpsea Ignis
Depresso Icon#17 DepressoLeezpunk Icon#45 LeezpunkTanzee Icon#8 Tanzee
Depresso Icon#17 DepressoLunaris Icon#63 LunarisTanzee Icon#8 Tanzee
Depresso Icon#17 DepressoGobfin Icon#31 GobfinDaedream Icon#19 Daedream
Depresso Icon#17 DepressoCawgnito Icon#44 CawgnitoDaedream Icon#19 Daedream
Depresso Icon#17 DepressoAzurobe Icon#82 AzurobeLovander Icon#69 Lovander
Depresso Icon#17 DepressoPetallia Icon#87 PetalliaCawgnito Icon#44 Cawgnito
Depresso Icon#17 DepressoKitsun Icon#61 KitsunLunaris Icon#63 Lunaris
Depresso Icon#17 DepressoDigtoise Icon#67 DigtoiseLunaris Icon#63 Lunaris
Depresso Icon#17 DepressoBroncherry Aqua Icon#86B Broncherry AquaLunaris Icon#63 Lunaris
Depresso Icon#17 DepressoSibelyx Icon#79 SibelyxEikthyrdeer Icon#37 Eikthyrdeer
Depresso Icon#17 DepressoKingpaca Icon#89 KingpacaEikthyrdeer Icon#37 Eikthyrdeer
Depresso Icon#17 DepressoWumpo Icon#91 WumpoEikthyrdeer Icon#37 Eikthyrdeer
Depresso Icon#17 DepressoElizabee Icon#51 ElizabeeDigtoise Icon#67 Digtoise
Depresso Icon#17 DepressoReptyro Icon#88 ReptyroDigtoise Icon#67 Digtoise
Depresso Icon#17 DepressoJormuntide Icon#101 JormuntideDigtoise Icon#67 Digtoise
Depresso Icon#17 DepressoJormuntide Ignis Icon#101B Jormuntide IgnisDigtoise Icon#67 Digtoise
Depresso Icon#17 DepressoMozzarina Icon#29 MozzarinaMaraith Icon#66 Maraith
Depresso Icon#17 DepressoEikthyrdeer Icon#37 EikthyrdeerMaraith Icon#66 Maraith
Depresso Icon#17 DepressoVanwyrm Icon#71 VanwyrmRobinquill Icon#48 Robinquill
Depresso Icon#17 DepressoBushi Icon#72 BushiFelbat Icon#94 Felbat
Depresso Icon#17 DepressoRayhound Icon#60 RayhoundDirehowl Icon#26 Direhowl
Depresso Icon#17 DepressoTombat Icon#68 TombatDirehowl Icon#26 Direhowl
Depresso Icon#17 DepressoKatress Icon#75 KatressGorirat Icon#49 Gorirat
Depresso Icon#17 DepressoBlazehowl Icon#84 BlazehowlGorirat Icon#49 Gorirat
Depresso Icon#17 DepressoArsox Icon#42 ArsoxGobfin Icon#31 Gobfin
Depresso Icon#17 DepressoChillet Icon#55 ChilletGobfin Icon#31 Gobfin
Depresso Icon#17 DepressoDinossom Lux Icon#64B Dinossom LuxGobfin Icon#31 Gobfin
Depresso Icon#17 DepressoBeakon Icon#73 BeakonChillet Icon#55 Chillet
Depresso Icon#17 DepressoFoxcicle Icon#57 FoxcicleBeegarde Icon#50 Beegarde
Depresso Icon#17 DepressoRagnahawk Icon#74 RagnahawkReindrix Icon#59 Reindrix
Depresso Icon#17 DepressoFaleris Icon#105 FalerisReindrix Icon#59 Reindrix
Depresso Icon#17 DepressoPyrin Icon#58 PyrinCelaray Icon#25 Celaray
Depresso Icon#17 DepressoCaprity Icon#35 CaprityRooby Icon#9 Rooby
Depresso Icon#17 DepressoSweepa Icon#54 SweepaDumud Icon#43 Dumud
Depresso Icon#17 DepressoMossanda Lux Icon#33B Mossanda LuxMelpaca Icon#36 Melpaca
Depresso Icon#17 DepressoDirehowl Icon#26 DirehowlFuddler Icon#22 Fuddler
Depresso Icon#17 DepressoBeegarde Icon#50 BeegardeFuddler Icon#22 Fuddler
Depresso Icon#17 DepressoGobfin Ignis Icon#31B Gobfin IgnisGumoss Icon#13 Gumoss
Depresso Icon#17 DepressoIce Kingpaca Icon#89B Ice KingpacaMozzarina Icon#29 Mozzarina
Depresso Icon#17 DepressoPaladius Icon#108 PaladiusRayhound Icon#60 Rayhound
Depresso Icon#17 DepressoNecromus Icon#109 NecromusRayhound Icon#60 Rayhound
Depresso Icon#17 DepressoFrostallion Noct Icon#110B Frostallion NoctRayhound Icon#60 Rayhound
Depresso Icon#17 DepressoJetragon Icon#111 JetragonRayhound Icon#60 Rayhound
Depresso Icon#17 DepressoRelaxaurus Icon#85 RelaxaurusKitsun Icon#61 Kitsun
Depresso Icon#17 DepressoRelaxaurus Lux Icon#85B Relaxaurus LuxKitsun Icon#61 Kitsun
Depresso Icon#17 DepressoMammorest Cryst Icon#90B Mammorest CrystKitsun Icon#61 Kitsun
Depresso Icon#17 DepressoWarsect  Icon#92 Warsect Broncherry Icon#86 Broncherry
Depresso Icon#17 DepressoQuivern Icon#95 QuivernBroncherry Icon#86 Broncherry
Depresso Icon#17 DepressoAstegon Icon#98 AstegonFoxcicle Icon#57 Foxcicle
Depresso Icon#17 DepressoOrserk Icon#106 OrserkFoxcicle Icon#57 Foxcicle
Depresso Icon#17 DepressoCryolinx Icon#83 CryolinxTombat Icon#68 Tombat
Depresso Icon#17 DepressoFrostallion Icon#110 FrostallionTombat Icon#68 Tombat
Depresso Icon#17 DepressoHelzephyr Icon#97 HelzephyrArsox Icon#42 Arsox
Depresso Icon#17 DepressoGrizzbolt Icon#103 GrizzboltArsox Icon#42 Arsox
Depresso Icon#17 DepressoLyleen Noct Icon#104B Lyleen NoctArsox Icon#42 Arsox
Depresso Icon#17 DepressoBroncherry Icon#86 BroncherryLeezpunk Icon#45 Leezpunk
Depresso Icon#17 DepressoMenasting Icon#99 MenastingDinossom Icon#64 Dinossom
Depresso Icon#17 DepressoLyleen Icon#104 LyleenDinossom Icon#64 Dinossom
Depresso Icon#17 DepressoSuzaku Icon#102 SuzakuBlazehowl Icon#84 Blazehowl
Depresso Icon#17 DepressoSuzaku Aqua Icon#102B Suzaku AquaBlazehowl Icon#84 Blazehowl
Depresso Icon#17 DepressoShadowbeak Icon#107 ShadowbeakBlazehowl Icon#84 Blazehowl
Depresso Icon#17 DepressoBlazamut Icon#96 BlazamutKatress Icon#75 Katress

Palworld Depresso Aktivfähigkeiten

Depresso hat neben seiner Partnerfähigkeit Koffeinschock 7 Aktivfähigkeiten.

FähigkeitsnameFähigkeitsbeschreibungFreischaltungsstufe
GiftschussBewirft den Gegner mit giftigem Schlamm.1
SchlammschussBewirft den Gegner mit klebrigem Schlamm.7
DüsterballErzeugt eine Schattenkugel, die dem Gegner langsam nachsetzt.15
EisraketeErzeugt in der Luft spitze Eiszapfen und schleudert sie in Richtung des Gegners.22
DüsterwelleEntlädt plötzlich Schattenenergie und fügt Gegnern in der Umgebung Schaden zu.30
AlbtraumballErzeugt eine große Schattenkugel und wirft sie mit hoher Geschwindigkeit in Richtung des Gegners.40
SchattenlaserTankt Schattenenergie und feuert einen mächtigen Strahl auf den Gegner ab.50
Vorheriges Pal
Nächstes Pal
Sehen Sie diese Seite auf: US flag icon ES flag icon
TAGS
Author Gosu No0b profile picture
Written by:
Sometimes articles on our website are a team effort. Such articles are published under the Gosu Noob author and that means the thing you are reading was created by the whole crew.

YOU MAY ALSO READ

CLICK TO POST A COMMENT