Jormuntide Crianza Lista, Ubicación, Objetos Obtenibles y Aptitud de Trabajo en Palworld

Jormuntide es una Dragón y Agua Pal en Palworld. Cuenta la leyenda que a cierto anciano lo lanzaron a un remolino tras haber sido acusado injustamente, pero al poco resucitó en forma de Jormuntidey arrasó con todo.
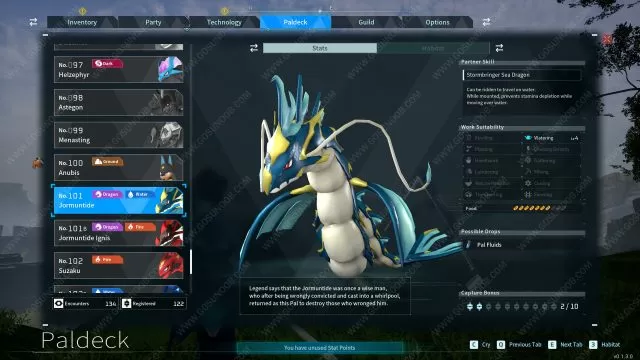
▼Article Continues Below ▼
Palworld Jormuntide
Jormuntide captura de pantalla por Gosunoob.com ©
Jormuntide Palworld Paldeck Pal Icon
Palpedia n.º#101
AtributoPal Element Dragón IconPal Element Agua Icon
Aptitud de trabajo
  • Riego Nv. 4
Técnica
de
compañero
Dragón marino invocatormentas
Puedes desplazarte sobre el agua montado sobre su lomo. Durante el viaje, el agua lo empuja, por lo que no consume energía.
Parámetros
PV130
Ataque120
Defensa100
Cantidad de comida7/10

Objetos obtenibles

Jormuntide tiene 1 objeto. Estos suelen ser materiales de fabricación. Algunos Pals también sueltan objetos de mejora o incluso armas.

  • 2-4x Fluido de Pal 100%

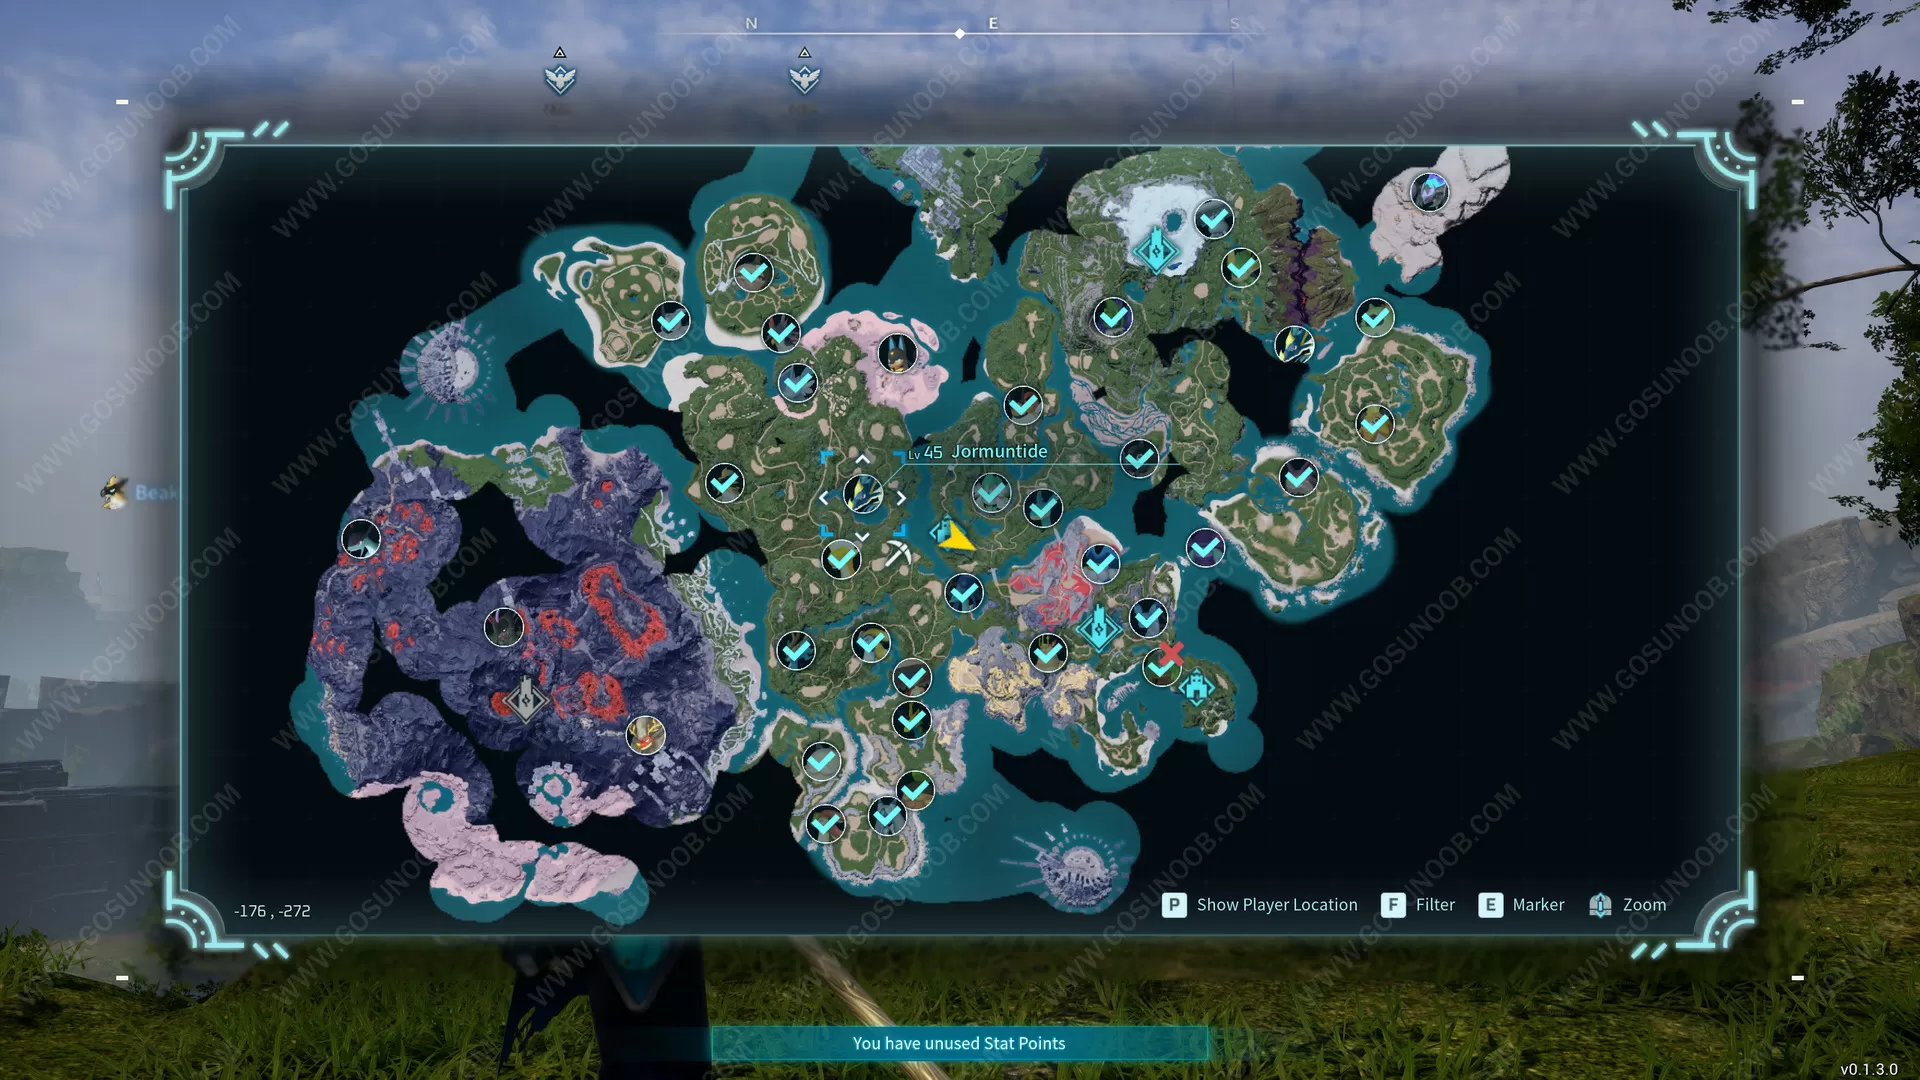
Jormuntide Ubicación – ¿Dónde encontrar y capturar Jormuntide en Palworld?

Algunos Pals solo se pueden encontrar durante la noche. Otros solo están disponibles como jefes. Algunos Pals raros se vuelven disponibles en Santuarios de Vida Silvestre después de derrotarlos como jefes. La captura de pantalla del mapa a continuación muestra puntos naranjas para Pals diurnos, puntos azules para Pals nocturnos y ubicaciones en el mapa para jefes.

Ubicación del Mapa de Jormuntide en Palworld
Captura de pantalla capturada por Gosunoob.com ©

¿Cómo obtener Jormuntide mediante la cría?

Hay 44 formas de criar Jormuntide. A continuación se muestran las primeras 10 de ellas. Necesitas que los padres sean de diferentes géneros y sean los Pals especificados.

Padre 1Padre 2
Penking Icon#11 PenkingFrostallion Noct Icon#110B Frostallion Noct
Penking Icon#11 PenkingJetragon Icon#111 Jetragon
Mossanda Icon#33 MossandaHelzephyr Icon#97 Helzephyr
Mossanda Lux Icon#33B Mossanda LuxBeakon Icon#73 Beakon
Mossanda Lux Icon#33B Mossanda LuxIce Reptyro Icon#88B Ice Reptyro
Nitewing Icon#38 NitewingHelzephyr Icon#97 Helzephyr
Nitewing Icon#38 NitewingGrizzbolt Icon#103 Grizzbolt
Incineram Icon#40 IncineramSuzaku Aqua Icon#102B Suzaku Aqua
Incineram Noct Icon#40B Incineram NoctSuzaku Aqua Icon#102B Suzaku Aqua
Cinnamoth Icon#41 CinnamothCryolinx Icon#83 Cryolinx
Haz clic aquí para mostrar las combinaciones de cría restantes 33
Cinnamoth Icon#41 CinnamothFrostallion Icon#110 Frostallion
Elizabee Icon#51 ElizabeeRelaxaurus Icon#85 Relaxaurus
Elizabee Icon#51 ElizabeeMammorest Cryst Icon#90B Mammorest Cryst
Grintale Icon#52 GrintaleFrostallion Noct Icon#110B Frostallion Noct
Sweepa Icon#54 SweepaGrizzbolt Icon#103 Grizzbolt
Sweepa Icon#54 SweepaLyleen Noct Icon#104B Lyleen Noct
Pyrin Icon#58 PyrinMenasting Icon#99 Menasting
Pyrin Icon#58 PyrinLyleen Icon#104 Lyleen
Pyrin Noct Icon#58B Pyrin NoctRagnahawk Icon#74 Ragnahawk
Pyrin Noct Icon#58B Pyrin NoctFaleris Icon#105 Faleris
Surfent Icon#65 SurfentSuzaku Icon#102 Suzaku
Surfent Icon#65 SurfentShadowbeak Icon#107 Shadowbeak
Surfent Terra Icon#65B Surfent TerraShadowbeak Icon#107 Shadowbeak
Surfent Terra Icon#65B Surfent TerraNecromus Icon#109 Necromus
Ragnahawk Icon#74 RagnahawkIce Reptyro Icon#88B Ice Reptyro
Elphidran Icon#80 ElphidranPaladius Icon#108 Paladius
Elphidran Icon#80 ElphidranNecromus Icon#109 Necromus
Elphidran Aqua Icon#80B Elphidran AquaPaladius Icon#108 Paladius
Elphidran Aqua Icon#80B Elphidran AquaJetragon Icon#111 Jetragon
Azurobe Icon#82 AzurobeFrostallion Icon#110 Frostallion
Cryolinx Icon#83 CryolinxWumpo Botan Icon#91B Wumpo Botan
Relaxaurus Icon#85 RelaxaurusWarsect  Icon#92 Warsect
Relaxaurus Lux Icon#85B Relaxaurus LuxWarsect  Icon#92 Warsect
Relaxaurus Lux Icon#85B Relaxaurus LuxQuivern Icon#95 Quivern
Reptyro Icon#88 ReptyroMammorest Icon#90 Mammorest
Reptyro Icon#88 ReptyroMammorest Cryst Icon#90B Mammorest Cryst
Kingpaca Icon#89 KingpacaAstegon Icon#98 Astegon
Kingpaca Icon#89 KingpacaOrserk Icon#106 Orserk
Mammorest Icon#90 MammorestJormuntide Ignis Icon#101B Jormuntide Ignis
Wumpo Icon#91 WumpoAstegon Icon#98 Astegon
Wumpo Botan Icon#91B Wumpo BotanOrserk Icon#106 Orserk
Quivern Icon#95 QuivernMenasting Icon#99 Menasting
Anubis Icon#100 AnubisSuzaku Icon#102 Suzaku
Lyleen Icon#104 LyleenFaleris Icon#105 Faleris

Jormuntide Combinaciones de Cría

A continuación se muestra la lista de todas las posibles combinaciones de cría de Jormuntide. Esto significa que al combinar Jormuntide con cualquiera de los Pals listados a continuación, obtendrás el Pal hijo especificado. El género de los padres es inconsecuente siempre y cuando tengan diferentes géneros.

Padre 1Padre 2Hijo
Foxparks Icon#5 FoxparksJormuntide Icon#101 JormuntideDigtoise Icon#67 Digtoise
Hoocrates Icon#15 HoocratesJormuntide Icon#101 JormuntideDigtoise Icon#67 Digtoise
Depresso Icon#17 DepressoJormuntide Icon#101 JormuntideDigtoise Icon#67 Digtoise
Killamari Icon#23 KillamariJormuntide Icon#101 JormuntideChillet Icon#55 Chillet
Vixy Icon#14 VixyJormuntide Icon#101 JormuntideReindrix Icon#59 Reindrix
Cremis Icon#18 CremisJormuntide Icon#101 JormuntideReindrix Icon#59 Reindrix
Mau Cryst Icon#24B Mau CrystJormuntide Icon#101 JormuntideReindrix Icon#59 Reindrix
Lifmunk Icon#4 LifmunkJormuntide Icon#101 JormuntideCelaray Icon#25 Celaray
Hangyu Cryst Icon#32B Hangyu CrystJormuntide Icon#101 JormuntideCelaray Icon#25 Celaray
Mau Icon#24 MauJormuntide Icon#101 JormuntideDumud Icon#43 Dumud
Haz clic aquí para mostrar las combinaciones de cría restantes 91
Lamball Icon#1 LamballJormuntide Icon#101 JormuntideMelpaca Icon#36 Melpaca
Cattiva Icon#2 CattivaJormuntide Icon#101 JormuntideMelpaca Icon#36 Melpaca
Rooby Icon#9 RoobyJormuntide Icon#101 JormuntideRayhound Icon#60 Rayhound
Leezpunk Ignis Icon#45B Leezpunk IgnisJormuntide Icon#101 JormuntideRayhound Icon#60 Rayhound
Maraith Icon#66 MaraithJormuntide Icon#101 JormuntideRayhound Icon#60 Rayhound
Wixen Icon#76 WixenJormuntide Icon#101 JormuntideRayhound Icon#60 Rayhound
Pengullet Icon#10 PengulletJormuntide Icon#101 JormuntideKitsun Icon#61 Kitsun
Jolthog Cryst Icon#12B Jolthog CrystJormuntide Icon#101 JormuntideKitsun Icon#61 Kitsun
Tocotoco Icon#27 TocotocoJormuntide Icon#101 JormuntideKitsun Icon#61 Kitsun
Sparkit Icon#7 SparkitJormuntide Icon#101 JormuntideBroncherry Icon#86 Broncherry
Hangyu Icon#32 HangyuJormuntide Icon#101 JormuntideBroncherry Icon#86 Broncherry
Flambelle Icon#70 FlambelleJormuntide Icon#101 JormuntideBroncherry Icon#86 Broncherry
Daedream Icon#19 DaedreamJormuntide Icon#101 JormuntideFoxcicle Icon#57 Foxcicle
Fuddler Icon#22 FuddlerJormuntide Icon#101 JormuntideFoxcicle Icon#57 Foxcicle
Dazzi Icon#62 DazziJormuntide Icon#101 JormuntideFoxcicle Icon#57 Foxcicle
Nox Icon#21 NoxJormuntide Icon#101 JormuntideTombat Icon#68 Tombat
Woolipop Icon#34 WoolipopJormuntide Icon#101 JormuntideTombat Icon#68 Tombat
Tanzee Icon#8 TanzeeJormuntide Icon#101 JormuntidePetallia Icon#87 Petallia
Gumoss Icon#13 GumossJormuntide Icon#101 JormuntidePetallia Icon#87 Petallia
Flopie Icon#28 FlopieJormuntide Icon#101 JormuntideArsox Icon#42 Arsox
Kelpsea Icon#81 KelpseaJormuntide Icon#101 JormuntideArsox Icon#42 Arsox
Kelpsea Ignis Icon#81B Kelpsea IgnisJormuntide Icon#101 JormuntideArsox Icon#42 Arsox
Fuack Icon#6 FuackJormuntide Icon#101 JormuntideDinossom Icon#64 Dinossom
Bristla Icon#30 BristlaJormuntide Icon#101 JormuntideDinossom Icon#64 Dinossom
Rushoar Icon#20 RushoarJormuntide Icon#101 JormuntideBlazehowl Icon#84 Blazehowl
Gobfin Ignis Icon#31B Gobfin IgnisJormuntide Icon#101 JormuntideBlazehowl Icon#84 Blazehowl
Leezpunk Icon#45 LeezpunkJormuntide Icon#101 JormuntideBlazehowl Icon#84 Blazehowl
Lunaris Icon#63 LunarisJormuntide Icon#101 JormuntideBlazehowl Icon#84 Blazehowl
Direhowl Icon#26 DirehowlJormuntide Icon#101 JormuntideUnivolt Icon#56 Univolt
Gorirat Icon#49 GoriratJormuntide Icon#101 JormuntideUnivolt Icon#56 Univolt
Beegarde Icon#50 BeegardeJormuntide Icon#101 JormuntideUnivolt Icon#56 Univolt
Vaelet Icon#78 VaeletJormuntide Icon#101 JormuntideUnivolt Icon#56 Univolt
Gobfin Icon#31 GobfinJormuntide Icon#101 JormuntideKatress Icon#75 Katress
Cawgnito Icon#44 CawgnitoJormuntide Icon#101 JormuntideKatress Icon#75 Katress
Robinquill Icon#48 RobinquillJormuntide Icon#101 JormuntideVanwyrm Icon#71 Vanwyrm
Robinquill Terra Icon#48B Robinquill TerraJormuntide Icon#101 JormuntideVanwyrm Icon#71 Vanwyrm
Verdash Icon#77 VerdashJormuntide Icon#101 JormuntideVanwyrm Icon#71 Vanwyrm
Felbat Icon#94 FelbatJormuntide Icon#101 JormuntideVanwyrm Icon#71 Vanwyrm
Fenglope Icon#93 FenglopeJormuntide Icon#101 JormuntideBushi Icon#72 Bushi
Celaray Icon#25 CelarayJormuntide Icon#101 JormuntideIncineram Icon#40 Incineram
Melpaca Icon#36 MelpacaJormuntide Icon#101 JormuntideIncineram Icon#40 Incineram
Eikthyrdeer Terra Icon#37B Eikthyrdeer TerraJormuntide Icon#101 JormuntideIncineram Icon#40 Incineram
Dumud Icon#43 DumudJormuntide Icon#101 JormuntideIncineram Icon#40 Incineram
Reindrix Icon#59 ReindrixJormuntide Icon#101 JormuntideIncineram Icon#40 Incineram
Broncherry Icon#86 BroncherryJormuntide Icon#101 JormuntideIncineram Icon#40 Incineram
Vanwyrm Icon#71 VanwyrmJormuntide Icon#101 JormuntideWumpo Botan Icon#91B Wumpo Botan
Bushi Icon#72 BushiJormuntide Icon#101 JormuntideWumpo Botan Icon#91B Wumpo Botan
Incineram Icon#40 IncineramJormuntide Icon#101 JormuntideSibelyx Icon#79 Sibelyx
Incineram Noct Icon#40B Incineram NoctJormuntide Icon#101 JormuntideSibelyx Icon#79 Sibelyx
Chillet Icon#55 ChilletJormuntide Icon#101 JormuntideSurfent Icon#65 Surfent
Dinossom Lux Icon#64B Dinossom LuxJormuntide Icon#101 JormuntideSurfent Icon#65 Surfent
Univolt Icon#56 UnivoltJormuntide Icon#101 JormuntideAzurobe Icon#82 Azurobe
Katress Icon#75 KatressJormuntide Icon#101 JormuntideAzurobe Icon#82 Azurobe
Penking Icon#11 PenkingJormuntide Icon#101 JormuntideNitewing Icon#38 Nitewing
Elphidran Icon#80 ElphidranJormuntide Icon#101 JormuntideNitewing Icon#38 Nitewing
Elphidran Aqua Icon#80B Elphidran AquaJormuntide Icon#101 JormuntideNitewing Icon#38 Nitewing
Vanwyrm Cryst Icon#71B Vanwyrm CrystJormuntide Icon#101 JormuntideWumpo Icon#91 Wumpo
Sibelyx Icon#79 SibelyxJormuntide Icon#101 JormuntideRagnahawk Icon#74 Ragnahawk
Foxcicle Icon#57 FoxcicleJormuntide Icon#101 JormuntideElphidran Icon#80 Elphidran
Petallia Icon#87 PetalliaJormuntide Icon#101 JormuntideElphidran Icon#80 Elphidran
Kitsun Icon#61 KitsunJormuntide Icon#101 JormuntideAnubis Icon#100 Anubis
Dinossom Icon#64 DinossomJormuntide Icon#101 JormuntideAnubis Icon#100 Anubis
Broncherry Aqua Icon#86B Broncherry AquaJormuntide Icon#101 JormuntideAnubis Icon#100 Anubis
Blazehowl Icon#84 BlazehowlJormuntide Icon#101 JormuntideGrintale Icon#52 Grintale
Elizabee Icon#51 ElizabeeJormuntide Icon#101 JormuntideReptyro Icon#88 Reptyro
Warsect  Icon#92 Warsect Jormuntide Icon#101 JormuntideReptyro Icon#88 Reptyro
Grintale Icon#52 GrintaleJormuntide Icon#101 JormuntideSweepa Icon#54 Sweepa
Azurobe Icon#82 AzurobeJormuntide Icon#101 JormuntideSweepa Icon#54 Sweepa
Blazehowl Noct Icon#84B Blazehowl NoctJormuntide Icon#101 JormuntideCinnamoth Icon#41 Cinnamoth
Surfent Icon#65 SurfentJormuntide Icon#101 JormuntideMossanda Icon#33 Mossanda
Surfent Terra Icon#65B Surfent TerraJormuntide Icon#101 JormuntideMossanda Icon#33 Mossanda
Nitewing Icon#38 NitewingJormuntide Icon#101 JormuntidePyrin Icon#58 Pyrin
Sweepa Icon#54 SweepaJormuntide Icon#101 JormuntidePyrin Icon#58 Pyrin
Pyrin Icon#58 PyrinJormuntide Icon#101 JormuntideElizabee Icon#51 Elizabee
Quivern Icon#95 QuivernJormuntide Icon#101 JormuntideElizabee Icon#51 Elizabee
Pyrin Noct Icon#58B Pyrin NoctJormuntide Icon#101 JormuntideRelaxaurus Icon#85 Relaxaurus
Menasting Icon#99 MenastingJormuntide Icon#101 JormuntideRelaxaurus Icon#85 Relaxaurus
Jormuntide Icon#101 JormuntideLyleen Icon#104 LyleenRelaxaurus Icon#85 Relaxaurus
Relaxaurus Icon#85 RelaxaurusJormuntide Icon#101 JormuntideMammorest Icon#90 Mammorest
Mammorest Cryst Icon#90B Mammorest CrystJormuntide Icon#101 JormuntideMammorest Icon#90 Mammorest
Mossanda Lux Icon#33B Mossanda LuxJormuntide Icon#101 JormuntideQuivern Icon#95 Quivern
Cryolinx Icon#83 CryolinxJormuntide Icon#101 JormuntideBeakon Icon#73 Beakon
Ragnahawk Icon#74 RagnahawkJormuntide Icon#101 JormuntideWarsect  Icon#92 Warsect
Jormuntide Icon#101 JormuntideFaleris Icon#105 FalerisWarsect  Icon#92 Warsect
Jormuntide Icon#101 JormuntideLyleen Noct Icon#104B Lyleen NoctMenasting Icon#99 Menasting
Blazamut Icon#96 BlazamutJormuntide Icon#101 JormuntideAstegon Icon#98 Astegon
Jormuntide Icon#101 JormuntideSuzaku Aqua Icon#102B Suzaku AquaAstegon Icon#98 Astegon
Jormuntide Icon#101 JormuntideSuzaku Icon#102 SuzakuHelzephyr Icon#97 Helzephyr
Jormuntide Icon#101 JormuntideShadowbeak Icon#107 ShadowbeakHelzephyr Icon#97 Helzephyr
Jormuntide Icon#101 JormuntideNecromus Icon#109 NecromusHelzephyr Icon#97 Helzephyr
Suzaku Icon#102 SuzakuJormuntide Icon#101 JormuntideSuzaku Aqua Icon#102B Suzaku Aqua

Palworld Jormuntide Técnicas activas & Técnicas pasivas

Jormuntide tiene 7 habilidades activas además de su habilidad de pareja principal Dragón marino invocatormentas.

Nombre de TécnicaDescripción de TécnicaNivel de Desbloqueo
Disparo acuosoDispara balas de agua que vuelan directas hacia el rival.1
DracocañónLanza balas de energía dragontina contra el rival.7
Aliento dragontinoLanza un poderoso aliento dragontino delante de él e inflige daño continuo al rival.15
Bomba de aguaCrea una enorme bola de agua sobre su cabeza y la lanza contra el rival.22
Rayo tripleProvoca la caída de 3 rayos por encima de la cabeza del rival.30
Torrente de aguaLibera un torrente de agua delante de él que arrasa con todo.40
MeteodragónInvoca muchos meteoritos pequeños y los lanza contra el rival.50

Jormuntide tiene Técnicas Pasivas por defecto al ser capturado en estado salvaje. Aquí tienes una lista de ellas.

Nombre de TécnicaDescripción de Técnica
ReinamaresAumenta el daño de los ataques de agua en un 20 %
Ver esta página en: US flag icon DE flag icon
TAGS
Author Gosu No0b profile picture
Written by:
Sometimes articles on our website are a team effort. Such articles are published under the Gosu Noob author and that means the thing you are reading was created by the whole crew.

YOU MAY ALSO READ

CLICK TO POST A COMMENT