Jormuntide Breeding Combos, Location, Drops and Skills | Palworld

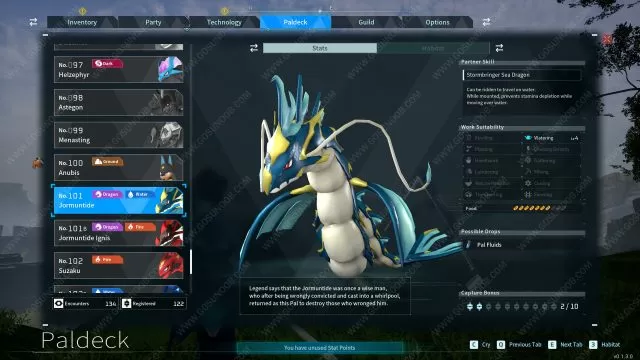
Jormuntide is a Dragon and Water Pal in Palworld. Legend says that the Jormuntide was once a wise man, who after being wrongly convicted and cast into a whirlpool, returned as this Pal to destroy those who wronged him.

▼Article Continues Below ▼
Palworld Jormuntide
Jormuntide screenshot by Gosunoob.com ©
Jormuntide Palworld Paldeck Pal Icon
Paldeck No.#101
ElementPal Element Dragon IconPal Element Water Icon
Work Suitability
  • Watering Lv. 4
Partner
Skill
Stormbringer Sea Dragon
Can be ridden to travel on water. While mounted, prevents stamina depletion while moving over water.
Stats
Health130
Attack120
Defense100
Food7/10

Possible Drops

Jormuntide has 1 drop. These are usually crafting materials. Some Pals also drop upgrade items or even weapons.

  • 2-4x Pal Fluids 100%

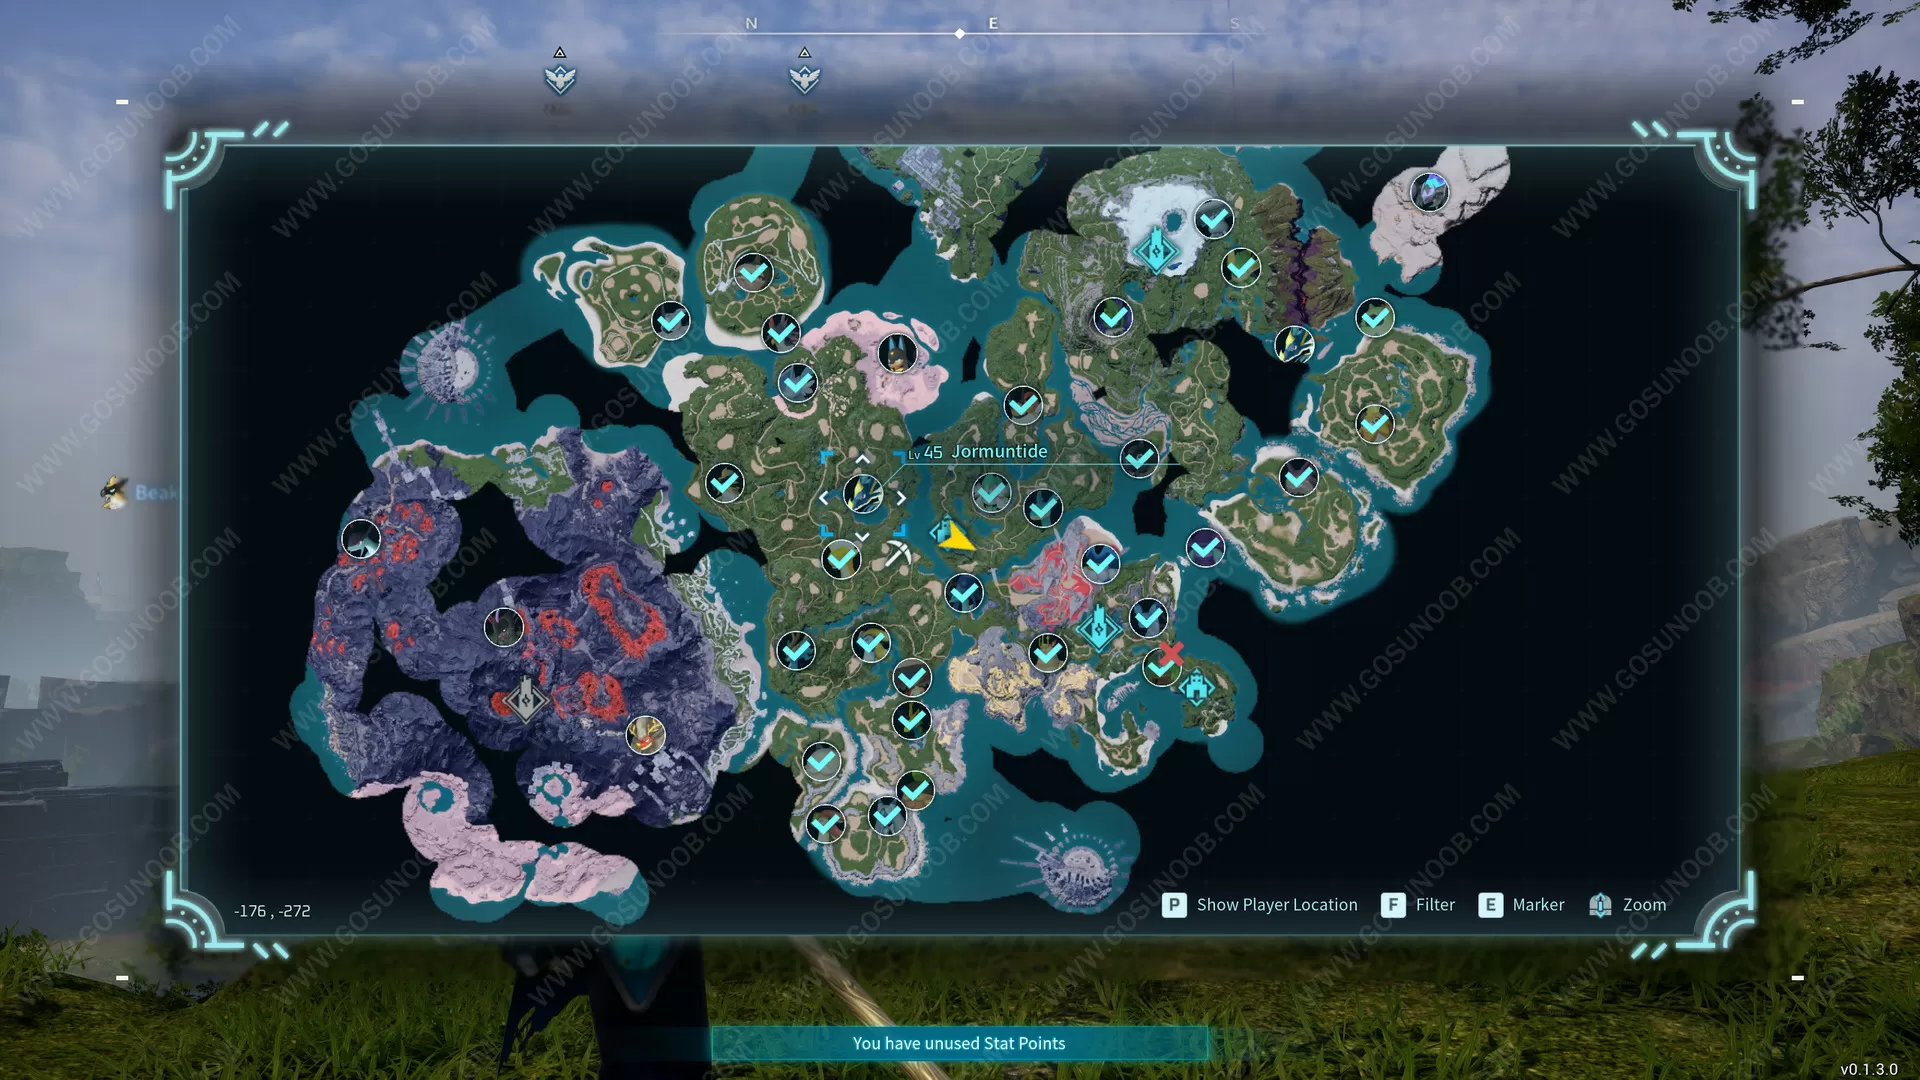
Jormuntide Location – Where to Find and Capture Jormuntide in Palworld?

Some Pals can be found only during nighttime. Others are available only as bosses. Some rare Pals become available in Wildlife Sanctuaries after you defeat them as bosses. The screenshot of the map below shows orange dots for daytime pals, blue dots for nighttime pals, and map locations for bosses.

Jormuntide Map Location in Palworld
Screenshot captured by Gosunoob.com ©

How to Get Jormuntide from Breeding?

There are 44 ways to breed Jormuntide. Bellow are the first 10 of them listed. You need the parents to be of different genders and be the specified Pals.

Parent 1Parent 2
Penking Icon#11 PenkingFrostallion Noct Icon#110B Frostallion Noct
Penking Icon#11 PenkingJetragon Icon#111 Jetragon
Mossanda Icon#33 MossandaHelzephyr Icon#97 Helzephyr
Mossanda Lux Icon#33B Mossanda LuxBeakon Icon#73 Beakon
Mossanda Lux Icon#33B Mossanda LuxIce Reptyro Icon#88B Ice Reptyro
Nitewing Icon#38 NitewingHelzephyr Icon#97 Helzephyr
Nitewing Icon#38 NitewingGrizzbolt Icon#103 Grizzbolt
Incineram Icon#40 IncineramSuzaku Aqua Icon#102B Suzaku Aqua
Incineram Noct Icon#40B Incineram NoctSuzaku Aqua Icon#102B Suzaku Aqua
Cinnamoth Icon#41 CinnamothCryolinx Icon#83 Cryolinx
Click here to show the remaining 33 breeding combos
Cinnamoth Icon#41 CinnamothFrostallion Icon#110 Frostallion
Elizabee Icon#51 ElizabeeRelaxaurus Icon#85 Relaxaurus
Elizabee Icon#51 ElizabeeMammorest Cryst Icon#90B Mammorest Cryst
Grintale Icon#52 GrintaleFrostallion Noct Icon#110B Frostallion Noct
Sweepa Icon#54 SweepaGrizzbolt Icon#103 Grizzbolt
Sweepa Icon#54 SweepaLyleen Noct Icon#104B Lyleen Noct
Pyrin Icon#58 PyrinMenasting Icon#99 Menasting
Pyrin Icon#58 PyrinLyleen Icon#104 Lyleen
Pyrin Noct Icon#58B Pyrin NoctRagnahawk Icon#74 Ragnahawk
Pyrin Noct Icon#58B Pyrin NoctFaleris Icon#105 Faleris
Surfent Icon#65 SurfentSuzaku Icon#102 Suzaku
Surfent Icon#65 SurfentShadowbeak Icon#107 Shadowbeak
Surfent Terra Icon#65B Surfent TerraShadowbeak Icon#107 Shadowbeak
Surfent Terra Icon#65B Surfent TerraNecromus Icon#109 Necromus
Ragnahawk Icon#74 RagnahawkIce Reptyro Icon#88B Ice Reptyro
Elphidran Icon#80 ElphidranPaladius Icon#108 Paladius
Elphidran Icon#80 ElphidranNecromus Icon#109 Necromus
Elphidran Aqua Icon#80B Elphidran AquaPaladius Icon#108 Paladius
Elphidran Aqua Icon#80B Elphidran AquaJetragon Icon#111 Jetragon
Azurobe Icon#82 AzurobeFrostallion Icon#110 Frostallion
Cryolinx Icon#83 CryolinxWumpo Botan Icon#91B Wumpo Botan
Relaxaurus Icon#85 RelaxaurusWarsect  Icon#92 Warsect
Relaxaurus Lux Icon#85B Relaxaurus LuxWarsect  Icon#92 Warsect
Relaxaurus Lux Icon#85B Relaxaurus LuxQuivern Icon#95 Quivern
Reptyro Icon#88 ReptyroMammorest Icon#90 Mammorest
Reptyro Icon#88 ReptyroMammorest Cryst Icon#90B Mammorest Cryst
Kingpaca Icon#89 KingpacaAstegon Icon#98 Astegon
Kingpaca Icon#89 KingpacaOrserk Icon#106 Orserk
Mammorest Icon#90 MammorestJormuntide Ignis Icon#101B Jormuntide Ignis
Wumpo Icon#91 WumpoAstegon Icon#98 Astegon
Wumpo Botan Icon#91B Wumpo BotanOrserk Icon#106 Orserk
Quivern Icon#95 QuivernMenasting Icon#99 Menasting
Anubis Icon#100 AnubisSuzaku Icon#102 Suzaku
Lyleen Icon#104 LyleenFaleris Icon#105 Faleris

Jormuntide Breeding Combos

Bellow is the list of all possible Jormuntide breeding combos. This means that when you combine Jormuntide with any of the bellow listed Pals you’ll get the specified child Pal. Gender of parents is inconsequential as long as they have different genders.

Parent 1Parent 2Child
Foxparks Icon#5 FoxparksJormuntide Icon#101 JormuntideDigtoise Icon#67 Digtoise
Hoocrates Icon#15 HoocratesJormuntide Icon#101 JormuntideDigtoise Icon#67 Digtoise
Depresso Icon#17 DepressoJormuntide Icon#101 JormuntideDigtoise Icon#67 Digtoise
Killamari Icon#23 KillamariJormuntide Icon#101 JormuntideChillet Icon#55 Chillet
Vixy Icon#14 VixyJormuntide Icon#101 JormuntideReindrix Icon#59 Reindrix
Cremis Icon#18 CremisJormuntide Icon#101 JormuntideReindrix Icon#59 Reindrix
Mau Cryst Icon#24B Mau CrystJormuntide Icon#101 JormuntideReindrix Icon#59 Reindrix
Lifmunk Icon#4 LifmunkJormuntide Icon#101 JormuntideCelaray Icon#25 Celaray
Hangyu Cryst Icon#32B Hangyu CrystJormuntide Icon#101 JormuntideCelaray Icon#25 Celaray
Mau Icon#24 MauJormuntide Icon#101 JormuntideDumud Icon#43 Dumud
Click here to show the remaining 91 breeding combos
Lamball Icon#1 LamballJormuntide Icon#101 JormuntideMelpaca Icon#36 Melpaca
Cattiva Icon#2 CattivaJormuntide Icon#101 JormuntideMelpaca Icon#36 Melpaca
Rooby Icon#9 RoobyJormuntide Icon#101 JormuntideRayhound Icon#60 Rayhound
Leezpunk Ignis Icon#45B Leezpunk IgnisJormuntide Icon#101 JormuntideRayhound Icon#60 Rayhound
Maraith Icon#66 MaraithJormuntide Icon#101 JormuntideRayhound Icon#60 Rayhound
Wixen Icon#76 WixenJormuntide Icon#101 JormuntideRayhound Icon#60 Rayhound
Pengullet Icon#10 PengulletJormuntide Icon#101 JormuntideKitsun Icon#61 Kitsun
Jolthog Cryst Icon#12B Jolthog CrystJormuntide Icon#101 JormuntideKitsun Icon#61 Kitsun
Tocotoco Icon#27 TocotocoJormuntide Icon#101 JormuntideKitsun Icon#61 Kitsun
Sparkit Icon#7 SparkitJormuntide Icon#101 JormuntideBroncherry Icon#86 Broncherry
Hangyu Icon#32 HangyuJormuntide Icon#101 JormuntideBroncherry Icon#86 Broncherry
Flambelle Icon#70 FlambelleJormuntide Icon#101 JormuntideBroncherry Icon#86 Broncherry
Daedream Icon#19 DaedreamJormuntide Icon#101 JormuntideFoxcicle Icon#57 Foxcicle
Fuddler Icon#22 FuddlerJormuntide Icon#101 JormuntideFoxcicle Icon#57 Foxcicle
Dazzi Icon#62 DazziJormuntide Icon#101 JormuntideFoxcicle Icon#57 Foxcicle
Nox Icon#21 NoxJormuntide Icon#101 JormuntideTombat Icon#68 Tombat
Woolipop Icon#34 WoolipopJormuntide Icon#101 JormuntideTombat Icon#68 Tombat
Tanzee Icon#8 TanzeeJormuntide Icon#101 JormuntidePetallia Icon#87 Petallia
Gumoss Icon#13 GumossJormuntide Icon#101 JormuntidePetallia Icon#87 Petallia
Flopie Icon#28 FlopieJormuntide Icon#101 JormuntideArsox Icon#42 Arsox
Kelpsea Icon#81 KelpseaJormuntide Icon#101 JormuntideArsox Icon#42 Arsox
Kelpsea Ignis Icon#81B Kelpsea IgnisJormuntide Icon#101 JormuntideArsox Icon#42 Arsox
Fuack Icon#6 FuackJormuntide Icon#101 JormuntideDinossom Icon#64 Dinossom
Bristla Icon#30 BristlaJormuntide Icon#101 JormuntideDinossom Icon#64 Dinossom
Rushoar Icon#20 RushoarJormuntide Icon#101 JormuntideBlazehowl Icon#84 Blazehowl
Gobfin Ignis Icon#31B Gobfin IgnisJormuntide Icon#101 JormuntideBlazehowl Icon#84 Blazehowl
Leezpunk Icon#45 LeezpunkJormuntide Icon#101 JormuntideBlazehowl Icon#84 Blazehowl
Lunaris Icon#63 LunarisJormuntide Icon#101 JormuntideBlazehowl Icon#84 Blazehowl
Direhowl Icon#26 DirehowlJormuntide Icon#101 JormuntideUnivolt Icon#56 Univolt
Gorirat Icon#49 GoriratJormuntide Icon#101 JormuntideUnivolt Icon#56 Univolt
Beegarde Icon#50 BeegardeJormuntide Icon#101 JormuntideUnivolt Icon#56 Univolt
Vaelet Icon#78 VaeletJormuntide Icon#101 JormuntideUnivolt Icon#56 Univolt
Gobfin Icon#31 GobfinJormuntide Icon#101 JormuntideKatress Icon#75 Katress
Cawgnito Icon#44 CawgnitoJormuntide Icon#101 JormuntideKatress Icon#75 Katress
Robinquill Icon#48 RobinquillJormuntide Icon#101 JormuntideVanwyrm Icon#71 Vanwyrm
Robinquill Terra Icon#48B Robinquill TerraJormuntide Icon#101 JormuntideVanwyrm Icon#71 Vanwyrm
Verdash Icon#77 VerdashJormuntide Icon#101 JormuntideVanwyrm Icon#71 Vanwyrm
Felbat Icon#94 FelbatJormuntide Icon#101 JormuntideVanwyrm Icon#71 Vanwyrm
Fenglope Icon#93 FenglopeJormuntide Icon#101 JormuntideBushi Icon#72 Bushi
Celaray Icon#25 CelarayJormuntide Icon#101 JormuntideIncineram Icon#40 Incineram
Melpaca Icon#36 MelpacaJormuntide Icon#101 JormuntideIncineram Icon#40 Incineram
Eikthyrdeer Terra Icon#37B Eikthyrdeer TerraJormuntide Icon#101 JormuntideIncineram Icon#40 Incineram
Dumud Icon#43 DumudJormuntide Icon#101 JormuntideIncineram Icon#40 Incineram
Reindrix Icon#59 ReindrixJormuntide Icon#101 JormuntideIncineram Icon#40 Incineram
Broncherry Icon#86 BroncherryJormuntide Icon#101 JormuntideIncineram Icon#40 Incineram
Vanwyrm Icon#71 VanwyrmJormuntide Icon#101 JormuntideWumpo Botan Icon#91B Wumpo Botan
Bushi Icon#72 BushiJormuntide Icon#101 JormuntideWumpo Botan Icon#91B Wumpo Botan
Incineram Icon#40 IncineramJormuntide Icon#101 JormuntideSibelyx Icon#79 Sibelyx
Incineram Noct Icon#40B Incineram NoctJormuntide Icon#101 JormuntideSibelyx Icon#79 Sibelyx
Chillet Icon#55 ChilletJormuntide Icon#101 JormuntideSurfent Icon#65 Surfent
Dinossom Lux Icon#64B Dinossom LuxJormuntide Icon#101 JormuntideSurfent Icon#65 Surfent
Univolt Icon#56 UnivoltJormuntide Icon#101 JormuntideAzurobe Icon#82 Azurobe
Katress Icon#75 KatressJormuntide Icon#101 JormuntideAzurobe Icon#82 Azurobe
Penking Icon#11 PenkingJormuntide Icon#101 JormuntideNitewing Icon#38 Nitewing
Elphidran Icon#80 ElphidranJormuntide Icon#101 JormuntideNitewing Icon#38 Nitewing
Elphidran Aqua Icon#80B Elphidran AquaJormuntide Icon#101 JormuntideNitewing Icon#38 Nitewing
Vanwyrm Cryst Icon#71B Vanwyrm CrystJormuntide Icon#101 JormuntideWumpo Icon#91 Wumpo
Sibelyx Icon#79 SibelyxJormuntide Icon#101 JormuntideRagnahawk Icon#74 Ragnahawk
Foxcicle Icon#57 FoxcicleJormuntide Icon#101 JormuntideElphidran Icon#80 Elphidran
Petallia Icon#87 PetalliaJormuntide Icon#101 JormuntideElphidran Icon#80 Elphidran
Kitsun Icon#61 KitsunJormuntide Icon#101 JormuntideAnubis Icon#100 Anubis
Dinossom Icon#64 DinossomJormuntide Icon#101 JormuntideAnubis Icon#100 Anubis
Broncherry Aqua Icon#86B Broncherry AquaJormuntide Icon#101 JormuntideAnubis Icon#100 Anubis
Blazehowl Icon#84 BlazehowlJormuntide Icon#101 JormuntideGrintale Icon#52 Grintale
Elizabee Icon#51 ElizabeeJormuntide Icon#101 JormuntideReptyro Icon#88 Reptyro
Warsect  Icon#92 Warsect Jormuntide Icon#101 JormuntideReptyro Icon#88 Reptyro
Grintale Icon#52 GrintaleJormuntide Icon#101 JormuntideSweepa Icon#54 Sweepa
Azurobe Icon#82 AzurobeJormuntide Icon#101 JormuntideSweepa Icon#54 Sweepa
Blazehowl Noct Icon#84B Blazehowl NoctJormuntide Icon#101 JormuntideCinnamoth Icon#41 Cinnamoth
Surfent Icon#65 SurfentJormuntide Icon#101 JormuntideMossanda Icon#33 Mossanda
Surfent Terra Icon#65B Surfent TerraJormuntide Icon#101 JormuntideMossanda Icon#33 Mossanda
Nitewing Icon#38 NitewingJormuntide Icon#101 JormuntidePyrin Icon#58 Pyrin
Sweepa Icon#54 SweepaJormuntide Icon#101 JormuntidePyrin Icon#58 Pyrin
Pyrin Icon#58 PyrinJormuntide Icon#101 JormuntideElizabee Icon#51 Elizabee
Quivern Icon#95 QuivernJormuntide Icon#101 JormuntideElizabee Icon#51 Elizabee
Pyrin Noct Icon#58B Pyrin NoctJormuntide Icon#101 JormuntideRelaxaurus Icon#85 Relaxaurus
Menasting Icon#99 MenastingJormuntide Icon#101 JormuntideRelaxaurus Icon#85 Relaxaurus
Jormuntide Icon#101 JormuntideLyleen Icon#104 LyleenRelaxaurus Icon#85 Relaxaurus
Relaxaurus Icon#85 RelaxaurusJormuntide Icon#101 JormuntideMammorest Icon#90 Mammorest
Mammorest Cryst Icon#90B Mammorest CrystJormuntide Icon#101 JormuntideMammorest Icon#90 Mammorest
Mossanda Lux Icon#33B Mossanda LuxJormuntide Icon#101 JormuntideQuivern Icon#95 Quivern
Cryolinx Icon#83 CryolinxJormuntide Icon#101 JormuntideBeakon Icon#73 Beakon
Ragnahawk Icon#74 RagnahawkJormuntide Icon#101 JormuntideWarsect  Icon#92 Warsect
Jormuntide Icon#101 JormuntideFaleris Icon#105 FalerisWarsect  Icon#92 Warsect
Jormuntide Icon#101 JormuntideLyleen Noct Icon#104B Lyleen NoctMenasting Icon#99 Menasting
Blazamut Icon#96 BlazamutJormuntide Icon#101 JormuntideAstegon Icon#98 Astegon
Jormuntide Icon#101 JormuntideSuzaku Aqua Icon#102B Suzaku AquaAstegon Icon#98 Astegon
Jormuntide Icon#101 JormuntideSuzaku Icon#102 SuzakuHelzephyr Icon#97 Helzephyr
Jormuntide Icon#101 JormuntideShadowbeak Icon#107 ShadowbeakHelzephyr Icon#97 Helzephyr
Jormuntide Icon#101 JormuntideNecromus Icon#109 NecromusHelzephyr Icon#97 Helzephyr
Suzaku Icon#102 SuzakuJormuntide Icon#101 JormuntideSuzaku Aqua Icon#102B Suzaku Aqua

Palworld Jormuntide Active Skills & Passive Skills

Jormuntide has 7 active skills beside his primary partner skill Stormbringer Sea Dragon.

Skill NameSkill DescriptionUnlock Lv.
Aqua GunHurls a ball of water straight at an enemy.1
Dragon CannonHurls an energy ball imbued with draconic energy at an enemy.7
Draconic BreathExhales breath imbued with draconic energy, dealing continuous damage to those in front of it.15
Aqua BurstCreates a giant ball of water and hurls it at an enemy.22
Tri-LightningGenerates lightning that strikes an enemy three times from above.30
Hydro LaserShoots pressurized water at extreme velocities, sweeping over a wide area in front of it.40
Dragon MeteorCalls down numerous small meteorites and launches them at an enemy.50

Jormuntide has Passive Skills by default when captured in the wild. Here’s a list of them.

Skill NameSkill Description
Lord of the Sea20% increase to Water attack damage.
See this page in: DE flag icon ES flag icon

YOU MAY ALSO READ

CLICK TO POST A COMMENT