Dishonored 2 Safe Combinations
Mission 3: The Good Doctor
Name: Vasko’s Monitor Safe
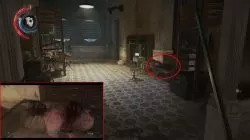
Safe location: On the second floor of the Addermire Institute. Once you exit the elevator, go left.Combination location: After you talk to Hypatia, look around. You’ll find a badly injured man on a stretcher. Talk to him, and he’ll tell you the combination.
Rewards: Vasco’s journal, Addermire solution
Click here to watch the video walkthrough for Mission 3: Vasko’s Monitor Safe Combination
Name: Steel Monitor Safe
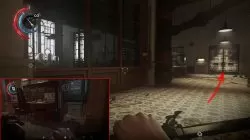
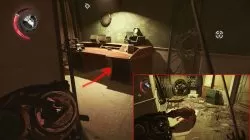
Safe location: Go to the lobby of the Addermire Institute. Walk towards the consultation area on the right. Teleport onto the balcony and head left. You’ll find the safe in the large office.Combination location: On a desk on the other side of the office.
Rewards: Combat sleep dart blueprint, Copper wire, Silver ingot
Thanks to Jacob for the additional info.
Click here to watch the video walkthrough for Mission 3: Near the main entrance Safe Combination
Mission 4: The Clockwork Mansion Safe Code Location
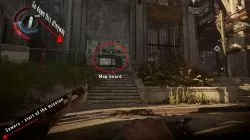
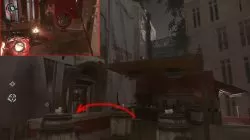
Name: Lower Aventa District safe
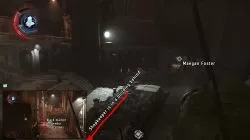
Safe location: As you start the mission you’ll exit the sewers. To your left will be a large building with a map board. Left of the map board is an alleyway. Go down it until you reach a couple of people and enter the apartment building behind them. Up on the first floor you’ll find an office room with the safe (there’s a work desk and a chair inside as well.Combination location: There is a blackboard on the wall across the entrance into the office with the safe. Hidden behind a bottle and some glasses are two numbers. Put those two numbers into the safe lock and rotate the third wheel until you get the combination and open the safe.
Rewards: Gathering of the Regenters book, Lucky Sphalerite, 2xSilver ingot
Click here to watch the video walkthrough for Mission 4: The Clockwork Mansion (Lower District)

Mission 5: The Royal Conservatory
Name: Winslow Safe
Safe location: In the condemned building across the road from the conservatory’s main entrance. Climb the plateau with the bar and jump across the gap onto the balcony. As you enter, turn left and go into the office. You’ll see the safe there, by the wall. Expect a lot of bloodflies, and an infected enemy.Combination location: Go to the black market vendor in the area, and simply buy the combination from him.
Rewards: Pistol, Pistol ammo, 5x Silver ingot, Silver dust
Click here to watch the video walkthrough for Mission 5: The Royal Conservatory Safe combination
Mission 7: A Crack In The Slab
Name: Steel Monitor Safe
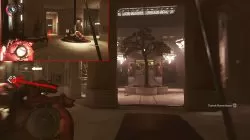
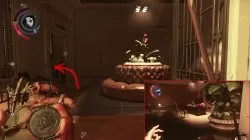
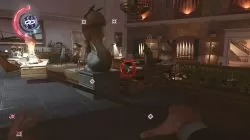
Safe location: When you reach the round foyer with the tree in the middle, jump to the past and turn left. Go past the steel door, then turn right. Go under the desk, all the way to the wall. Jump to the present, and you’ll be on the other side. Transition to the past, and you’ll see the safe in front of you.Combination location: While you’re in the room with the safe, in the past, pick up the wolfdog corpse. Throw it into the furnace and incinerate it. When you return to the present, you’ll see the safe door on the floor, without the bloodfly nest blocking it. Read the combination off of it.
Rewards: Bonecharm, Silver ingot, Coins, Konos star tables
Click here to watch the video walkthrough for Mission 7: A Crack in The Slab
Mission 8: The Grand Palace
Name: Steel Monitor Safe
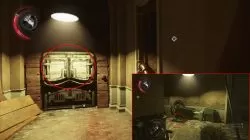
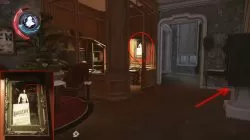
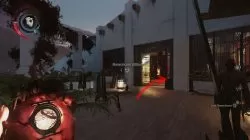
Safe location: When you’re in the courtyard with the giant tree, turn towards the big wooden wall. Enter the building next to it, on the left. Climb the stairs and use Shadow Walk/Possession to get into the apartment. The safe will be in the large room.Combination location: When you face the safe, turn around and go into the tiny workshop. Look to your right – there will be a black and white photo of a man with a safe. Look closely at the safe, and you’ll see the combination.
Rewards: Pistol, Pistol Bullets, Silver Ingot, Gold Ingot
Click here to watch the video walkthrough for Mission 8: The Grand Palace
Name: First Captain’s Safe
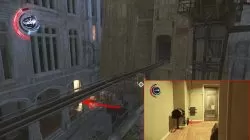
Safe location: In the First Captain’s Office. Enter the throne room from the terrace, and go into the foyer with the round bench. Take the left hallway and enter the office. The safe is behind the desk.Combination location: You’ll find it in the Duke’s office – it’s the room direclty under his suite. It’s on the desk to the left of the Duke’s desk, from where you enter.
Rewards: Rune
Click here to watch the video walkthrough for First Captain’s Safe Combination
If you happen upon any safes we don’t have on the list, feel free to share both their locations and where to find the combinations that’ll open them.
Pages: 1 2

The winslow safe in the royal conservatory,I bought the code at black market,went to safe,THEN,I did NOT have code,went back to the BM and after search found Geer wheel that opened water gate back at boat dock,found chain,after shooting Cain back at BM got into BM and robbed it,NEVER GOT INTO SAFE!! NO COLE ON this or any site worked, Has this been case for anyone else???
The first combination for any thing in a game descended from the System Shock linage is always 451. I didn’t even find the code behind the painting on mission 1 but I just entered 451. I just knew it would work.
There is a safe in the carriage station behind the wall of light in Clockwork Mansion. Not sure how to open yet
I got a safe and code is mission one. After you leave dunwal tower made the first kill from the air and have those 3 guys getting orders from a guard. Hold on to the left. Get inside the house. Kill one guard and there’s a safe in the room. Found the code behind the painting on the right. Safecode is 451
Thank you for the info
Where is code for safe 1st mission? before the ship
4-5-1 worked for me. 2 silver bars a gun and 3 bullets.
For the Addermire institute safe location The code for the safe is on the desk across from the door you enter from.
Here is a image http://imgur.com/a/SiP7u
Inside is Copper wire, Siver ingot, and the combat sleep dark formula.
Mission 4 – Clockwork Mansion: There’s a safe in a building off the side of an alley with a safe where the code is written on the wall behind some bottles in the hall right outside the room where the safe is in. For me, the code was 6-0-4.
Thanks for the input guys, we’ve changed the format and will include combination locations from now on.
Thank you!
Picked up a book in the vice overseers office and it gave me a mission clue that said “errand mind is structure 7. Wandering gaze is structure 1. And restless hands is structure 3. Types in 713 into the safe and it opened. Very strange way to find a code I must say.
The book on Strictures is just beside the safe. Input the corresponding number from the name into the safe.
Juss what this guy said, but my code was 753
How are you people finding the combo? Wtf
Not for all. In my game it was 053 and 173
Safe codes that are written in blue in notes are random. Note the locations of the safes and the code locations for those.
I found that the combination to the safe in the Vice Overseer’s office was 346. Not sure if this means that the combinations are randomised in Dishonored 2 or whether it is like the art dealer’s safe in Dishonored 1 where there are 5 or so possible combinations.
I’m pretty sure that the codes are different for everybody, I tried the combination you posted here for the Winslow safe and it didn’t work. Could you instead post how to find the code?
So I just figured this out – as soon as you walk into the shop, on the right hand side, there’s a cash register. Open that and the safe combination is in there!