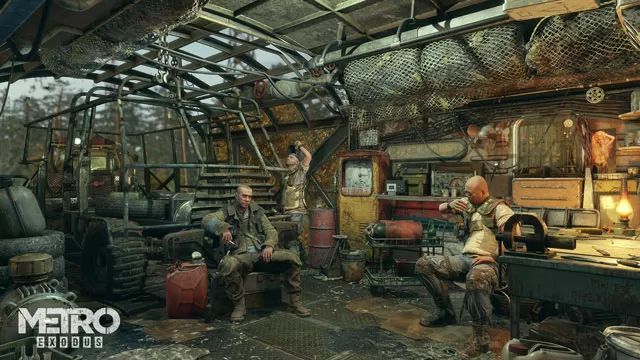
Metro Exodus Moscow Chapter 1 Diary Page Locations
Diary pages, or just diaries, are collectible documents you can find in Metro Exodus. In Chapter 1 of Metro Exodus, Moscow, there are ten diary collectibles to find. All of them are pretty well-hidden, and some of them you have to look for during really stressful situations. So, it’s pretty easy to miss some of the diaries in Metro Exodus Chapter 1 – Moscow. That being the case, our Metro Exodus Moscow Chapter 1 Diary Page Locations guide will show you where to find all the diaries during the first chapter of the game.
Where to Find Diary Collectible in Metro Exodus Chapter 1 – Moscow?
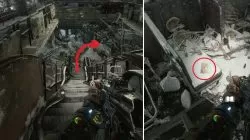
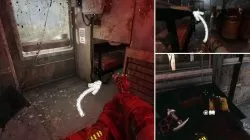
To find the Diaries in Chapter 1 of Metro Exodus, Moscow, you’ll have to explore the nooks and crannies of the game. You can find the first diary right after your first jump-scare encounter with a mutant. Walk down the track and turn right when you see the neon green mushrooms. You’ll see a lit desk in the corner, next to some lockers. The diary, called Half-Torn Notebook, is on the desk, next to some tools. The second diary, Patient File, is right there as you wake up in the medical ward. Look for it on the desk under a bookshelf on the right, next to a beaker on a plate.
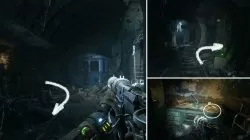

The third diary in Moscow, Dusty Diary, is easy to miss. As you and Anna walk into the building after observing the city, don’t follow her down the second flight of stairs. Instead, head down the corridor and into the apartment on the right. The diary is in the second room, on an orange file drawer, next to the couch, in the form of an envelope. For the fourth diary, head into the mall area and clear out the mutants. Before following Anna, examine the corpse at the door on the left. It’s holding a document called Shopping List.
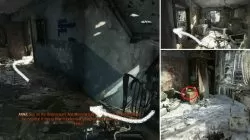
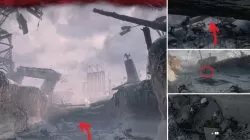
The location of the fifth diary is near the fourth one. Just as you walk down the escalator, walk into the bus on the right. Check the double seat with a skeleton sitting in one of them, and you’ll see Shura’s Note on the seat next to it. After the next sequence, crawl under the barrier, and approach the chunk of ground jutting out in the middle. You’ll see an almost-buried corpse at the base of the column, with a messenger bag next to it. Pick up the Crumpled Letter from the bag.
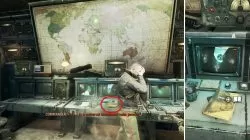
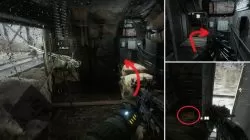
The next diary is waiting for you at the room with the “broadband radio jammer”. It’s the control room with the huge map and a bunch of blocky tech below it. The Official Note is smack in the center of the middle console. Our next target is after you sneak across the courtyard and enter through the red door. As you round the corner in the hallway, you’ll come across a desk. The Memo is on the left side of the desk.
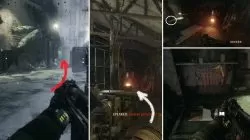
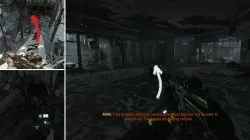
After you’ve jumped from train to train during the chase, and made your way inside the enemy train (into the red-lit room), crouch through the hole on the left. The Official Letter is on the table immediately on the left. Just make sure to get rid of the enemies first. After you’ve sneaked around a bunch of enemies further down the train, clear out the machine gun nest. As you enter the next train car, look to the right immediately, and you’ll find the Crumpled Note on some boxes.
If you need help with something else in the game, please feel free to check the rest of our nascent Metro Exodus guide list. For example, we have Metro Exodus Difficulty Settings Explained – Standard, Ranger and Metro Exodus Not Appearing in Epic Store Library.