Anubis Breeding Combos, Location, Drops and Skills | Palworld

Anubis is a Ground Pal in Palworld. Once seen as a symbol of nobility, and an idol for those who shunned wealth and power. Yet over time, this Pal became a token of death.
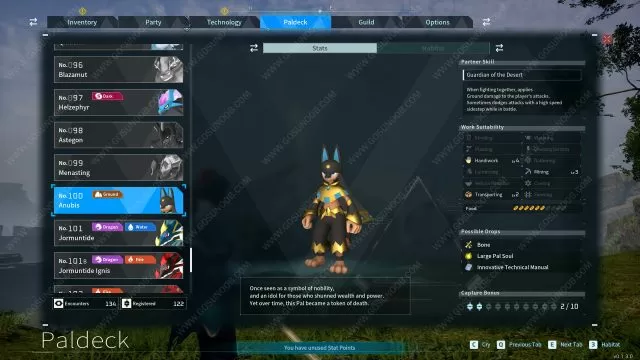
▼Article Continues Below ▼
Palworld Anubis
Anubis screenshot by Gosunoob.com ©
Anubis Palworld Paldeck Pal Icon
Paldeck No.#100
ElementPal Element Ground Icon
Work Suitability
  • Handiwork Lv. 4
  • Mining Lv. 3
  • Transporting Lv. 2
Partner
Skill
Guardian of the Desert
When fighting together, applies Ground damage to the player’s attacks. Sometimes dodges attacks with a high speed sidestep while in battle.
Stats
Health120
Attack130
Defense100
Food6/10

Possible Drops

Anubis has 3 drops. These are usually crafting materials. Some Pals also drop upgrade items or even weapons.

  • 3-5x Bone 100%
  • 1x Large Pal Soul 100%
  • 1x Innovative Technical Manual 5%

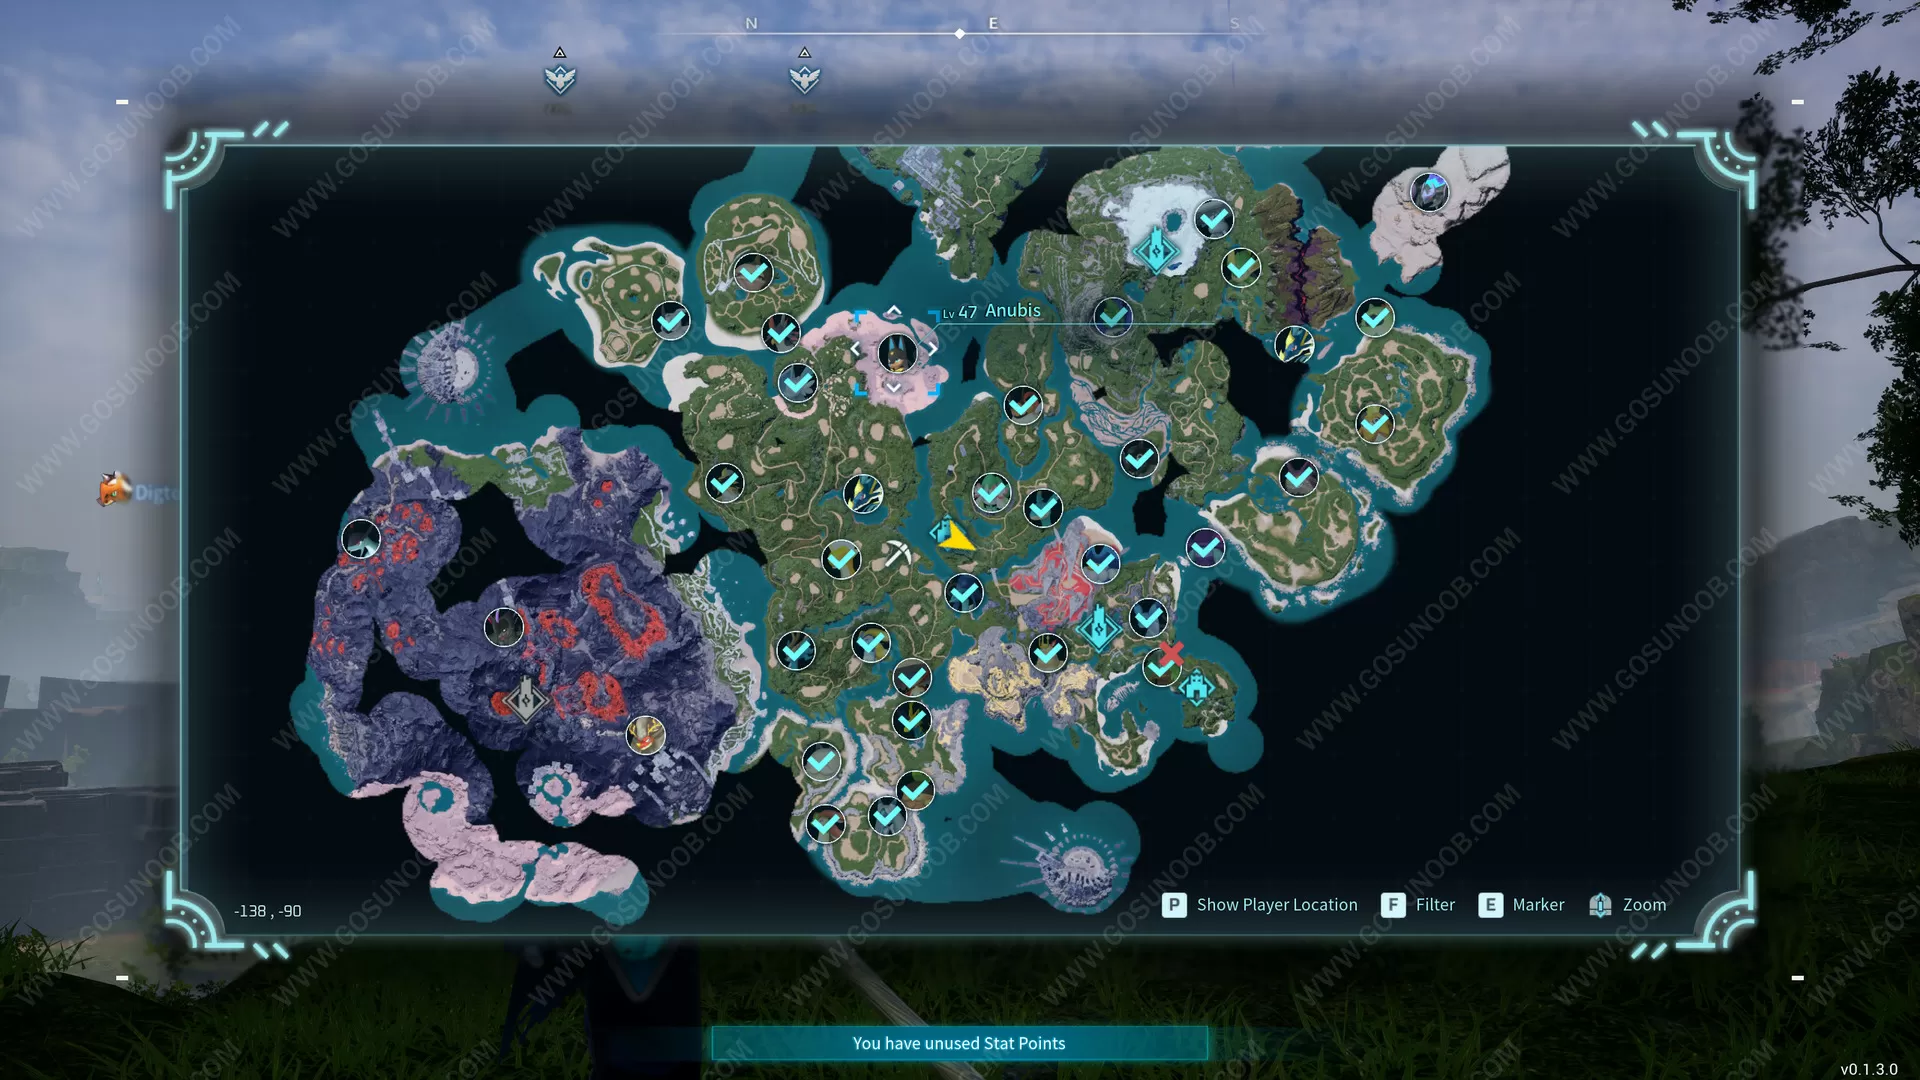
Anubis Location – Where to Find and Capture Anubis in Palworld?

Some Pals can be found only during nighttime. Others are available only as bosses. Some rare Pals become available in Wildlife Sanctuaries after you defeat them as bosses. The screenshot of the map below shows orange dots for daytime pals, blue dots for nighttime pals, and map locations for bosses.

Anubis Map Location in Palworld
Screenshot captured by Gosunoob.com ©

How to Get Anubis from Breeding?

There are 126 ways to breed Anubis. Bellow are the first 10 of them listed. You need the parents to be of different genders and be the specified Pals.

Parent 1Parent 2
Penking Icon#11 PenkingVanwyrm Cryst Icon#71B Vanwyrm Cryst
Rushoar Icon#20 RushoarBlazamut Icon#96 Blazamut
Celaray Icon#25 CelarayRelaxaurus Icon#85 Relaxaurus
Celaray Icon#25 CelarayRelaxaurus Lux Icon#85B Relaxaurus Lux
Celaray Icon#25 CelarayMenasting Icon#99 Menasting
Direhowl Icon#26 DirehowlPaladius Icon#108 Paladius
Direhowl Icon#26 DirehowlNecromus Icon#109 Necromus
Direhowl Icon#26 DirehowlJetragon Icon#111 Jetragon
Mozzarina Icon#29 MozzarinaPyrin Noct Icon#58B Pyrin Noct
Mozzarina Icon#29 MozzarinaBeakon Icon#73 Beakon
Click here to show the remaining 115 breeding combos
Mozzarina Icon#29 MozzarinaIce Reptyro Icon#88B Ice Reptyro
Gobfin Icon#31 GobfinSuzaku Icon#102 Suzaku
Gobfin Icon#31 GobfinShadowbeak Icon#107 Shadowbeak
Gobfin Ignis Icon#31B Gobfin IgnisSuzaku Icon#102 Suzaku
Gobfin Ignis Icon#31B Gobfin IgnisSuzaku Aqua Icon#102B Suzaku Aqua
Mossanda Icon#33 MossandaKatress Icon#75 Katress
Mossanda Icon#33 MossandaBlazehowl Icon#84 Blazehowl
Mossanda Lux Icon#33B Mossanda LuxFoxcicle Icon#57 Foxcicle
Mossanda Lux Icon#33B Mossanda LuxRayhound Icon#60 Rayhound
Mossanda Lux Icon#33B Mossanda LuxTombat Icon#68 Tombat
Caprity Icon#35 CaprityBeakon Icon#73 Beakon
Caprity Icon#35 CaprityGrizzbolt Icon#103 Grizzbolt
Caprity Icon#35 CaprityLyleen Noct Icon#104B Lyleen Noct
Melpaca Icon#36 MelpacaPyrin Noct Icon#58B Pyrin Noct
Melpaca Icon#36 MelpacaMenasting Icon#99 Menasting
Melpaca Icon#36 MelpacaLyleen Icon#104 Lyleen
Eikthyrdeer Icon#37 EikthyrdeerBeakon Icon#73 Beakon
Eikthyrdeer Icon#37 EikthyrdeerIce Reptyro Icon#88B Ice Reptyro
Eikthyrdeer Icon#37 EikthyrdeerLyleen Noct Icon#104B Lyleen Noct
Eikthyrdeer Terra Icon#37B Eikthyrdeer TerraPyrin Noct Icon#58B Pyrin Noct
Eikthyrdeer Terra Icon#37B Eikthyrdeer TerraIce Reptyro Icon#88B Ice Reptyro
Eikthyrdeer Terra Icon#37B Eikthyrdeer TerraLyleen Icon#104 Lyleen
Nitewing Icon#38 NitewingBlazehowl Icon#84 Blazehowl
Incineram Icon#40 IncineramSurfent Icon#65 Surfent
Incineram Icon#40 IncineramSurfent Terra Icon#65B Surfent Terra
Incineram Icon#40 IncineramElphidran Icon#80 Elphidran
Incineram Noct Icon#40B Incineram NoctSurfent Icon#65 Surfent
Incineram Noct Icon#40B Incineram NoctSurfent Terra Icon#65B Surfent Terra
Cinnamoth Icon#41 CinnamothVanwyrm Icon#71 Vanwyrm
Cinnamoth Icon#41 CinnamothBushi Icon#72 Bushi
Arsox Icon#42 ArsoxPyrin Icon#58 Pyrin
Arsox Icon#42 ArsoxWarsect  Icon#92 Warsect
Arsox Icon#42 ArsoxQuivern Icon#95 Quivern
Dumud Icon#43 DumudPyrin Noct Icon#58B Pyrin Noct
Dumud Icon#43 DumudLyleen Icon#104 Lyleen
Cawgnito Icon#44 CawgnitoSuzaku Icon#102 Suzaku
Cawgnito Icon#44 CawgnitoShadowbeak Icon#107 Shadowbeak
Cawgnito Icon#44 CawgnitoNecromus Icon#109 Necromus
Leezpunk Icon#45 LeezpunkBlazamut Icon#96 Blazamut
Leezpunk Icon#45 LeezpunkSuzaku Aqua Icon#102B Suzaku Aqua
Leezpunk Ignis Icon#45B Leezpunk IgnisBlazamut Icon#96 Blazamut
Loupmoon Icon#46 LoupmoonHelzephyr Icon#97 Helzephyr
Loupmoon Icon#46 LoupmoonGrizzbolt Icon#103 Grizzbolt
Galeclaw Icon#47 GaleclawFrostallion Icon#110 Frostallion
Galeclaw Icon#47 GaleclawFrostallion Noct Icon#110B Frostallion Noct
Robinquill Icon#48 RobinquillCryolinx Icon#83 Cryolinx
Robinquill Icon#48 RobinquillFrostallion Icon#110 Frostallion
Robinquill Terra Icon#48B Robinquill TerraCryolinx Icon#83 Cryolinx
Robinquill Terra Icon#48B Robinquill TerraAstegon Icon#98 Astegon
Robinquill Terra Icon#48B Robinquill TerraOrserk Icon#106 Orserk
Gorirat Icon#49 GoriratFrostallion Noct Icon#110B Frostallion Noct
Gorirat Icon#49 GoriratJetragon Icon#111 Jetragon
Beegarde Icon#50 BeegardeShadowbeak Icon#107 Shadowbeak
Beegarde Icon#50 BeegardePaladius Icon#108 Paladius
Beegarde Icon#50 BeegardeNecromus Icon#109 Necromus
Elizabee Icon#51 ElizabeeChillet Icon#55 Chillet
Elizabee Icon#51 ElizabeeDinossom Icon#64 Dinossom
Elizabee Icon#51 ElizabeeDinossom Lux Icon#64B Dinossom Lux
Grintale Icon#52 GrintaleVanwyrm Cryst Icon#71B Vanwyrm Cryst
Grintale Icon#52 GrintaleBushi Icon#72 Bushi
Sweepa Icon#54 SweepaRayhound Icon#60 Rayhound
Chillet Icon#55 ChilletWarsect  Icon#92 Warsect
Chillet Icon#55 ChilletQuivern Icon#95 Quivern
Univolt Icon#56 UnivoltSibelyx Icon#79 Sibelyx
Univolt Icon#56 UnivoltKingpaca Icon#89 Kingpaca
Univolt Icon#56 UnivoltWumpo Icon#91 Wumpo
Foxcicle Icon#57 FoxcicleRagnahawk Icon#74 Ragnahawk
Foxcicle Icon#57 FoxcicleFaleris Icon#105 Faleris
Pyrin Icon#58 PyrinPetallia Icon#87 Petallia
Reindrix Icon#59 ReindrixRelaxaurus Lux Icon#85B Relaxaurus Lux
Reindrix Icon#59 ReindrixMenasting Icon#99 Menasting
Reindrix Icon#59 ReindrixLyleen Icon#104 Lyleen
Kitsun Icon#61 KitsunReptyro Icon#88 Reptyro
Kitsun Icon#61 KitsunMammorest Icon#90 Mammorest
Kitsun Icon#61 KitsunJormuntide Icon#101 Jormuntide
Kitsun Icon#61 KitsunJormuntide Ignis Icon#101B Jormuntide Ignis
Lunaris Icon#63 LunarisSuzaku Aqua Icon#102B Suzaku Aqua
Dinossom Icon#64 DinossomReptyro Icon#88 Reptyro
Dinossom Icon#64 DinossomJormuntide Icon#101 Jormuntide
Dinossom Icon#64 DinossomJormuntide Ignis Icon#101B Jormuntide Ignis
Dinossom Lux Icon#64B Dinossom LuxReptyro Icon#88 Reptyro
Dinossom Lux Icon#64B Dinossom LuxWarsect  Icon#92 Warsect
Digtoise Icon#67 DigtoiseRelaxaurus Icon#85 Relaxaurus
Digtoise Icon#67 DigtoiseMammorest Icon#90 Mammorest
Digtoise Icon#67 DigtoiseMammorest Cryst Icon#90B Mammorest Cryst
Tombat Icon#68 TombatRagnahawk Icon#74 Ragnahawk
Lovander Icon#69 LovanderHelzephyr Icon#97 Helzephyr
Lovander Icon#69 LovanderGrizzbolt Icon#103 Grizzbolt
Lovander Icon#69 LovanderLyleen Noct Icon#104B Lyleen Noct
Vanwyrm Icon#71 VanwyrmKingpaca Icon#89 Kingpaca
Vanwyrm Icon#71 VanwyrmWumpo Botan Icon#91B Wumpo Botan
Vanwyrm Cryst Icon#71B Vanwyrm CrystElphidran Aqua Icon#80B Elphidran Aqua
Bushi Icon#72 BushiAzurobe Icon#82 Azurobe
Katress Icon#75 KatressSibelyx Icon#79 Sibelyx
Katress Icon#75 KatressIce Kingpaca Icon#89B Ice Kingpaca
Verdash Icon#77 VerdashAstegon Icon#98 Astegon
Verdash Icon#77 VerdashOrserk Icon#106 Orserk
Vaelet Icon#78 VaeletPaladius Icon#108 Paladius
Vaelet Icon#78 VaeletFrostallion Noct Icon#110B Frostallion Noct
Vaelet Icon#78 VaeletJetragon Icon#111 Jetragon
Cryolinx Icon#83 CryolinxFelbat Icon#94 Felbat
Blazehowl Icon#84 BlazehowlIce Kingpaca Icon#89B Ice Kingpaca
Blazehowl Noct Icon#84B Blazehowl NoctKingpaca Icon#89 Kingpaca
Blazehowl Noct Icon#84B Blazehowl NoctWumpo Icon#91 Wumpo
Blazehowl Noct Icon#84B Blazehowl NoctWumpo Botan Icon#91B Wumpo Botan
Relaxaurus Icon#85 RelaxaurusBroncherry Icon#86 Broncherry
Relaxaurus Lux Icon#85B Relaxaurus LuxBroncherry Icon#86 Broncherry
Broncherry Icon#86 BroncherryMammorest Cryst Icon#90B Mammorest Cryst
Broncherry Aqua Icon#86B Broncherry AquaMammorest Icon#90 Mammorest
Broncherry Aqua Icon#86B Broncherry AquaMammorest Cryst Icon#90B Mammorest Cryst
Broncherry Aqua Icon#86B Broncherry AquaJormuntide Icon#101 Jormuntide
Petallia Icon#87 PetalliaQuivern Icon#95 Quivern
Petallia Icon#87 PetalliaFaleris Icon#105 Faleris
Fenglope Icon#93 FenglopeAstegon Icon#98 Astegon
Felbat Icon#94 FelbatOrserk Icon#106 Orserk
Felbat Icon#94 FelbatFrostallion Icon#110 Frostallion

Anubis Breeding Combos

Bellow is the list of all possible Anubis breeding combos. This means that when you combine Anubis with any of the bellow listed Pals you’ll get the specified child Pal. Gender of parents is inconsequential as long as they have different genders.

Parent 1Parent 2Child
Fuack Icon#6 FuackAnubis Icon#100 AnubisLoupmoon Icon#46 Loupmoon
Pengullet Icon#10 PengulletAnubis Icon#100 AnubisLoupmoon Icon#46 Loupmoon
Jolthog Cryst Icon#12B Jolthog CrystAnubis Icon#100 AnubisLoupmoon Icon#46 Loupmoon
Tocotoco Icon#27 TocotocoAnubis Icon#100 AnubisLoupmoon Icon#46 Loupmoon
Bristla Icon#30 BristlaAnubis Icon#100 AnubisLoupmoon Icon#46 Loupmoon
Killamari Icon#23 KillamariAnubis Icon#100 AnubisCaprity Icon#35 Caprity
Swee Icon#53 SweeAnubis Icon#100 AnubisCaprity Icon#35 Caprity
Chikipi Icon#3 ChikipiAnubis Icon#100 AnubisGaleclaw Icon#47 Galeclaw
Teafant Icon#16 TeafantAnubis Icon#100 AnubisGaleclaw Icon#47 Galeclaw
Mau Icon#24 MauAnubis Icon#100 AnubisGaleclaw Icon#47 Galeclaw
Click here to show the remaining 101 breeding combos
Foxparks Icon#5 FoxparksAnubis Icon#100 AnubisFenglope Icon#93 Fenglope
Jolthog Icon#12 JolthogAnubis Icon#100 AnubisFenglope Icon#93 Fenglope
Hoocrates Icon#15 HoocratesAnubis Icon#100 AnubisFenglope Icon#93 Fenglope
Depresso Icon#17 DepressoAnubis Icon#100 AnubisFenglope Icon#93 Fenglope
Sparkit Icon#7 SparkitAnubis Icon#100 AnubisVerdash Icon#77 Verdash
Flambelle Icon#70 FlambelleAnubis Icon#100 AnubisVerdash Icon#77 Verdash
Ribbuny Icon#39 RibbunyAnubis Icon#100 AnubisLovander Icon#69 Lovander
Flopie Icon#28 FlopieAnubis Icon#100 AnubisEikthyrdeer Icon#37 Eikthyrdeer
Kelpsea Icon#81 KelpseaAnubis Icon#100 AnubisEikthyrdeer Icon#37 Eikthyrdeer
Kelpsea Ignis Icon#81B Kelpsea IgnisAnubis Icon#100 AnubisEikthyrdeer Icon#37 Eikthyrdeer
Rushoar Icon#20 RushoarAnubis Icon#100 AnubisDigtoise Icon#67 Digtoise
Leezpunk Icon#45 LeezpunkAnubis Icon#100 AnubisDigtoise Icon#67 Digtoise
Leezpunk Ignis Icon#45B Leezpunk IgnisAnubis Icon#100 AnubisDigtoise Icon#67 Digtoise
Lamball Icon#1 LamballAnubis Icon#100 AnubisRobinquill Icon#48 Robinquill
Cattiva Icon#2 CattivaAnubis Icon#100 AnubisRobinquill Icon#48 Robinquill
Vixy Icon#14 VixyAnubis Icon#100 AnubisFelbat Icon#94 Felbat
Cremis Icon#18 CremisAnubis Icon#100 AnubisFelbat Icon#94 Felbat
Galeclaw Icon#47 GaleclawAnubis Icon#100 AnubisChillet Icon#55 Chillet
Nox Icon#21 NoxAnubis Icon#100 AnubisReindrix Icon#59 Reindrix
Woolipop Icon#34 WoolipopAnubis Icon#100 AnubisReindrix Icon#59 Reindrix
Fuddler Icon#22 FuddlerAnubis Icon#100 AnubisDumud Icon#43 Dumud
Dazzi Icon#62 DazziAnubis Icon#100 AnubisMelpaca Icon#36 Melpaca
Tanzee Icon#8 TanzeeAnubis Icon#100 AnubisMozzarina Icon#29 Mozzarina
Mozzarina Icon#29 MozzarinaAnubis Icon#100 AnubisRayhound Icon#60 Rayhound
Melpaca Icon#36 MelpacaAnubis Icon#100 AnubisRayhound Icon#60 Rayhound
Eikthyrdeer Terra Icon#37B Eikthyrdeer TerraAnubis Icon#100 AnubisRayhound Icon#60 Rayhound
Dumud Icon#43 DumudAnubis Icon#100 AnubisRayhound Icon#60 Rayhound
Reindrix Icon#59 ReindrixAnubis Icon#100 AnubisRayhound Icon#60 Rayhound
Gobfin Icon#31 GobfinAnubis Icon#100 AnubisKitsun Icon#61 Kitsun
Gobfin Ignis Icon#31B Gobfin IgnisAnubis Icon#100 AnubisKitsun Icon#61 Kitsun
Cawgnito Icon#44 CawgnitoAnubis Icon#100 AnubisKitsun Icon#61 Kitsun
Rooby Icon#9 RoobyAnubis Icon#100 AnubisBroncherry Icon#86 Broncherry
Maraith Icon#66 MaraithAnubis Icon#100 AnubisBroncherry Icon#86 Broncherry
Wixen Icon#76 WixenAnubis Icon#100 AnubisBroncherry Icon#86 Broncherry
Loupmoon Icon#46 LoupmoonAnubis Icon#100 AnubisFoxcicle Icon#57 Foxcicle
Caprity Icon#35 CaprityAnubis Icon#100 AnubisTombat Icon#68 Tombat
Eikthyrdeer Icon#37 EikthyrdeerAnubis Icon#100 AnubisTombat Icon#68 Tombat
Lovander Icon#69 LovanderAnubis Icon#100 AnubisTombat Icon#68 Tombat
Verdash Icon#77 VerdashAnubis Icon#100 AnubisPetallia Icon#87 Petallia
Fenglope Icon#93 FenglopeAnubis Icon#100 AnubisPetallia Icon#87 Petallia
Robinquill Icon#48 RobinquillAnubis Icon#100 AnubisArsox Icon#42 Arsox
Robinquill Terra Icon#48B Robinquill TerraAnubis Icon#100 AnubisArsox Icon#42 Arsox
Felbat Icon#94 FelbatAnubis Icon#100 AnubisArsox Icon#42 Arsox
Direhowl Icon#26 DirehowlAnubis Icon#100 AnubisDinossom Icon#64 Dinossom
Beegarde Icon#50 BeegardeAnubis Icon#100 AnubisDinossom Icon#64 Dinossom
Celaray Icon#25 CelarayAnubis Icon#100 AnubisBlazehowl Icon#84 Blazehowl
Digtoise Icon#67 DigtoiseAnubis Icon#100 AnubisBlazehowl Icon#84 Blazehowl
Broncherry Icon#86 BroncherryAnubis Icon#100 AnubisBlazehowl Icon#84 Blazehowl
Broncherry Aqua Icon#86B Broncherry AquaAnubis Icon#100 AnubisBlazehowl Icon#84 Blazehowl
Arsox Icon#42 ArsoxAnubis Icon#100 AnubisUnivolt Icon#56 Univolt
Chillet Icon#55 ChilletAnubis Icon#100 AnubisUnivolt Icon#56 Univolt
Dinossom Lux Icon#64B Dinossom LuxAnubis Icon#100 AnubisUnivolt Icon#56 Univolt
Petallia Icon#87 PetalliaAnubis Icon#100 AnubisUnivolt Icon#56 Univolt
Kitsun Icon#61 KitsunAnubis Icon#100 AnubisKatress Icon#75 Katress
Dinossom Icon#64 DinossomAnubis Icon#100 AnubisKatress Icon#75 Katress
Foxcicle Icon#57 FoxcicleAnubis Icon#100 AnubisVanwyrm Icon#71 Vanwyrm
Rayhound Icon#60 RayhoundAnubis Icon#100 AnubisVanwyrm Icon#71 Vanwyrm
Tombat Icon#68 TombatAnubis Icon#100 AnubisVanwyrm Icon#71 Vanwyrm
Katress Icon#75 KatressAnubis Icon#100 AnubisBushi Icon#72 Bushi
Blazehowl Icon#84 BlazehowlAnubis Icon#100 AnubisBushi Icon#72 Bushi
Vanwyrm Cryst Icon#71B Vanwyrm CrystAnubis Icon#100 AnubisIncineram Icon#40 Incineram
Bushi Icon#72 BushiAnubis Icon#100 AnubisIncineram Icon#40 Incineram
Mossanda Lux Icon#33B Mossanda LuxAnubis Icon#100 AnubisWumpo Botan Icon#91B Wumpo Botan
Ragnahawk Icon#74 RagnahawkAnubis Icon#100 AnubisWumpo Botan Icon#91B Wumpo Botan
Elizabee Icon#51 ElizabeeAnubis Icon#100 AnubisSibelyx Icon#79 Sibelyx
Reptyro Icon#88 ReptyroAnubis Icon#100 AnubisSibelyx Icon#79 Sibelyx
Warsect  Icon#92 Warsect Anubis Icon#100 AnubisSibelyx Icon#79 Sibelyx
Anubis Icon#100 AnubisFaleris Icon#105 FalerisKingpaca Icon#89 Kingpaca
Surfent Terra Icon#65B Surfent TerraAnubis Icon#100 AnubisSurfent Icon#65 Surfent
Elphidran Icon#80 ElphidranAnubis Icon#100 AnubisSurfent Icon#65 Surfent
Mossanda Icon#33 MossandaAnubis Icon#100 AnubisAzurobe Icon#82 Azurobe
Nitewing Icon#38 NitewingAnubis Icon#100 AnubisAzurobe Icon#82 Azurobe
Ice Kingpaca Icon#89B Ice KingpacaAnubis Icon#100 AnubisAzurobe Icon#82 Azurobe
Relaxaurus Icon#85 RelaxaurusAnubis Icon#100 AnubisNitewing Icon#38 Nitewing
Relaxaurus Lux Icon#85B Relaxaurus LuxAnubis Icon#100 AnubisNitewing Icon#38 Nitewing
Menasting Icon#99 MenastingAnubis Icon#100 AnubisNitewing Icon#38 Nitewing
Kingpaca Icon#89 KingpacaAnubis Icon#100 AnubisPenking Icon#11 Penking
Wumpo Icon#91 WumpoAnubis Icon#100 AnubisPenking Icon#11 Penking
Pyrin Icon#58 PyrinAnubis Icon#100 AnubisWumpo Icon#91 Wumpo
Quivern Icon#95 QuivernAnubis Icon#100 AnubisWumpo Icon#91 Wumpo
Helzephyr Icon#97 HelzephyrAnubis Icon#100 AnubisRagnahawk Icon#74 Ragnahawk
Penking Icon#11 PenkingAnubis Icon#100 AnubisElphidran Icon#80 Elphidran
Grintale Icon#52 GrintaleAnubis Icon#100 AnubisElphidran Icon#80 Elphidran
Azurobe Icon#82 AzurobeAnubis Icon#100 AnubisElphidran Icon#80 Elphidran
Sibelyx Icon#79 SibelyxAnubis Icon#100 AnubisGrintale Icon#52 Grintale
Anubis Icon#100 AnubisPaladius Icon#108 PaladiusReptyro Icon#88 Reptyro
Anubis Icon#100 AnubisNecromus Icon#109 NecromusReptyro Icon#88 Reptyro
Pyrin Noct Icon#58B Pyrin NoctAnubis Icon#100 AnubisSweepa Icon#54 Sweepa
Anubis Icon#100 AnubisLyleen Icon#104 LyleenSweepa Icon#54 Sweepa
Sweepa Icon#54 SweepaAnubis Icon#100 AnubisCinnamoth Icon#41 Cinnamoth
Mammorest Icon#90 MammorestAnubis Icon#100 AnubisMossanda Icon#33 Mossanda
Mammorest Cryst Icon#90B Mammorest CrystAnubis Icon#100 AnubisMossanda Icon#33 Mossanda
Astegon Icon#98 AstegonAnubis Icon#100 AnubisPyrin Icon#58 Pyrin
Anubis Icon#100 AnubisOrserk Icon#106 OrserkPyrin Icon#58 Pyrin
Anubis Icon#100 AnubisFrostallion Noct Icon#110B Frostallion NoctElizabee Icon#51 Elizabee
Anubis Icon#100 AnubisJetragon Icon#111 JetragonElizabee Icon#51 Elizabee
Anubis Icon#100 AnubisSuzaku Aqua Icon#102B Suzaku AquaMammorest Icon#90 Mammorest
Anubis Icon#100 AnubisSuzaku Icon#102 SuzakuJormuntide Icon#101 Jormuntide
Cryolinx Icon#83 CryolinxAnubis Icon#100 AnubisQuivern Icon#95 Quivern
Anubis Icon#100 AnubisFrostallion Icon#110 FrostallionWarsect  Icon#92 Warsect
Vanwyrm Icon#71 VanwyrmAnubis Icon#100 AnubisFaleris Icon#105 Faleris

Palworld Anubis Active Skills & Passive Skills

Anubis has 7 active skills beside his primary partner skill Guardian of the Desert.

Skill NameSkill DescriptionUnlock Lv.
Stone BlastFires a barrage of stones forward.1
Power BombCharges a massive amount of energy before firing a large destructive ball.7
Sand TornadoGenerates two sand tornadoes on either side before launching them at an enemy.15
Spinning RoundhouseAnubis‘s special skill. Performs a spin kick with its strong legs, cutting down enemies over a wide area.22
Forceful ChargeAnubis‘s special skill. Pursues its foe with a high speed dash while releasing energy and unleashes a powerful punch.30
Ground SmashAnubis‘s special skill. Leaps high into the air before diving to the ground with a punch. The force of the impact deals damage over a wide area.40
Rock LanceGenerates a sharp rock spear under an enemy.50

Anubis has Passive Skills by default when captured in the wild. Here’s a list of them.

Skill NameSkill Description
Earth Emperor20% increase to Earth attack damage.
See this page in: DE flag icon ES flag icon
TAGS ,
Author Gosu No0b profile picture
Written by:
Sometimes articles on our website are a team effort. Such articles are published under the Gosu Noob author and that means the thing you are reading was created by the whole crew.

YOU MAY ALSO READ

CLICK TO POST A COMMENT