Sibelyx Breeding Combos, Location, Drops and Skills | Palworld

Sibelyx is an Ice Pal in Palworld. A Pal that likes the rain, and will often bask in rain showers until the weather clears up. On rainy days, Foxparks can often be found taking shelter beneath it.
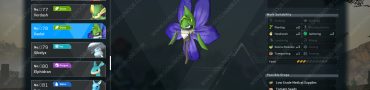
▼Article Continues Below ▼
Palworld Sibelyx
Sibelyx screenshot by Gosunoob.com ©
Sibelyx Palworld Paldeck Pal Icon
Paldeck No.#079
ElementPal Element Ice Icon
Work Suitability
  • Medicine Production Lv. 2
  • Cooling Lv. 2
  • Farming Lv. 1
Partner
Skill
Silk Maker
When activated, attacks targeted enemy with a powerful Blizzard Spike. Sometimes produces High Quality Cloth when assigned to Ranch.
Stats
Health110
Attack90
Defense100
Food5/10

Possible Drops

Sibelyx has 2 drops. These are usually crafting materials. Some Pals also drop upgrade items or even weapons.

  • 1x High Quality Cloth 100%
  • 2-3x Ice Organ 100%

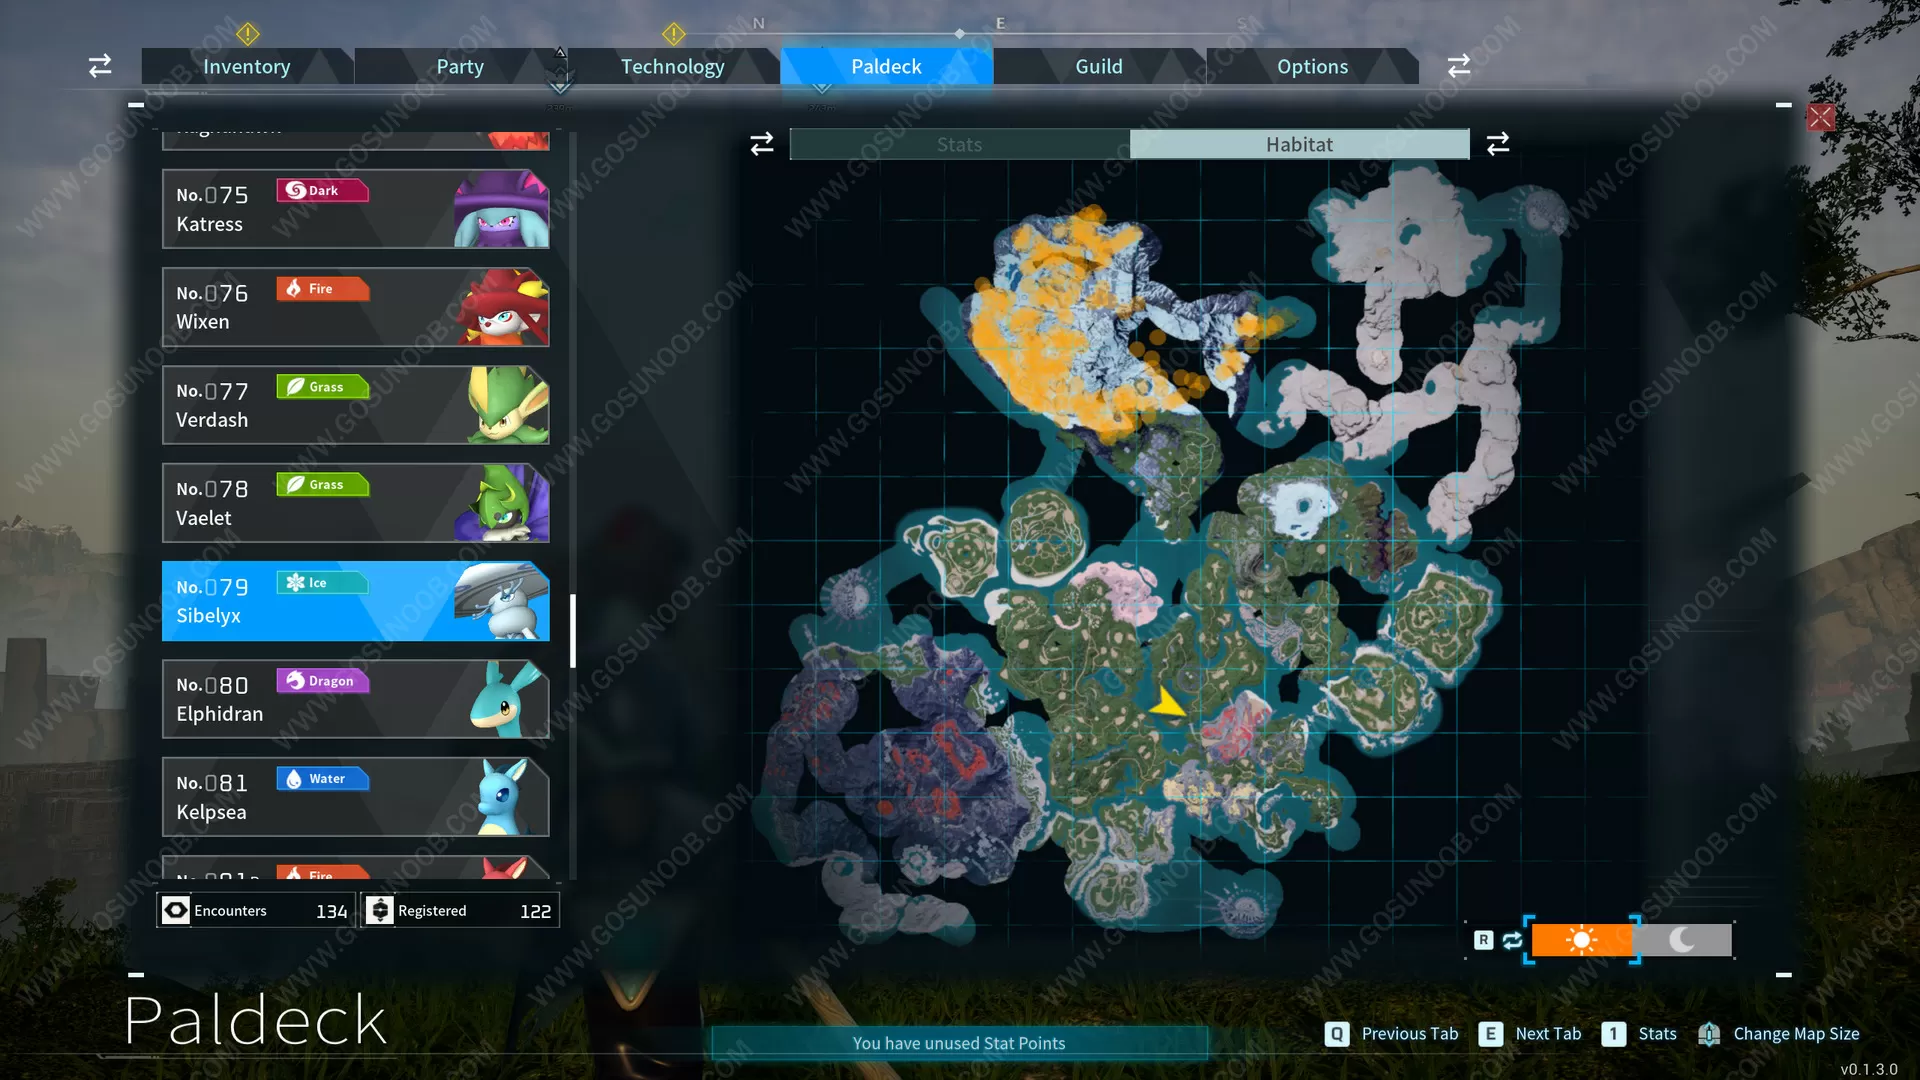
Sibelyx Location – Where to Find and Capture Sibelyx in Palworld?

Some Pals can be found only during nighttime. Others are available only as bosses. Some rare Pals become available in Wildlife Sanctuaries after you defeat them as bosses. The screenshot of the map below shows orange dots for daytime pals, blue dots for nighttime pals, and map locations for bosses.

Sibelyx Map Location in Palworld
Screenshot captured by Gosunoob.com ©

How to Get Sibelyx from Breeding?

There are 94 ways to breed Sibelyx. Bellow are the first 10 of them listed. You need the parents to be of different genders and be the specified Pals.

Parent 1Parent 2
Penking Icon#11 PenkingMossanda Lux Icon#33B Mossanda Lux
Penking Icon#11 PenkingRagnahawk Icon#74 Ragnahawk
Penking Icon#11 PenkingFaleris Icon#105 Faleris
Celaray Icon#25 CelaraySuzaku Aqua Icon#102B Suzaku Aqua
Mossanda Icon#33 MossandaKingpaca Icon#89 Kingpaca
Mossanda Icon#33 MossandaWumpo Icon#91 Wumpo
Mossanda Icon#33 MossandaWumpo Botan Icon#91B Wumpo Botan
Mossanda Lux Icon#33B Mossanda LuxGrintale Icon#52 Grintale
Mossanda Lux Icon#33B Mossanda LuxAzurobe Icon#82 Azurobe
Melpaca Icon#36 MelpacaBlazamut Icon#96 Blazamut
Click here to show the remaining 83 breeding combos
Eikthyrdeer Terra Icon#37B Eikthyrdeer TerraBlazamut Icon#96 Blazamut
Nitewing Icon#38 NitewingCinnamoth Icon#41 Cinnamoth
Nitewing Icon#38 NitewingKingpaca Icon#89 Kingpaca
Nitewing Icon#38 NitewingWumpo Botan Icon#91B Wumpo Botan
Incineram Icon#40 IncineramReptyro Icon#88 Reptyro
Incineram Icon#40 IncineramMammorest Icon#90 Mammorest
Incineram Icon#40 IncineramJormuntide Icon#101 Jormuntide
Incineram Icon#40 IncineramJormuntide Ignis Icon#101B Jormuntide Ignis
Incineram Noct Icon#40B Incineram NoctElizabee Icon#51 Elizabee
Incineram Noct Icon#40B Incineram NoctReptyro Icon#88 Reptyro
Incineram Noct Icon#40B Incineram NoctJormuntide Icon#101 Jormuntide
Incineram Noct Icon#40B Incineram NoctJormuntide Ignis Icon#101B Jormuntide Ignis
Cinnamoth Icon#41 CinnamothSweepa Icon#54 Sweepa
Arsox Icon#42 ArsoxFrostallion Icon#110 Frostallion
Arsox Icon#42 ArsoxFrostallion Noct Icon#110B Frostallion Noct
Dumud Icon#43 DumudBlazamut Icon#96 Blazamut
Elizabee Icon#51 ElizabeeSurfent Icon#65 Surfent
Elizabee Icon#51 ElizabeeAnubis Icon#100 Anubis
Grintale Icon#52 GrintaleRagnahawk Icon#74 Ragnahawk
Sweepa Icon#54 SweepaAzurobe Icon#82 Azurobe
Sweepa Icon#54 SweepaWumpo Botan Icon#91B Wumpo Botan
Chillet Icon#55 ChilletFrostallion Noct Icon#110B Frostallion Noct
Chillet Icon#55 ChilletJetragon Icon#111 Jetragon
Univolt Icon#56 UnivoltBeakon Icon#73 Beakon
Univolt Icon#56 UnivoltIce Reptyro Icon#88B Ice Reptyro
Univolt Icon#56 UnivoltLyleen Noct Icon#104B Lyleen Noct
Foxcicle Icon#57 FoxcicleCryolinx Icon#83 Cryolinx
Foxcicle Icon#57 FoxcicleAstegon Icon#98 Astegon
Foxcicle Icon#57 FoxcicleOrserk Icon#106 Orserk
Pyrin Icon#58 PyrinSurfent Terra Icon#65B Surfent Terra
Pyrin Icon#58 PyrinElphidran Icon#80 Elphidran
Pyrin Icon#58 PyrinElphidran Aqua Icon#80B Elphidran Aqua
Pyrin Noct Icon#58B Pyrin NoctVanwyrm Icon#71 Vanwyrm
Pyrin Noct Icon#58B Pyrin NoctBlazehowl Noct Icon#84B Blazehowl Noct
Reindrix Icon#59 ReindrixBlazamut Icon#96 Blazamut
Reindrix Icon#59 ReindrixSuzaku Aqua Icon#102B Suzaku Aqua
Rayhound Icon#60 RayhoundAstegon Icon#98 Astegon
Kitsun Icon#61 KitsunShadowbeak Icon#107 Shadowbeak
Kitsun Icon#61 KitsunPaladius Icon#108 Paladius
Kitsun Icon#61 KitsunNecromus Icon#109 Necromus
Dinossom Icon#64 DinossomPaladius Icon#108 Paladius
Dinossom Icon#64 DinossomNecromus Icon#109 Necromus
Dinossom Icon#64 DinossomJetragon Icon#111 Jetragon
Dinossom Lux Icon#64B Dinossom LuxPaladius Icon#108 Paladius
Dinossom Lux Icon#64B Dinossom LuxFrostallion Noct Icon#110B Frostallion Noct
Dinossom Lux Icon#64B Dinossom LuxJetragon Icon#111 Jetragon
Surfent Icon#65 SurfentWarsect  Icon#92 Warsect
Surfent Icon#65 SurfentQuivern Icon#95 Quivern
Surfent Terra Icon#65B Surfent TerraWarsect  Icon#92 Warsect
Surfent Terra Icon#65B Surfent TerraQuivern Icon#95 Quivern
Digtoise Icon#67 DigtoiseSuzaku Icon#102 Suzaku
Digtoise Icon#67 DigtoiseShadowbeak Icon#107 Shadowbeak
Tombat Icon#68 TombatAstegon Icon#98 Astegon
Tombat Icon#68 TombatOrserk Icon#106 Orserk
Vanwyrm Icon#71 VanwyrmIce Reptyro Icon#88B Ice Reptyro
Vanwyrm Icon#71 VanwyrmLyleen Icon#104 Lyleen
Vanwyrm Cryst Icon#71B Vanwyrm CrystRelaxaurus Icon#85 Relaxaurus
Vanwyrm Cryst Icon#71B Vanwyrm CrystRelaxaurus Lux Icon#85B Relaxaurus Lux
Vanwyrm Cryst Icon#71B Vanwyrm CrystMammorest Cryst Icon#90B Mammorest Cryst
Bushi Icon#72 BushiRelaxaurus Lux Icon#85B Relaxaurus Lux
Bushi Icon#72 BushiMenasting Icon#99 Menasting
Bushi Icon#72 BushiLyleen Icon#104 Lyleen
Beakon Icon#73 BeakonBlazehowl Noct Icon#84B Blazehowl Noct
Ragnahawk Icon#74 RagnahawkElphidran Aqua Icon#80B Elphidran Aqua
Katress Icon#75 KatressHelzephyr Icon#97 Helzephyr
Katress Icon#75 KatressGrizzbolt Icon#103 Grizzbolt
Katress Icon#75 KatressLyleen Noct Icon#104B Lyleen Noct
Elphidran Icon#80 ElphidranQuivern Icon#95 Quivern
Elphidran Icon#80 ElphidranFaleris Icon#105 Faleris
Elphidran Aqua Icon#80B Elphidran AquaFaleris Icon#105 Faleris
Cryolinx Icon#83 CryolinxPetallia Icon#87 Petallia
Blazehowl Icon#84 BlazehowlHelzephyr Icon#97 Helzephyr
Blazehowl Icon#84 BlazehowlGrizzbolt Icon#103 Grizzbolt
Blazehowl Noct Icon#84B Blazehowl NoctIce Reptyro Icon#88B Ice Reptyro
Broncherry Icon#86 BroncherrySuzaku Icon#102 Suzaku
Broncherry Icon#86 BroncherrySuzaku Aqua Icon#102B Suzaku Aqua
Broncherry Aqua Icon#86B Broncherry AquaSuzaku Icon#102 Suzaku
Broncherry Aqua Icon#86B Broncherry AquaShadowbeak Icon#107 Shadowbeak
Broncherry Aqua Icon#86B Broncherry AquaNecromus Icon#109 Necromus
Petallia Icon#87 PetalliaFrostallion Icon#110 Frostallion
Reptyro Icon#88 ReptyroAnubis Icon#100 Anubis
Kingpaca Icon#89 KingpacaIce Kingpaca Icon#89B Ice Kingpaca
Ice Kingpaca Icon#89B Ice KingpacaWumpo Icon#91 Wumpo
Warsect  Icon#92 Warsect Anubis Icon#100 Anubis

Sibelyx Breeding Combos

Bellow is the list of all possible Sibelyx breeding combos. This means that when you combine Sibelyx with any of the bellow listed Pals you’ll get the specified child Pal. Gender of parents is inconsequential as long as they have different genders.

Parent 1Parent 2Child
Lamball Icon#1 LamballSibelyx Icon#79 SibelyxLoupmoon Icon#46 Loupmoon
Cattiva Icon#2 CattivaSibelyx Icon#79 SibelyxLoupmoon Icon#46 Loupmoon
Vixy Icon#14 VixySibelyx Icon#79 SibelyxLoupmoon Icon#46 Loupmoon
Cremis Icon#18 CremisSibelyx Icon#79 SibelyxLoupmoon Icon#46 Loupmoon
Mau Icon#24 MauSibelyx Icon#79 SibelyxLoupmoon Icon#46 Loupmoon
Mau Cryst Icon#24B Mau CrystSibelyx Icon#79 SibelyxLoupmoon Icon#46 Loupmoon
Sparkit Icon#7 SparkitSibelyx Icon#79 SibelyxCaprity Icon#35 Caprity
Hangyu Icon#32 HangyuSibelyx Icon#79 SibelyxCaprity Icon#35 Caprity
Flambelle Icon#70 FlambelleSibelyx Icon#79 SibelyxCaprity Icon#35 Caprity
Chikipi Icon#3 ChikipiSibelyx Icon#79 SibelyxFenglope Icon#93 Fenglope
Click here to show the remaining 99 breeding combos
Teafant Icon#16 TeafantSibelyx Icon#79 SibelyxFenglope Icon#93 Fenglope
Lifmunk Icon#4 LifmunkSibelyx Icon#79 SibelyxLovander Icon#69 Lovander
Hangyu Cryst Icon#32B Hangyu CrystSibelyx Icon#79 SibelyxLovander Icon#69 Lovander
Foxparks Icon#5 FoxparksSibelyx Icon#79 SibelyxEikthyrdeer Icon#37 Eikthyrdeer
Hoocrates Icon#15 HoocratesSibelyx Icon#79 SibelyxEikthyrdeer Icon#37 Eikthyrdeer
Depresso Icon#17 DepressoSibelyx Icon#79 SibelyxEikthyrdeer Icon#37 Eikthyrdeer
Tanzee Icon#8 TanzeeSibelyx Icon#79 SibelyxDigtoise Icon#67 Digtoise
Gumoss Icon#13 GumossSibelyx Icon#79 SibelyxDigtoise Icon#67 Digtoise
Sibelyx Icon#79 SibelyxKelpsea Icon#81 KelpseaDigtoise Icon#67 Digtoise
Rooby Icon#9 RoobySibelyx Icon#79 SibelyxChillet Icon#55 Chillet
Maraith Icon#66 MaraithSibelyx Icon#79 SibelyxChillet Icon#55 Chillet
Ribbuny Icon#39 RibbunySibelyx Icon#79 SibelyxReindrix Icon#59 Reindrix
Swee Icon#53 SweeSibelyx Icon#79 SibelyxReindrix Icon#59 Reindrix
Killamari Icon#23 KillamariSibelyx Icon#79 SibelyxCelaray Icon#25 Celaray
Tocotoco Icon#27 TocotocoSibelyx Icon#79 SibelyxDumud Icon#43 Dumud
Fuack Icon#6 FuackSibelyx Icon#79 SibelyxMelpaca Icon#36 Melpaca
Bristla Icon#30 BristlaSibelyx Icon#79 SibelyxMelpaca Icon#36 Melpaca
Jolthog Icon#12 JolthogSibelyx Icon#79 SibelyxMozzarina Icon#29 Mozzarina
Galeclaw Icon#47 GaleclawSibelyx Icon#79 SibelyxRayhound Icon#60 Rayhound
Robinquill Icon#48 RobinquillSibelyx Icon#79 SibelyxRayhound Icon#60 Rayhound
Robinquill Terra Icon#48B Robinquill TerraSibelyx Icon#79 SibelyxRayhound Icon#60 Rayhound
Sibelyx Icon#79 SibelyxFelbat Icon#94 FelbatRayhound Icon#60 Rayhound
Fuddler Icon#22 FuddlerSibelyx Icon#79 SibelyxKitsun Icon#61 Kitsun
Dazzi Icon#62 DazziSibelyx Icon#79 SibelyxKitsun Icon#61 Kitsun
Flopie Icon#28 FlopieSibelyx Icon#79 SibelyxBroncherry Icon#86 Broncherry
Sibelyx Icon#79 SibelyxKelpsea Ignis Icon#81B Kelpsea IgnisBroncherry Icon#86 Broncherry
Gobfin Icon#31 GobfinSibelyx Icon#79 SibelyxFoxcicle Icon#57 Foxcicle
Cawgnito Icon#44 CawgnitoSibelyx Icon#79 SibelyxFoxcicle Icon#57 Foxcicle
Beegarde Icon#50 BeegardeSibelyx Icon#79 SibelyxFoxcicle Icon#57 Foxcicle
Direhowl Icon#26 DirehowlSibelyx Icon#79 SibelyxTombat Icon#68 Tombat
Gorirat Icon#49 GoriratSibelyx Icon#79 SibelyxTombat Icon#68 Tombat
Vaelet Icon#78 VaeletSibelyx Icon#79 SibelyxTombat Icon#68 Tombat
Gobfin Ignis Icon#31B Gobfin IgnisSibelyx Icon#79 SibelyxPetallia Icon#87 Petallia
Lunaris Icon#63 LunarisSibelyx Icon#79 SibelyxPetallia Icon#87 Petallia
Rushoar Icon#20 RushoarSibelyx Icon#79 SibelyxArsox Icon#42 Arsox
Leezpunk Icon#45 LeezpunkSibelyx Icon#79 SibelyxArsox Icon#42 Arsox
Leezpunk Ignis Icon#45B Leezpunk IgnisSibelyx Icon#79 SibelyxArsox Icon#42 Arsox
Nox Icon#21 NoxSibelyx Icon#79 SibelyxDinossom Icon#64 Dinossom
Woolipop Icon#34 WoolipopSibelyx Icon#79 SibelyxDinossom Icon#64 Dinossom
Verdash Icon#77 VerdashSibelyx Icon#79 SibelyxBlazehowl Icon#84 Blazehowl
Sibelyx Icon#79 SibelyxFenglope Icon#93 FenglopeBlazehowl Icon#84 Blazehowl
Mozzarina Icon#29 MozzarinaSibelyx Icon#79 SibelyxUnivolt Icon#56 Univolt
Caprity Icon#35 CapritySibelyx Icon#79 SibelyxUnivolt Icon#56 Univolt
Eikthyrdeer Icon#37 EikthyrdeerSibelyx Icon#79 SibelyxUnivolt Icon#56 Univolt
Eikthyrdeer Terra Icon#37B Eikthyrdeer TerraSibelyx Icon#79 SibelyxUnivolt Icon#56 Univolt
Loupmoon Icon#46 LoupmoonSibelyx Icon#79 SibelyxKatress Icon#75 Katress
Lovander Icon#69 LovanderSibelyx Icon#79 SibelyxKatress Icon#75 Katress
Celaray Icon#25 CelaraySibelyx Icon#79 SibelyxVanwyrm Icon#71 Vanwyrm
Reindrix Icon#59 ReindrixSibelyx Icon#79 SibelyxVanwyrm Icon#71 Vanwyrm
Digtoise Icon#67 DigtoiseSibelyx Icon#79 SibelyxVanwyrm Icon#71 Vanwyrm
Sibelyx Icon#79 SibelyxBroncherry Icon#86 BroncherryVanwyrm Icon#71 Vanwyrm
Kitsun Icon#61 KitsunSibelyx Icon#79 SibelyxBushi Icon#72 Bushi
Dinossom Icon#64 DinossomSibelyx Icon#79 SibelyxBushi Icon#72 Bushi
Sibelyx Icon#79 SibelyxBroncherry Aqua Icon#86B Broncherry AquaBushi Icon#72 Bushi
Foxcicle Icon#57 FoxcicleSibelyx Icon#79 SibelyxIncineram Icon#40 Incineram
Rayhound Icon#60 RayhoundSibelyx Icon#79 SibelyxIncineram Icon#40 Incineram
Tombat Icon#68 TombatSibelyx Icon#79 SibelyxIncineram Icon#40 Incineram
Penking Icon#11 PenkingSibelyx Icon#79 SibelyxWumpo Botan Icon#91B Wumpo Botan
Grintale Icon#52 GrintaleSibelyx Icon#79 SibelyxWumpo Botan Icon#91B Wumpo Botan
Sibelyx Icon#79 SibelyxAzurobe Icon#82 AzurobeWumpo Botan Icon#91B Wumpo Botan
Cinnamoth Icon#41 CinnamothSibelyx Icon#79 SibelyxKingpaca Icon#89 Kingpaca
Vanwyrm Icon#71 VanwyrmSibelyx Icon#79 SibelyxSurfent Icon#65 Surfent
Sibelyx Icon#79 SibelyxBlazehowl Noct Icon#84B Blazehowl NoctSurfent Icon#65 Surfent
Surfent Icon#65 SurfentSibelyx Icon#79 SibelyxAzurobe Icon#82 Azurobe
Surfent Terra Icon#65B Surfent TerraSibelyx Icon#79 SibelyxAzurobe Icon#82 Azurobe
Sibelyx Icon#79 SibelyxElphidran Icon#80 ElphidranAzurobe Icon#82 Azurobe
Mossanda Lux Icon#33B Mossanda LuxSibelyx Icon#79 SibelyxNitewing Icon#38 Nitewing
Ragnahawk Icon#74 RagnahawkSibelyx Icon#79 SibelyxNitewing Icon#38 Nitewing
Incineram Icon#40 IncineramSibelyx Icon#79 SibelyxPenking Icon#11 Penking
Incineram Noct Icon#40B Incineram NoctSibelyx Icon#79 SibelyxPenking Icon#11 Penking
Sibelyx Icon#79 SibelyxKingpaca Icon#89 KingpacaWumpo Icon#91 Wumpo
Sibelyx Icon#79 SibelyxWumpo Botan Icon#91B Wumpo BotanWumpo Icon#91 Wumpo
Sibelyx Icon#79 SibelyxJormuntide Icon#101 JormuntideRagnahawk Icon#74 Ragnahawk
Sibelyx Icon#79 SibelyxJormuntide Ignis Icon#101B Jormuntide IgnisRagnahawk Icon#74 Ragnahawk
Vanwyrm Cryst Icon#71B Vanwyrm CrystSibelyx Icon#79 SibelyxElphidran Icon#80 Elphidran
Bushi Icon#72 BushiSibelyx Icon#79 SibelyxElphidran Icon#80 Elphidran
Univolt Icon#56 UnivoltSibelyx Icon#79 SibelyxAnubis Icon#100 Anubis
Katress Icon#75 KatressSibelyx Icon#79 SibelyxAnubis Icon#100 Anubis
Sibelyx Icon#79 SibelyxAnubis Icon#100 AnubisGrintale Icon#52 Grintale
Sibelyx Icon#79 SibelyxHelzephyr Icon#97 HelzephyrReptyro Icon#88 Reptyro
Sibelyx Icon#79 SibelyxGrizzbolt Icon#103 GrizzboltReptyro Icon#88 Reptyro
Pyrin Icon#58 PyrinSibelyx Icon#79 SibelyxSweepa Icon#54 Sweepa
Sibelyx Icon#79 SibelyxFaleris Icon#105 FalerisSweepa Icon#54 Sweepa
Sibelyx Icon#79 SibelyxElphidran Aqua Icon#80B Elphidran AquaCinnamoth Icon#41 Cinnamoth
Nitewing Icon#38 NitewingSibelyx Icon#79 SibelyxMossanda Icon#33 Mossanda
Sweepa Icon#54 SweepaSibelyx Icon#79 SibelyxMossanda Icon#33 Mossanda
Sibelyx Icon#79 SibelyxRelaxaurus Icon#85 RelaxaurusPyrin Icon#58 Pyrin
Sibelyx Icon#79 SibelyxRelaxaurus Lux Icon#85B Relaxaurus LuxPyrin Icon#58 Pyrin
Sibelyx Icon#79 SibelyxMenasting Icon#99 MenastingPyrin Icon#58 Pyrin
Beakon Icon#73 BeakonSibelyx Icon#79 SibelyxElizabee Icon#51 Elizabee
Sibelyx Icon#79 SibelyxLyleen Noct Icon#104B Lyleen NoctElizabee Icon#51 Elizabee
Sibelyx Icon#79 SibelyxFrostallion Icon#110 FrostallionRelaxaurus Icon#85 Relaxaurus
Sibelyx Icon#79 SibelyxFrostallion Noct Icon#110B Frostallion NoctRelaxaurus Icon#85 Relaxaurus
Sibelyx Icon#79 SibelyxAstegon Icon#98 AstegonMammorest Icon#90 Mammorest
Sibelyx Icon#79 SibelyxOrserk Icon#106 OrserkMammorest Icon#90 Mammorest
Sibelyx Icon#79 SibelyxLyleen Icon#104 LyleenQuivern Icon#95 Quivern
Pyrin Noct Icon#58B Pyrin NoctSibelyx Icon#79 SibelyxWarsect  Icon#92 Warsect
Sibelyx Icon#79 SibelyxIce Reptyro Icon#88B Ice ReptyroWarsect  Icon#92 Warsect
Sibelyx Icon#79 SibelyxNecromus Icon#109 NecromusMenasting Icon#99 Menasting

Palworld Sibelyx Active Skills

Sibelyx has 7 active skills beside his primary partner skill Silk Maker.

Skill NameSkill DescriptionUnlock Lv.
Ice MissileCreates ice lances in the air that fly towards enemies.1
Icicle CutterCreates a crescent blade of ice and hurls it forward.7
IcebergSummons a sharp ice lance under an enemy.15
Cryst BreathEnshrouds an enemy in a frigid blast of air, dealing continuous damage.22
Spirit FlameFires three balls of malice that relentlessly pursue an enemy.30
Aqua BurstCreates a giant ball of water and hurls it at an enemy.40
Blizzard SpikeCreates a giant lump of ice and hurls it at an enemy. It deals damage to those in the surrounding area upon impact.50
See this page in: DE flag icon ES flag icon
TAGS ,
Author Gosu No0b profile picture
Written by:
Sometimes articles on our website are a team effort. Such articles are published under the Gosu Noob author and that means the thing you are reading was created by the whole crew.

YOU MAY ALSO READ

CLICK TO POST A COMMENT