Mossanda Breeding Combos, Location, Drops and Skills | Palworld

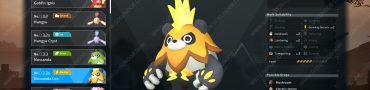
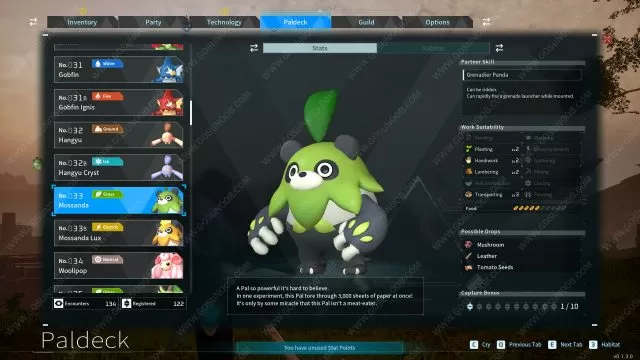
Mossanda is a Grass Pal in Palworld. A Pal so powerful it’s hard to believe. In one experiment, this Pal tore through 3,000 sheets of paper at once! It’s only by some miracle that this Pal isn’t a meat-eater.

▼Article Continues Below ▼
Palworld Mossanda
Mossanda screenshot by Gosunoob.com ©
Mossanda Palworld Paldeck Pal Icon
Paldeck No.#033
ElementPal Element Grass Icon
Work Suitability
  • Planting Lv. 2
  • Handiwork Lv. 2
  • Lumbering Lv. 2
  • Transporting Lv. 3
Partner
Skill
Grenadier Panda
Can be ridden. Can rapidly fire a grenade launcher while mounted.
Stats
Health100
Attack90
Defense90
Food5/10

Possible Drops

Mossanda has 3 drops. These are usually crafting materials. Some Pals also drop upgrade items or even weapons.

  • 2-3x Mushroom 100%
  • 2-3x Leather 100%
  • 1x Tomato Seeds 50%

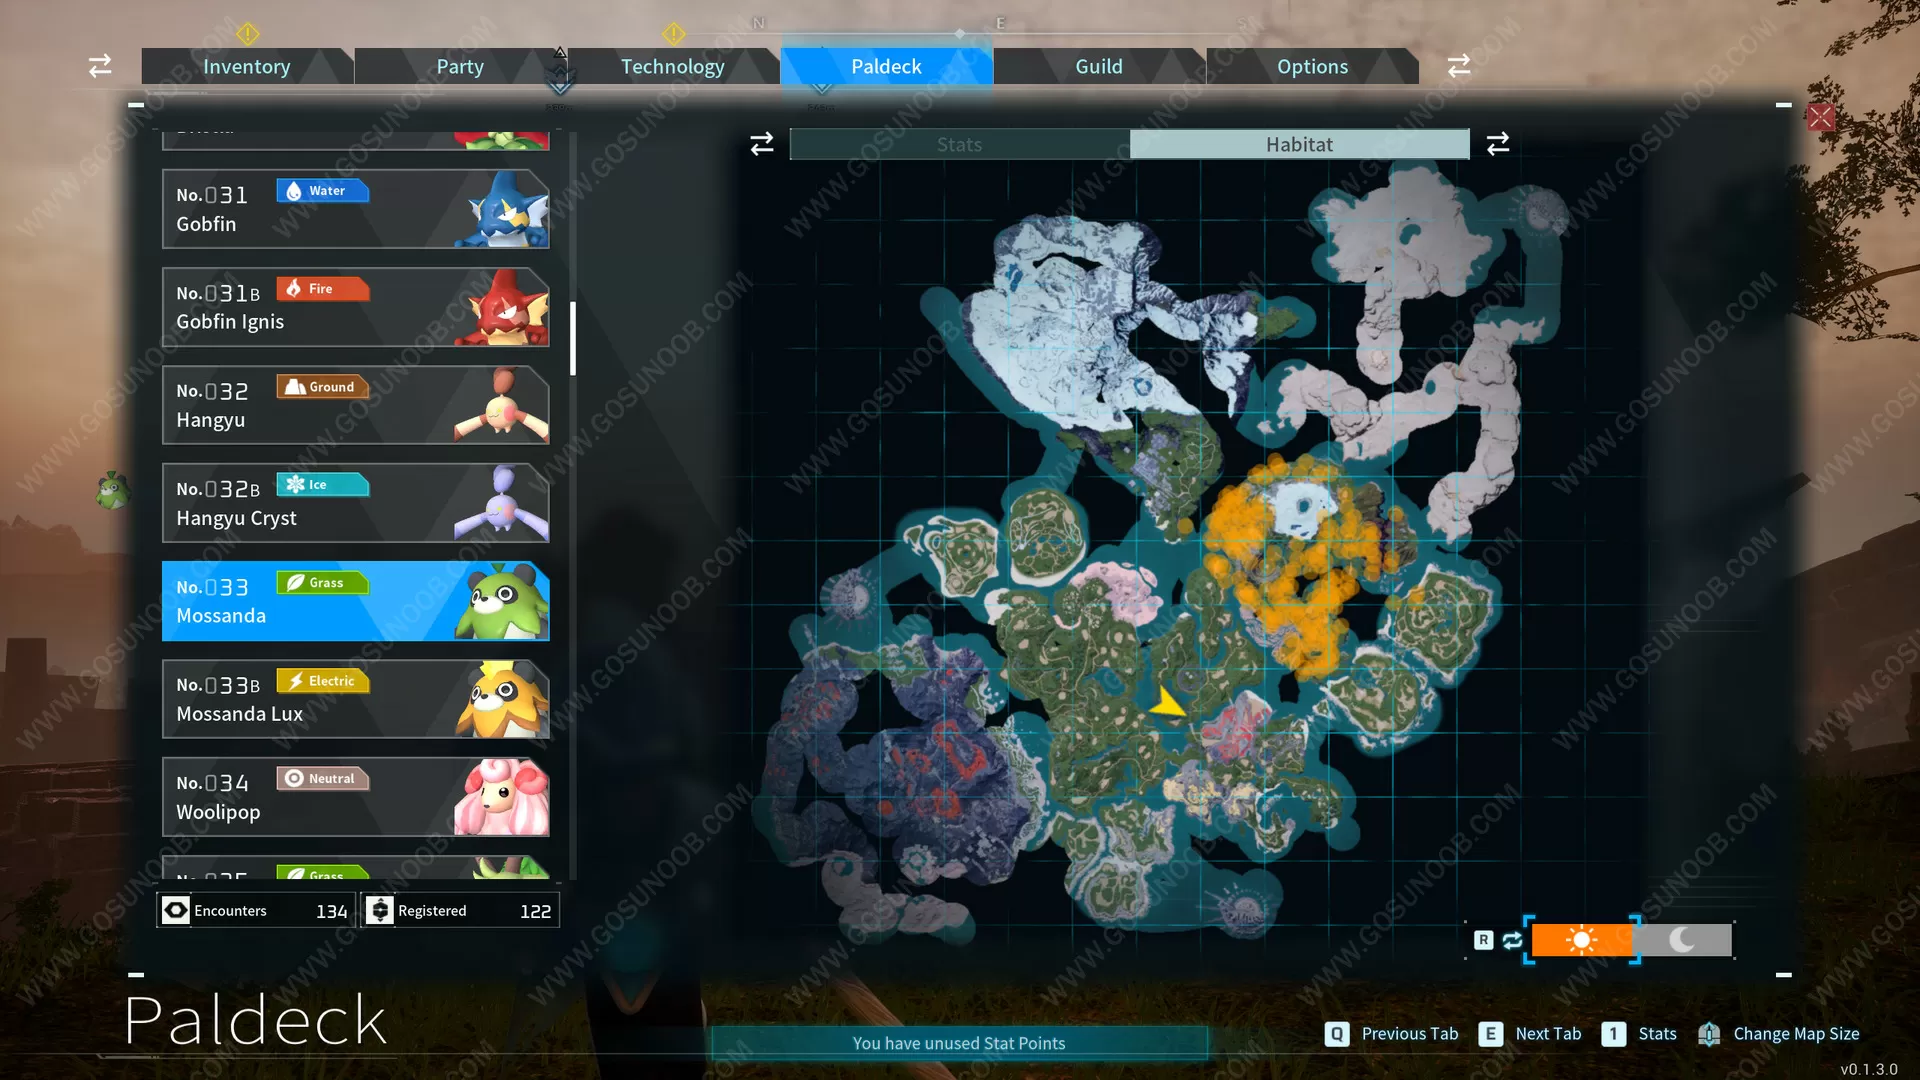
Mossanda Location – Where to Find and Capture Mossanda in Palworld?

Some Pals can be found only during nighttime. Others are available only as bosses. Some rare Pals become available in Wildlife Sanctuaries after you defeat them as bosses. The screenshot of the map below shows orange dots for daytime pals, blue dots for nighttime pals, and map locations for bosses.

Mossanda Map Location in Palworld
Screenshot captured by Gosunoob.com ©

How to Get Mossanda from Breeding?

There are 58 ways to breed Mossanda. Bellow are the first 10 of them listed. You need the parents to be of different genders and be the specified Pals.

Parent 1Parent 2
Penking Icon#11 PenkingWarsect  Icon#92 Warsect
Penking Icon#11 PenkingQuivern Icon#95 Quivern
Mossanda Lux Icon#33B Mossanda LuxKingpaca Icon#89 Kingpaca
Mossanda Lux Icon#33B Mossanda LuxWumpo Botan Icon#91B Wumpo Botan
Nitewing Icon#38 NitewingSibelyx Icon#79 Sibelyx
Nitewing Icon#38 NitewingIce Kingpaca Icon#89B Ice Kingpaca
Incineram Icon#40 IncineramRelaxaurus Icon#85 Relaxaurus
Incineram Icon#40 IncineramRelaxaurus Lux Icon#85B Relaxaurus Lux
Incineram Noct Icon#40B Incineram NoctRelaxaurus Icon#85 Relaxaurus
Incineram Noct Icon#40B Incineram NoctMammorest Cryst Icon#90B Mammorest Cryst
Click here to show the remaining 47 breeding combos
Cinnamoth Icon#41 CinnamothRagnahawk Icon#74 Ragnahawk
Cinnamoth Icon#41 CinnamothFaleris Icon#105 Faleris
Arsox Icon#42 ArsoxPaladius Icon#108 Paladius
Arsox Icon#42 ArsoxNecromus Icon#109 Necromus
Elizabee Icon#51 ElizabeeElphidran Icon#80 Elphidran
Elizabee Icon#51 ElizabeeElphidran Aqua Icon#80B Elphidran Aqua
Grintale Icon#52 GrintalePyrin Icon#58 Pyrin
Grintale Icon#52 GrintaleQuivern Icon#95 Quivern
Sweepa Icon#54 SweepaSibelyx Icon#79 Sibelyx
Sweepa Icon#54 SweepaWumpo Icon#91 Wumpo
Chillet Icon#55 ChilletShadowbeak Icon#107 Shadowbeak
Chillet Icon#55 ChilletNecromus Icon#109 Necromus
Univolt Icon#56 UnivoltHelzephyr Icon#97 Helzephyr
Foxcicle Icon#57 FoxcicleFrostallion Noct Icon#110B Frostallion Noct
Pyrin Icon#58 PyrinAzurobe Icon#82 Azurobe
Pyrin Noct Icon#58B Pyrin NoctVanwyrm Cryst Icon#71B Vanwyrm Cryst
Rayhound Icon#60 RayhoundCryolinx Icon#83 Cryolinx
Rayhound Icon#60 RayhoundFrostallion Icon#110 Frostallion
Kitsun Icon#61 KitsunSuzaku Aqua Icon#102B Suzaku Aqua
Dinossom Icon#64 DinossomSuzaku Icon#102 Suzaku
Dinossom Lux Icon#64B Dinossom LuxSuzaku Icon#102 Suzaku
Dinossom Lux Icon#64B Dinossom LuxShadowbeak Icon#107 Shadowbeak
Surfent Icon#65 SurfentMammorest Icon#90 Mammorest
Surfent Icon#65 SurfentJormuntide Icon#101 Jormuntide
Surfent Terra Icon#65B Surfent TerraReptyro Icon#88 Reptyro
Surfent Terra Icon#65B Surfent TerraJormuntide Icon#101 Jormuntide
Surfent Terra Icon#65B Surfent TerraJormuntide Ignis Icon#101B Jormuntide Ignis
Digtoise Icon#67 DigtoiseBlazamut Icon#96 Blazamut
Tombat Icon#68 TombatFrostallion Icon#110 Frostallion
Vanwyrm Icon#71 VanwyrmGrizzbolt Icon#103 Grizzbolt
Vanwyrm Icon#71 VanwyrmLyleen Noct Icon#104B Lyleen Noct
Vanwyrm Cryst Icon#71B Vanwyrm CrystLyleen Icon#104 Lyleen
Bushi Icon#72 BushiBeakon Icon#73 Beakon
Bushi Icon#72 BushiIce Reptyro Icon#88B Ice Reptyro
Ragnahawk Icon#74 RagnahawkWumpo Botan Icon#91B Wumpo Botan
Elphidran Icon#80 ElphidranReptyro Icon#88 Reptyro
Elphidran Icon#80 ElphidranJormuntide Ignis Icon#101B Jormuntide Ignis
Elphidran Aqua Icon#80B Elphidran AquaWarsect  Icon#92 Warsect
Azurobe Icon#82 AzurobeFaleris Icon#105 Faleris
Blazehowl Icon#84 BlazehowlAstegon Icon#98 Astegon
Blazehowl Noct Icon#84B Blazehowl NoctHelzephyr Icon#97 Helzephyr
Blazehowl Noct Icon#84B Blazehowl NoctGrizzbolt Icon#103 Grizzbolt
Broncherry Icon#86 BroncherryBlazamut Icon#96 Blazamut
Broncherry Aqua Icon#86B Broncherry AquaSuzaku Aqua Icon#102B Suzaku Aqua
Petallia Icon#87 PetalliaPaladius Icon#108 Paladius
Petallia Icon#87 PetalliaJetragon Icon#111 Jetragon
Mammorest Icon#90 MammorestAnubis Icon#100 Anubis
Mammorest Cryst Icon#90B Mammorest CrystAnubis Icon#100 Anubis

Mossanda Breeding Combos

Bellow is the list of all possible Mossanda breeding combos. This means that when you combine Mossanda with any of the bellow listed Pals you’ll get the specified child Pal. Gender of parents is inconsequential as long as they have different genders.

Parent 1Parent 2Child
Lamball Icon#1 LamballMossanda Icon#33 MossandaLoupmoon Icon#46 Loupmoon
Cattiva Icon#2 CattivaMossanda Icon#33 MossandaLoupmoon Icon#46 Loupmoon
Chikipi Icon#3 ChikipiMossanda Icon#33 MossandaLoupmoon Icon#46 Loupmoon
Teafant Icon#16 TeafantMossanda Icon#33 MossandaLoupmoon Icon#46 Loupmoon
Mau Icon#24 MauMossanda Icon#33 MossandaLoupmoon Icon#46 Loupmoon
Lifmunk Icon#4 LifmunkMossanda Icon#33 MossandaCaprity Icon#35 Caprity
Mau Cryst Icon#24B Mau CrystMossanda Icon#33 MossandaCaprity Icon#35 Caprity
Hangyu Cryst Icon#32B Hangyu CrystMossanda Icon#33 MossandaCaprity Icon#35 Caprity
Vixy Icon#14 VixyMossanda Icon#33 MossandaLovander Icon#69 Lovander
Cremis Icon#18 CremisMossanda Icon#33 MossandaLovander Icon#69 Lovander
Click here to show the remaining 99 breeding combos
Foxparks Icon#5 FoxparksMossanda Icon#33 MossandaEikthyrdeer Icon#37 Eikthyrdeer
Sparkit Icon#7 SparkitMossanda Icon#33 MossandaEikthyrdeer Icon#37 Eikthyrdeer
Hangyu Icon#32 HangyuMossanda Icon#33 MossandaEikthyrdeer Icon#37 Eikthyrdeer
Mossanda Icon#33 MossandaFlambelle Icon#70 FlambelleEikthyrdeer Icon#37 Eikthyrdeer
Flopie Icon#28 FlopieMossanda Icon#33 MossandaDigtoise Icon#67 Digtoise
Mossanda Icon#33 MossandaKelpsea Icon#81 KelpseaDigtoise Icon#67 Digtoise
Mossanda Icon#33 MossandaKelpsea Ignis Icon#81B Kelpsea IgnisDigtoise Icon#67 Digtoise
Fuack Icon#6 FuackMossanda Icon#33 MossandaReindrix Icon#59 Reindrix
Bristla Icon#30 BristlaMossanda Icon#33 MossandaReindrix Icon#59 Reindrix
Mossanda Icon#33 MossandaRibbuny Icon#39 RibbunyCelaray Icon#25 Celaray
Jolthog Cryst Icon#12B Jolthog CrystMossanda Icon#33 MossandaDumud Icon#43 Dumud
Pengullet Icon#10 PengulletMossanda Icon#33 MossandaMelpaca Icon#36 Melpaca
Tocotoco Icon#27 TocotocoMossanda Icon#33 MossandaMelpaca Icon#36 Melpaca
Hoocrates Icon#15 HoocratesMossanda Icon#33 MossandaMozzarina Icon#29 Mozzarina
Mossanda Icon#33 MossandaGaleclaw Icon#47 GaleclawRayhound Icon#60 Rayhound
Mossanda Icon#33 MossandaRobinquill Icon#48 RobinquillRayhound Icon#60 Rayhound
Mossanda Icon#33 MossandaGorirat Icon#49 GoriratRayhound Icon#60 Rayhound
Mossanda Icon#33 MossandaVaelet Icon#78 VaeletRayhound Icon#60 Rayhound
Gumoss Icon#13 GumossMossanda Icon#33 MossandaKitsun Icon#61 Kitsun
Daedream Icon#19 DaedreamMossanda Icon#33 MossandaKitsun Icon#61 Kitsun
Fuddler Icon#22 FuddlerMossanda Icon#33 MossandaKitsun Icon#61 Kitsun
Killamari Icon#23 KillamariMossanda Icon#33 MossandaBroncherry Icon#86 Broncherry
Mossanda Icon#33 MossandaSwee Icon#53 SweeBroncherry Icon#86 Broncherry
Gobfin Icon#31 GobfinMossanda Icon#33 MossandaFoxcicle Icon#57 Foxcicle
Gobfin Ignis Icon#31B Gobfin IgnisMossanda Icon#33 MossandaFoxcicle Icon#57 Foxcicle
Mossanda Icon#33 MossandaLunaris Icon#63 LunarisFoxcicle Icon#57 Foxcicle
Direhowl Icon#26 DirehowlMossanda Icon#33 MossandaTombat Icon#68 Tombat
Mossanda Icon#33 MossandaCawgnito Icon#44 CawgnitoTombat Icon#68 Tombat
Mossanda Icon#33 MossandaBeegarde Icon#50 BeegardeTombat Icon#68 Tombat
Rushoar Icon#20 RushoarMossanda Icon#33 MossandaPetallia Icon#87 Petallia
Mossanda Icon#33 MossandaLeezpunk Icon#45 LeezpunkPetallia Icon#87 Petallia
Rooby Icon#9 RoobyMossanda Icon#33 MossandaArsox Icon#42 Arsox
Mossanda Icon#33 MossandaLeezpunk Ignis Icon#45B Leezpunk IgnisArsox Icon#42 Arsox
Mossanda Icon#33 MossandaMaraith Icon#66 MaraithArsox Icon#42 Arsox
Mossanda Icon#33 MossandaWixen Icon#76 WixenArsox Icon#42 Arsox
Mossanda Icon#33 MossandaDazzi Icon#62 DazziDinossom Icon#64 Dinossom
Mossanda Icon#33 MossandaRobinquill Terra Icon#48B Robinquill TerraBlazehowl Icon#84 Blazehowl
Mossanda Icon#33 MossandaVerdash Icon#77 VerdashBlazehowl Icon#84 Blazehowl
Mossanda Icon#33 MossandaFenglope Icon#93 FenglopeBlazehowl Icon#84 Blazehowl
Mossanda Icon#33 MossandaFelbat Icon#94 FelbatBlazehowl Icon#84 Blazehowl
Mossanda Icon#33 MossandaCaprity Icon#35 CaprityUnivolt Icon#56 Univolt
Mossanda Icon#33 MossandaEikthyrdeer Icon#37 EikthyrdeerUnivolt Icon#56 Univolt
Mossanda Icon#33 MossandaLoupmoon Icon#46 LoupmoonUnivolt Icon#56 Univolt
Mossanda Icon#33 MossandaLovander Icon#69 LovanderUnivolt Icon#56 Univolt
Celaray Icon#25 CelarayMossanda Icon#33 MossandaVanwyrm Icon#71 Vanwyrm
Mossanda Icon#33 MossandaMelpaca Icon#36 MelpacaVanwyrm Icon#71 Vanwyrm
Mossanda Icon#33 MossandaEikthyrdeer Terra Icon#37B Eikthyrdeer TerraVanwyrm Icon#71 Vanwyrm
Mossanda Icon#33 MossandaDumud Icon#43 DumudVanwyrm Icon#71 Vanwyrm
Mossanda Icon#33 MossandaReindrix Icon#59 ReindrixVanwyrm Icon#71 Vanwyrm
Mossanda Icon#33 MossandaDigtoise Icon#67 DigtoiseBushi Icon#72 Bushi
Mossanda Icon#33 MossandaBroncherry Icon#86 BroncherryBushi Icon#72 Bushi
Mossanda Icon#33 MossandaBroncherry Aqua Icon#86B Broncherry AquaBushi Icon#72 Bushi
Mossanda Icon#33 MossandaFoxcicle Icon#57 FoxcicleIncineram Icon#40 Incineram
Mossanda Icon#33 MossandaRayhound Icon#60 RayhoundIncineram Icon#40 Incineram
Mossanda Icon#33 MossandaTombat Icon#68 TombatIncineram Icon#40 Incineram
Mossanda Icon#33 MossandaPetallia Icon#87 PetalliaIncineram Icon#40 Incineram
Penking Icon#11 PenkingMossanda Icon#33 MossandaWumpo Botan Icon#91B Wumpo Botan
Mossanda Icon#33 MossandaElphidran Icon#80 ElphidranWumpo Botan Icon#91B Wumpo Botan
Mossanda Icon#33 MossandaElphidran Aqua Icon#80B Elphidran AquaWumpo Botan Icon#91B Wumpo Botan
Mossanda Icon#33 MossandaKingpaca Icon#89 KingpacaSibelyx Icon#79 Sibelyx
Mossanda Icon#33 MossandaWumpo Icon#91 WumpoSibelyx Icon#79 Sibelyx
Mossanda Icon#33 MossandaWumpo Botan Icon#91B Wumpo BotanSibelyx Icon#79 Sibelyx
Mossanda Icon#33 MossandaGrintale Icon#52 GrintaleKingpaca Icon#89 Kingpaca
Mossanda Icon#33 MossandaUnivolt Icon#56 UnivoltSurfent Icon#65 Surfent
Mossanda Icon#33 MossandaIncineram Noct Icon#40B Incineram NoctAzurobe Icon#82 Azurobe
Mossanda Icon#33 MossandaSurfent Icon#65 SurfentAzurobe Icon#82 Azurobe
Mossanda Icon#33 MossandaAnubis Icon#100 AnubisAzurobe Icon#82 Azurobe
Mossanda Icon#33 MossandaNitewing Icon#38 NitewingNitewing Icon#38 Nitewing
Mossanda Icon#33 MossandaSweepa Icon#54 SweepaNitewing Icon#38 Nitewing
Mossanda Icon#33 MossandaCinnamoth Icon#41 CinnamothWumpo Icon#91 Wumpo
Mossanda Icon#33 MossandaAzurobe Icon#82 AzurobeWumpo Icon#91 Wumpo
Mossanda Icon#33 MossandaElizabee Icon#51 ElizabeeRagnahawk Icon#74 Ragnahawk
Mossanda Icon#33 MossandaVanwyrm Icon#71 VanwyrmElphidran Icon#80 Elphidran
Mossanda Icon#33 MossandaBushi Icon#72 BushiElphidran Icon#80 Elphidran
Mossanda Icon#33 MossandaKatress Icon#75 KatressAnubis Icon#100 Anubis
Mossanda Icon#33 MossandaBlazehowl Icon#84 BlazehowlAnubis Icon#100 Anubis
Mossanda Icon#33 MossandaIncineram Icon#40 IncineramGrintale Icon#52 Grintale
Mossanda Icon#33 MossandaBeakon Icon#73 BeakonReptyro Icon#88 Reptyro
Mossanda Icon#33 MossandaLyleen Noct Icon#104B Lyleen NoctReptyro Icon#88 Reptyro
Mossanda Icon#33 MossandaMossanda Lux Icon#33B Mossanda LuxSweepa Icon#54 Sweepa
Mossanda Icon#33 MossandaRagnahawk Icon#74 RagnahawkSweepa Icon#54 Sweepa
Mossanda Icon#33 MossandaSurfent Terra Icon#65B Surfent TerraCinnamoth Icon#41 Cinnamoth
Mossanda Icon#33 MossandaRelaxaurus Icon#85 RelaxaurusPyrin Icon#58 Pyrin
Mossanda Icon#33 MossandaMammorest Icon#90 MammorestPyrin Icon#58 Pyrin
Mossanda Icon#33 MossandaMammorest Cryst Icon#90B Mammorest CrystPyrin Icon#58 Pyrin
Mossanda Icon#33 MossandaPyrin Noct Icon#58B Pyrin NoctElizabee Icon#51 Elizabee
Mossanda Icon#33 MossandaIce Reptyro Icon#88B Ice ReptyroElizabee Icon#51 Elizabee
Mossanda Icon#33 MossandaCryolinx Icon#83 CryolinxRelaxaurus Icon#85 Relaxaurus
Mossanda Icon#33 MossandaOrserk Icon#106 OrserkRelaxaurus Icon#85 Relaxaurus
Mossanda Icon#33 MossandaFrostallion Icon#110 FrostallionRelaxaurus Icon#85 Relaxaurus
Mossanda Icon#33 MossandaHelzephyr Icon#97 HelzephyrJormuntide Icon#101 Jormuntide
Mossanda Icon#33 MossandaRelaxaurus Lux Icon#85B Relaxaurus LuxQuivern Icon#95 Quivern
Mossanda Icon#33 MossandaBlazamut Icon#96 BlazamutBeakon Icon#73 Beakon
Mossanda Icon#33 MossandaMenasting Icon#99 MenastingWarsect  Icon#92 Warsect
Mossanda Icon#33 MossandaLyleen Icon#104 LyleenWarsect  Icon#92 Warsect
Mossanda Icon#33 MossandaJetragon Icon#111 JetragonMenasting Icon#99 Menasting
Mossanda Icon#33 MossandaGrizzbolt Icon#103 GrizzboltMossanda Lux Icon#33B Mossanda Lux
Mossanda Icon#33 MossandaPetallia Icon#87 PetalliaLyleen Icon#104 Lyleen
Mossanda Icon#33 MossandaRayhound Icon#60 RayhoundGrizzbolt Icon#103 Grizzbolt

Palworld Mossanda Active Skills

Mossanda has 7 active skills beside his primary partner skill Grenadier Panda.

Skill NameSkill DescriptionUnlock Lv.
Power ShotCharges energy into a focused blast.1
Seed Machine GunFires a volley of hard seeds at enemies in front of it.7
Stone CannonDigs up a boulder and hurls it at an enemy.15
Crushing PunchMossanda‘s exclusive skill. Winds up its fist before striking an enemy with a devastating punch.22
Seed MineLaunches a deadly seed. If it hits an enemy, the seed explodes.30
Spine VineGenerates spiny thorns that chase an enemy along the ground, piercing them from below.40
Solar BlastCharges solar energy before blasting enemies with a powerful beam.50
See this page in: DE flag icon ES flag icon
TAGS ,
Author Gosu No0b profile picture
Written by:
Sometimes articles on our website are a team effort. Such articles are published under the Gosu Noob author and that means the thing you are reading was created by the whole crew.

YOU MAY ALSO READ

CLICK TO POST A COMMENT