Cascade Kingdom Moon Locations - Super Mario Odyssey Power Moons
Power Moons in Cascade Kingdom are a collectible in Super Mario Odyssey, which are necessary for you to progress further. There’s forty of them that you can find in the Cascade Kingdom level. You don’t have to find all of them, at least initially; five Power Moons will be enough. Seeing how this is one of the earliest levels of the game, some of the Moons will be easy to find, and the game will lead you to them. Others, however, are hidden pretty well, and will require you to search every nook and cranny. Because of their importance in progressing and unlocking more game content, we’ve put together our map and guide for Cascade Kingdom Power Moon locations.
We will also help you find all the power moons in Cascade, Sand, Lake, Wooded, Lost Kingdom, Metro Kingdom, Snow Kingdom, Seaside Kingdom, Luncheon Kingdom, Bowser’s Kingdom, Moon Kingdom, Mushroom Kingdom and Dark Side.
Cascade Kingdom Mandatory Moons
1. Our First Power Moon – The first Cascade Kingdom Power Moon is fairly simple to get. It is at the beginning of the kingdom, in Waterfall Basin. The game will pretty much zoom in on the in the cutscene for “Our First Power Moon”. Head over to the plateau with the Chain Chomp. When it attacks you, use Cappy to possess it. Wind it up by pulling the left stick down, aim for the glowing rock formation, and release to destroy the rocks and get the first Power Moon in Cascade Kingdom. Then, cross the bridge you’ve just created.2. Multi Moon Atop The Falls – There’s a Multi Moon (worth three Power Moons) in Cascade Kingdom, and you get it from the horrifying Madame Broode boss fight in “Multi Moon Atop the Falls”. To get there, you have to reach the top of the 2D platforming section described above. You’ll now be in Fossil Falls Height. Possess one of the Chomps, knock down the rocks, and get ready for the boss fight. It’s pretty simple; all you have to do is possess the Chomp she throws at you, and use it to knock her in the face. Do so three times, and she’ll go down. Collect your Multi Moon.
Sand Kingdom Power Moons Locations in Super Mario Odyssey
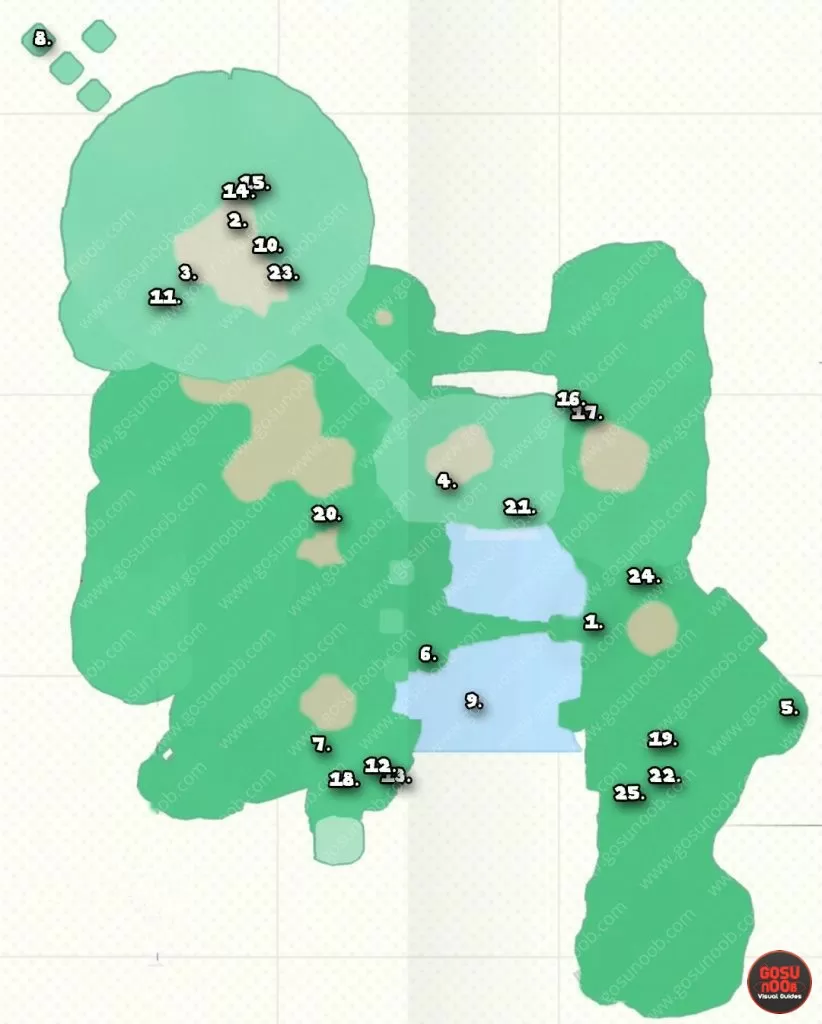
Super Mario Odyssey Cascade Kingdom Power Moon Locations
3. Chomp through the Rocks – While you’re possessing the T-Rex, you can find a section of rock to break in the cliff, nearby where the T-Rex is sleeping, left of the three Chomps. Behind those rocks is another Power Moon. Alternatively, you can use one of the tree Chain Chomps to break the rocks, it’s up to you.4. Behind the Waterfall – Go past the Odyssey, and follow the path to the plateau with three Chain Chomps. Hop up the blocks on the left, possess the sleeping T-Rex, and clear the way below to Stone Bridge. Possess the larger Chomp and break the rocks behind it, then enter the 2D platforming section. There’s a part of it that leads you to the left, around the corner. Go to the end and you’ll get the Power Moon.
5. On Top of the Rubble – True to its name, the Power Moon is located on a pile of rubble. It’s near the very beginning of Cascade Kingdom, on the right. It doesn’t appear until you start the Odyssey, then come back to Cascade Kingdom.
6. Treasure of the Waterfall Basin – From the bridge that you made after collecting the first Power Moon, jump into the water and swim to the left and around the corner. You’ll notice a small alcove in the cliff. Swim over and open the chest to receive the Power Moon.
7. Above a High Cliff – When the game returns you to the Odyssey after you’ve defeated the boss, to find one more Cascade Kingdom Power Moon, turn around and you’ll spot another Chain Chomp. It’s to the left of the bridge you’ve created earlier. Possess it, wind up, and destroy the rock formation. You’ll uncover a pipe entrance. Go inside, and you’ll pop up on the top of the ledge. The Power Moon is right there for you collect.
8. Across the Floating Isles – Look towards the northwest from the arena where you fought Madame Broode, and you’ll see some floating platforms. Jump over to the Power Moon to collect it.
9. Cascade Kingdom Timer Challenge 1 – Head left from the start of the stone bridge, and you’ll come across a scarecrow. Possess it with Cappy, and a short platforming puzzle will begin. Complete it, and you’ll earn another Power Moon. If you don’t make it, you can retry by possessing the scarecrow again.
10. Cascade Kingdom Timer Challenge 2 – Just like with the previous one, go to the location of the scarecrow, possess it to start the mini game, and complete it in time to acquire the Power Moon.
11. Good Morning, Captain Toad!: Locate Captain Toad in Cascade Kingdom to receive a Power Moon. He’s on a platform you seemingly can’t reach. To reach him, you have to climb the mountain above Toad, and then drop down.
12. Dinosaur Nest: Big Cleanup! – There’s a secret red door in Cascade Kingdom. To reach it, drop off the ledge to the south of the Top of the Big Stump flag. Capture the T-Rex and smush the enemies inside to get the Power Moon.
13. Dinosaur Nest: Running Wild! – In the same location as the previous entry, capture the T-Rex and drop to the ledge below. There’s a fossilized rock you have to destroy in order to unlock the Power Moon.
14. Nice Shot With the Chain Chomp! – Going down the warp pipe, which you can access by turning the white hats into cloud platforms, will take you into a new area. Here, you’ll be playing a little bit of pool with Chain Chomps. You’ll have to possess the nearest Chain Chomp, and use it to knock the other Chain Chomp into the target. Repeat this in the three areas to get the Power Moon, but don’t go into the warp pipe yet.
15. Very Nice Shot with the Chain Chomp! – After you’ve completed the previous moon, head to the right and you’ll find a hidden area with another Chain Chomp puzzle to solve. This will get you another Power Moon. Now, go into the warp pipe back to the surface.
16. Past the Chasm Lifts – Go to the area where you cleared the stone blocks with the T-Rex, and drop to the small area on the side of the bridge to find another secret red door. Complete the first 2D platforming section all the way to earn the moon.
17. Hidden Chasm Passage – There’s another 2D section in the area described in the previous point. Carefully drop down from the ledge that comes after the elevating platforms to find it. Complete the section, and you’ll be rewarded with another moon.
18. Secret Path to Fossil Falls – This one is pretty complicated. The only way to reach this place is through a warp painting in Snow Kingdom. There, you’ll have to possess a Ty-Foo closest to your ship. Then, head northeast, knock down the wooden wall to the left, then jump out of the Ty-Foo to reach the painting. Welcome back to Cascade Kingdom! Simply pick up the Power Moon.
19. A Tourist in the Cascade Kingdom – This one can only be gotten after defeating Bowser. Go back to Sand Kingdom and speak to the guy that’s standing around the taxi. After that, find him in Metro Kingdom. Finally, go back to Cascade Kingdom and find the taxi near the waterfall. Speak to the Tostarenan guy to get the Power Moon.20. Rolling Rock by the Falls – There’s a rock on the map that you have to crush in order to reveal the Power Moon. You can either throw it around a few times to smash it open, or stomp it while possessing the T-Rex; your call.
21. Peach in the Cascade Kingdom – Another Power Moon you can only get after defeating Bowser. Travel back to Cascade Kingdom and find Peach and Tiara. Talk to them, and you’ll get another moon.
22. Cascade Kingdom Regular Cup – Return to Cascade Kingdom, and you’ll meet a Koopa that offers you to take part in the Freerunning race. It stats at Waterfall Basin. From there, you’ll go up to the clearing with Chain Chomps, straight over the bridge, and ends not far from the Wall. It’s not too difficult. When you win the race, you’ll get the moon.
23.Caveman Cave-Fan – Go back to the place where you fought Madame Broode and talk to the Bonneter. Then, head back to Cascade Kingdom after you’ve left once, and buy the Caveman headwear and outfit at Crazy Cap, if you haven’t already. Put them on, then talk to the Bonneter again, and he’ll give you the Power Moon.
24. Shopping in Fossil Falls – After you’ve left Cascade Kingdom for the first time, you can return to find the Crazy Cap vendor, very close to the Odyssey’s landing zone. You can buy this Power Moon here for 100 Golden Coins.
25. Sphynx Traveling to the Waterfall – Return to Cascade once you defeat Bowser. Find the pair of Binoculars nearby. Look at the skies until you spot a Sphynx flying around in a balloon (or, rather, sail) much like your own. To get the Power Moon, zoom in on the Sphynx.
End Game Cascade Kingdom Moons
Once you’ve beaten Super Mario Odyssey, you can (and should) return to Cascade Kingdom for the end-game content. Among other things, you can locate and open the Moon Rock (the large gray stone square) to unlock fifteen new Power Moons that you can then collect. The Moon Rock is located on a ledge in the southwest corner of the arena where you fought Madame Broode.26. Bottom of the Waterfall Basin – In Waterfall Basin, jump into the water to the left of the small bridge that you created when you got the first moon. You’ll notice a glowing spot on the floor, which you have to Ground Pound to reveal the moon.
27. Just a Hat, Skip, and a Jump – Across from the 8-bit section, next to the large, semi-buried hat, you’ll see a series of cloud-hat platforms leading to the power moon. Simply throw Cappy at the hats to create platforms, and hop over to the moon.
28. Treasure Under the Cliff – From the Stone Bridge flag, look right and left. You’ll see the Power Moon levitating above one of the clod-hat platforms. Climb up there, jump onto the second cloud platform, and jump towards the moon from there.
29. Next to the Stone Arch – The Stone Archway in question is the one between Fossil Falls Heights and the arena where you fought Madame Broode. In the middle of the bridge, look over the south side, and you’ll see the moon. To get it, simply dangle of the edge, take careful aim, and drop.
30. Guarded by a Colossal Fossil – Climb onto the triceratops skull in Fossil Falls Heights. Walk to the small horn on the skull’s nose, and you’ll notice that it glows. What you have to do here is to chuck Cappy onto the horn, then hold the trow so that Cappy spins. Keep holding until the Power Moon appears.
31. Under the Old Electrical Pole – Capture the T-Rex, and guide it down towards the Odyssey. Smash the Water Basin electrical pole, and that will reveal a glowing spot on the ground. Perform a Ground Pound to reveal the moon.
32. Under the Ground – This Power Moon is hiding under the T-Rex’s head. Capture the dinosaur and move it away, then quickly de-possess it, run over to the glowing patch of grass, and do a Ground Pound.
33. Inside the Busted Fossil – Head over to Fossil Falls Heights. Take note of the tooth-like fossil near the electrical pole (with your back to the Chain Chomps, left of the flag). Capture the nearest Chain Chomp, wind it up, and crash it into the fossil to free the Power Moon.
34. Caught Hopping at the Waterfall! – Chase down the rabbit by stunning it with Cappy. It’s on the plateau where you met the first Chain Chomp, in front of the Crazy Cap.
35. Taking Notes: Hurry Upward – This one is pretty simple. head to the 8-bit section in the Ancient Wall. Collect the treble clef to start the challenge. Pick up all the notes before the time runs out to receive the Power Moon.
36. Cascade Kingdom Master Cup – Just like with Power Moon #22, talk to the Koopa and win the race.
37. Across the Mysterious Clouds – Go inside the Moon Pipe next to the Stone Bridge checkpoint flag. Complete the whole section, and you’ll get the Power Moon at the end. The major challenge here are the cloud platforms which you activate by hitting the white hats with Cappy. The good news is that you can jump, throw Cappy to activate the platform, and land on it all in one jump.
38. Atop a Wall Among the Clouds – In the area mentioned above, keep going past the nine-platform grid, onto the pendulum, and then onto the following cloud platform. You’ll notice that there are some blocks here. Jump onto them, and jump up again to reveal a hidden block. From there, jump to the top of the wall to find the Power Moon.
39. Across the Gusty Bridges – In the place where you first saw the Odyssey, there’s a Moon Pipe you can go down. Here’s how this section works. You need to pull the levers to open the way forward. The catch is, the gust of wind move the orange platforms. So, you’ll have to make your way through the obstacle course while making sure you find a safe spot, so that the moving platforms don’t push you into the void. At the end of the course, you’ll get the moon.
40. Flying Far Away from Gusty Bridges – In the section mentioned above, make your way to the second lever. Throw Cappy onto the the wind gust, and that’ll take him onto the third lever on the left, which you can’t normally reach. Go into the side area, and fling Cappy into the hat launcher just as the gusts begin. Proper timing will lead Cappy to the the far-away lever, which will get you the moon.