Zelda BotW Joloo Nah Shrine Apparatus Walkthrough
Joloo Nah certainly is one of the more interesting shrines in Zelda Breath of the Wild. To reveal it, you’ll need to complete a funny quest, and while inside, you’ll also have to rotate your controller to make it through. To make the last shrine room much easier, be sure to bring at least one fire arrow. In this guide, we’re going to show you how to get to Zelda BoTW Joloo Nah shrine, how to complete Apparatus puzzle and get all treasure chests.
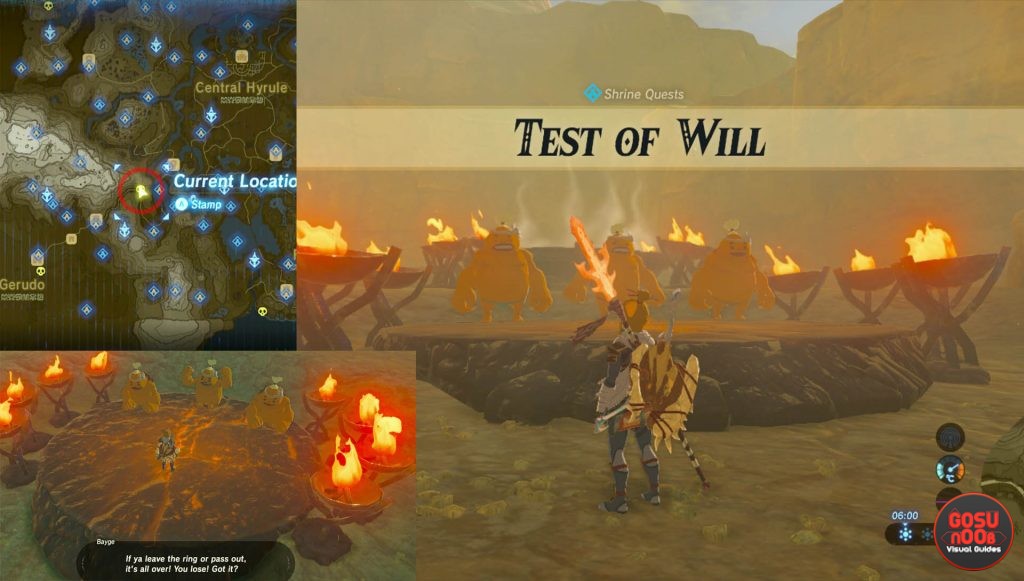
Test of Will – Joloo Nah Quest
To find and start the quest, follow the road from Central Hyrule to Gerudo Desert. Once you are about to make a hard left turn, climb up the hill’s edge north from you. Up there, somewhere between Outskirt Stable (northeast from it) and Wasteland Tower (to the southwest) you’ll find three Goron Blood Brothers. Talk to them to start the quest.
Zelda BoTW shrine locations map – find & complete all 120
In order to complete the quest, you’ll need to stand on the heat plate, the same one they’re sitting on. The temperature on this plate is great and you’ll lose your health slowly. If you have some food, you can use it to replenish some of it. The Flamebreaker set should also help, as well as the Fireproof Elixirs.
To complete the quest, you’ll need to stand on one more heat plate. This one is less forgiving. If you survive, the Goron Brothers will reveal the Joloo Nah entrance.
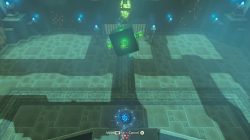
Joloo Nah Apparatus Walkthrough
The first room gives you a glimpse into the shrine’s theme. Examine the first console in order to rotate the cube and power up all sides. Once all six sides are powered, the gate to the next room will open up.
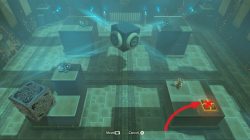
The second room contains the first treasure chest. It is left from where you enter the room. To reach it, you can use the power of the wind from the nearby console. Aim the wind from the central device toward the chest and just glide toward it. There is also another way which a bit harder. Magnesis the metal cube and pull it into the air, between the chest and the next nearby platform. Let it fall down and stasis it at the right moment to make a bridge. Inside the chest there is a Golden Claymore (28 damage).

After you’ve emptied the treasure chest, head to the console and change the direction of the mechanism so it blows the air toward the four spinning fans. Two of them are on a lower level than they need to be. You’ll need to use the weight on the two nearby switches in order to raise the two fan platforms. The metal cube can be placed on one, with the help of Magnesis. For the second pressure switch, just stand on it. The door to the next area will open. To avoid having the fan’s platform go down during to your trip to the next room, be sure to use Stasis on the switch you stood on.
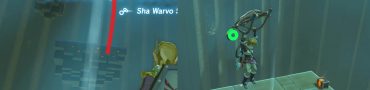
The last room has one well hidden chest. If you look up from the entrance, you can spot it on a wooden balcony. Bring it down with the help of a fire arrow. I am not sure, but you can probably use Magnesis on a fire brazier and save one arrow. Once the chest is down, you can loot the Gerudo Spear (16 damage).
If you have a treasure chest down, use Magnesis to place it on a nearby pressure switch. It will bring down one water pillar. Go to the nearby console and move the central cube with six braziers in order to light them all up. Try to not get them wet from the right water tower. Once they are all lit, the spirit orb gate opens, and you can collect it.

Note: If you don’t have any fire arrows, and you just want to collect the spirit orb, you can put some heavy stuff like weapons on the pressure switch.

One the first plate, use the flamebreaker set. It’d be better to have it upgraded twice to get the set bonus. The brothers don’t like Link using that set on the second plate because it defeats the whole purpose of catching fire, so the desert voe set is perfect for the second plate. I used a flameproof elixir, and took no damage.
Use the dessert voe set instead of the flame breaker, for the first plate at least. leveled up it gives major heat resistance and no need for heat elixirs