Zelda Breath of the Wild Shrine Locations Map - Find & Complete all 120
Shrines are places of trial located throughout Legend of Zelda: Breath of The Wild’s map. They’re like small dungeons. Once inside, you’ll have to complete platforming challenges and various other puzzles. In the end, you’ll be rewarded with a spirit orb. There are 120 shrines in the game and after completing them all you’ll unlock Green Tunic of the Wild. In this guide, we’re going to show you all Zelda Breath of The Wild shrine locations and help you solve their puzzles.
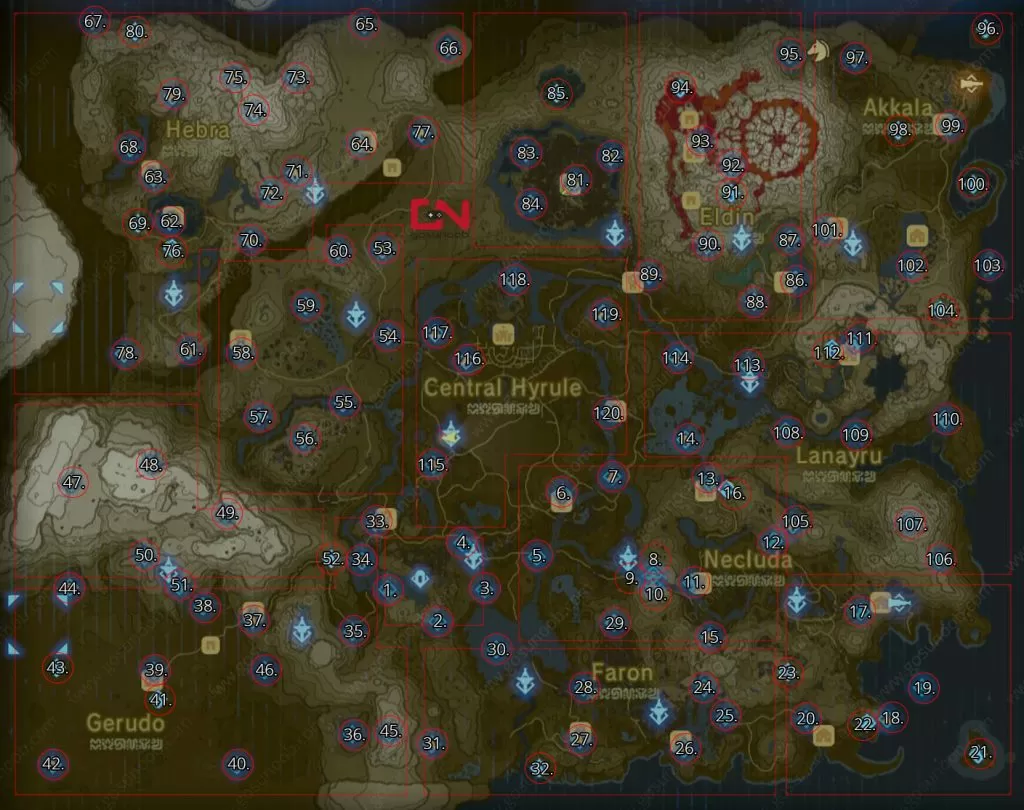
The map is divided into regions for easier usage. Click the region name to get a more detailed description of all the shrine locations in it.
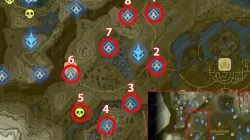
- Great Plateau: 1-4
- West Necluda: 5-16
- East Necluda: 17-23
- Faron: 24-32
- Gerudo (Desert & Highlands): 33-52
- Hyrule Ridge: 53-60
- Hebra: 61-80
- Great Hyrule Forest: 81-85
- Eldin: 86-95
- Akkala: 96-104
- Lanayru: 105-114
- Central Hyrule: 115-120
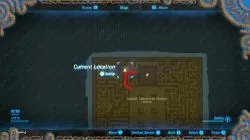
Great Plateau Shrine locations
- Keh Namut – Cryonis Trial
- Owa Daim – Stasis Trial
- Ja Baij – Bomb Trial
- Oman Au – Magnesis Trial
Zelda Shrine Rewards & Challenges
Necluda Shrine locations
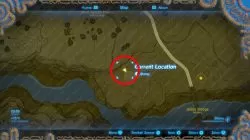
This region is positioned just east from the first one – Great Plateau. It consists of two major areas – West and East Necluda.
West Necluda

While wandering the second area, West Necluda, you’ll be able to complete several Shrines:
- Bosh Kala – On the Hylia river, near Proxim bridge.
- Wahgo Katta – Next to the Riverside Stable, close to the road, hard to miss.
- Hila Rao – On an island. As soon as you reach the island, you’ll get the quest “Watch out for the Flowers”. From Magda, who gives you the quest, follow the path to your left. Find your way through the flower maze.
- Shee Venath – You’ll have to climb to the top of the mountain. The shrine is located just below it. Jump from the top, and glide toward the hidden entrance.
- Ree Dahee – At Dueling Peaks, close to the river. You’ll have to climb a bit.
- Shee Vaneer – This shrine is just across the Shee Venath. You’ll need to bring your Warm Doublet, as it is cold up there. This is the highest peak in the area.
- Ha Dahamar – Close to the stable, easy to spot.
- Kam Urog – Reveals itself upon completion of the The Cursed Statue Shrine Quest – puzzle solution found in this guide.
East Necluda
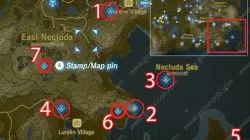
- Myahm Agana – At the entrance to Hateno Village, up on the hill.
- Muwo Jeem – On the mountain peak, can be seen from a distance.
- Chaas Qeta – On the tiny Tenoko Island. You can glide down to it from Muwo Jeem shrine.
- Yah Rin – Above Lurelin Village. That’s the same place where you can find Cloyne, and earn a bunch of rupees easily.
- Korgu Chideh – Found on the Eventide Island, deep in the southeast. You might need stamina regeneration food, as gliding toward this island takes a lot of time. This is the most fun part of the shrine reveal quests, so we won’t spoil it.
- Kah Yah – Just under the eastern part of Mount Dunsel, on the beach, in an area called Palmorae Ruins. Talk to Garini to start the quest “A Fragmented Monument”. The first fragment is close to Garini, in the grass around the boulder near the three palm trees. The second is on Palmorae Beach. Look for some floating barrels and inspect the rocks in the water nearby. The third one is a the furthest point of the crescent-shaped peninsula called Soka Point. Return to Garini, then stand on the orange shrine plate and hit crouch.
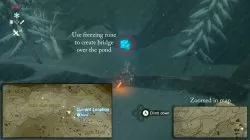
- Tawa Jin – Up in the mountains, on the plateau between three ponds: Hany Pond, Rabella Wetlands and Uteh Marsh. You’ll spot it from afar thanks to the five large bones and the three pressure plates. Three giants guard the three ancient spheres nearby. Defeat them, take the spheres and place them on the plates.
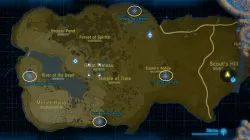
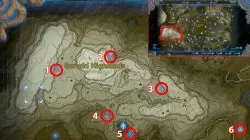
Faron Shrine locations
Faron is an area in the south. It’s made up of zones like Faron Grasslands and Sea, Lake Hylia, Bronas Forest, Corta Lake, Riola Sprint, Rodai Lake and others.
- Shoda San – Behind the Riola Spring waterfall. There is a hidden path next to the waterfall that takes you to the entrance.
- Qukah Nata – this is a secret Shrine. You’ll have to find Kass first and start a quest “A Song of Storms“. He is found high in the hills, next to the Calora Lake. If there is rain preventing you from climbing the cliff-side, use the Cryonis rune on the waterfall and climb up, step by step. Once you reach the top you should find Kass. Guides for completing the quest are found here.
- Shai Utoh – At Ubota Point, behind the stable, on the ground floor. Find a breakable stone structure and destroy it. It will reveal the cave entrance with the shrine inside it.
- Pumaaag Nitae – Somewhere between Finra Woods (to the west) and Pagos Woods (to the east), at ground level.
- Ka’o Makagh – On a hill above the stable.
- Shae Katha – North of Dracozu Lake, behind the statue of Goddess Hylia in the Spring of Courage. Offer one of Farosh’s scales to enter. You can find more detailed instructions here.
- Ya Naga – In the middle of Hylia Island in Hylia Lake. Start from Lake Tower, turn northwest and paraglide from there.
- Ishto Soh – East of Daval Peaks. Use your paraglider to fly eastward from the mountains.
- Shoqa Tatone – Talk to Loone in northwest Puffer Beach to start Guardian Slideshow Shrine Quest. She’ll ask you to show her pictures of three different Guardians – small, flying, and walking around. Take the orb and put it in the mound.
Gerudo Desert Shrine locations
Gerudo desert is located in the southwestern part of Hyrule. Three shrines listed here are found on the way to the desert from Central Hyrule. Some of the areas that compose Gerudo Desert are West and East Barrens, Gerudo Ruins, Toruma Dunes, Northern Icehosue, Palu Wasteland and many others.
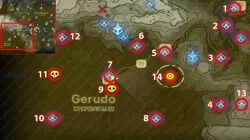
- Rota ooh – If you head toward the Gerudo Desert from the center of the map – Hyrule Field – you’ll go by the Outskirt Stable. From the stable, head west up the hill.
- Dah Kaso – There’s a set of bridges that connect the tall stone formations in this area. Look down from the bridge that connects two larger platforms. The shrine is next to the water and the raft. Beware of the sleeping giant Hinox mini-boss.
- Jee Noh – East from the Wasteland Tower that reveals the desert map, close to the road.
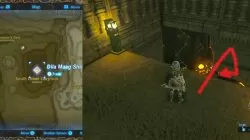
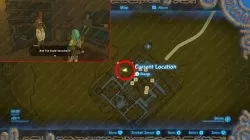
- Dila Maag – Glide from the Wasteland Tower to the southeast. Soon enough, you’ll spot the tall stone maze called South Lomei Labyrinth. If you don’t care about rupees, head to the west of the central maze part, the one just south from its mid-line. You should spot a few corrupted areas there. There’s a hidden entrance below the one that looks like a bridge.
- Key Noh – The path that takes you to the desert goes by the Gerudo Canyon Stable, just before the Gerudo Desert Gateway. Climb the rocks south from the stable.
- Dako Tah – This one is tricky to find if there is a desert storm in the area. You can easily spot it during the night. It is in the middle of the stone structures in the Great Cliffs area, a bit above ground level.
- Daqo Chisay – Just before the entrance to Gerudo Town.
- Misae Suma – Southeast from Gerudo Town, in the area between Southern Oasis (to the west) and East Barrens (to the east), you’ll find a big rock formation. Jump on it to find the “sealed” entrance of the shrine. In order to gain entrance, you’ll need to complete the quest “The Perfect Drink”. To do so, you’ll need to gain entrance to Gerudo Town. Once you can enter, follow the quest markers. To get the ice to Furosa without melting, be sure to not carry it all the way, but to throw it, or use the stasis punch combo.
- Raqa Zunzo – Head south of Gerudo Town to the Sand Seal Rally spot after you defeat the Divine Beast. Win the sand seal really challenge to get the orb to activate the shrine.
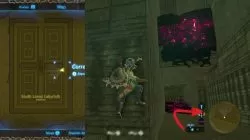
- Hawa Koth – In the desert southwest from Gerudo Town, in Gerudo Great Skeleton, near Dragon’s Exile.
- Tho Kayu – In the Toruma Dunes, just under the letter M (when zooming the map at 2x – thanks to E-ZombieHERO for pointing that out in the comments). Beware the Molduga mini-boss.
- Kema Zoos – There’s a part of a skeleton where the mountains curve to the north. It’s west of Karusa Valley, northwest of West Gerudo Ruins. The shrine is in the skeleton. Plan ahead, since the in-game map will become unavailable as you approach.
- Suma Sahma – Between Mount Granajh and Daval Peak. You must roll a snowball down into the puddle, then wait until the sun is in position so the snowball casts a shadow on the circular contraption on the hillside. For full instructions, check out our Secret Shrine Quest Locations guide.
- Korsh O’hu – In the East Gerudo Ruins, which are in the east of Palu Wasteland. Speak to Rotana in the northwestern section of Gerudo Town to start The Seven heroines quest. Go to the circular formation at the bottom of the mountain southwest of Wasteland Tower. There, you’ll find the Seven Heroines statues. To solve the puzzle, you have to put the large metal balls in their proper basin. For a more detailed guide, check out our Zelda BotW Secret Shrine Quest Locations guide.
Gerudo Highlands Shrine Locations
Gerudo Highlands is the mountainous region north of the Gerudo Desert. It encompasses the area east of Mount Agaat, west of Zirco Mesa, south of Hemaar’s Decent and north of the Desert, with Gerudo Summit in the center.
- Kema Kosassa – On the eastern slope of Mount Agaat, north of Risoka Snowfield.
- Keeha Yoog – On the east side of Gerudo Summit, find the large mural of lighting bolts and a mound in the middle on the mountain wall. Shoot the center with a Shock Arrow.
- Kuh Takkar – On the western slope of Laparoh Mesa. You’ll have to do some climbing in harsh weather, so prepare warm clothes. Bring a torch or flint and firewood, since you’ll have to melt the ice off the shrine.
- Sho Dantu – Climb atop Gerudo Tower and paraglide to the west, then continue north on foot until you reach a shrine mound in a circle of green Luminous Stones. Destroy one of the stones, get the ore (Luminous Stone) and put it on the mound. It’s best to do so at night.
- Sasa Kai – Go to Gerudo Tower and talk to Kass. He’ll give you the Sign of the Shadow riddle. Look southeast, find the altar and glide there. When the shadow is on the altar, shoot at the sun or moon. Take a gander here for more detailed instructions.
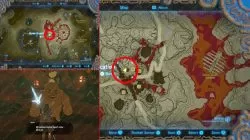
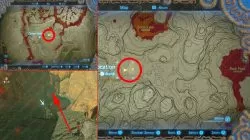
- Joloo Nah – In the north of Mount Naboroo, just east of Koukot Plateau. It is up above the road that takes you to Gerudo desert. There are three Goron Blood brothers there that will give you the Test of Will Shrine Quest. You need to stand on the heated platform first and next stand in the fire for some time. Bsst bring a lot of health restoring food and the best heat resistance armor and ice swords you can get your hands on. After you survive the trial, the shrine gets revealed.
Hyrule Ridge Shrine locations
Hyrule Ridge area is located west from Central Hyrule. In there, you’ll find areas like Salari Plain and Hill, Satori Mountain, Sanidin Park Ruins, Tabantha Great Bridge, Mount Rhoam, Thundra Plateau and others.
- Monya Toma – From the Hebra Tower, if you look south-eastward, you’ll see the shrine’s glow. It is up the Salari Hill, close to the road.
- Zalta Wa – If you have Ridgeland Tower discovered, jump from it towards the east. Head for the Breach of Demise canyon. At the center of it, next to the road, almost above the letter “f” of the Breach of Demise is the location of the shrine.
- Sheem Dagoze – In the south of Hyrule Ridge, west from Jeddo Bridge. You have to complete the Two Rings quest first, by shooting one arrow through two stone hoops at once. We used the hoops on the northern side. If you’re still having trouble, please visit these guides.
- Mogg Latan – This one requires a bit of climbing. It is on top of Satori Mountain, on its southern peak. While you climb up, you’ll notice three larger boulders, rising above the mountain’s peak. Head south of them.
- Mijah Rokee – In the south corner of Washa’s Bluff, you have to stand on the pedestal with no clothes on and wait for the Blood Moon. Take a peek here for further info.
- Shae Loya – If you follow the road on your way from Hyrule Ridge to Hebra, you’ll need to go over Tabantha Great Bridge. Just before it, there is the Tabantha Bridge Stable. Look south from it, towards the taller hill and you’ll see the shrine.
- Toh Yahsa – From Ridgeland Tower, you can spot the area called Thundra Plateau, the one with thunderstorms and mushroom-like trees. In the center of it, you’ll need to place four balls into their corresponding color spots. Once this is done, you’ll reveal the secret shrine location. In short, glide towards the orange ball from the nearby hills, drop it on the nearby plateau with the bonfire. Use the Stasis rune and hit it in order to reach the center of the compound. Use the same method for the red ball, but this time, hit it from the area where it stands.
- Maag No’rah – Find the Bokoblin camp on the northern slope north of Lindor’s Brow, the one with a very tall crow’s nest. Look at the mountainside from the nest and you’ll notice rocks that you can destroy. That’s where the shrine is.
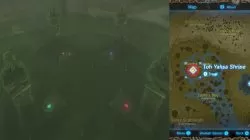
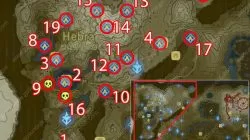
Hebra Shrine locations
Hebra is the area located in far northwest. The large, snowy Hebra Mountains are at its center. You’ll also spot two larger areas like Tabantha Frontier and Tabantha Tundra.
- Tena Ko sah – Close to the Tabantha Great Bridge, high up on the Ancient Columns, among the ruins … you’ll find it.
- Akh Va’quot – South from the Heabra Mountains, there is a rather deep lake. This is where you’ll find Rito Village and the shrine. If you haven’t so far, be sure to pick up pieces of cold resistance gear from the armor vendor in the village. You’ll need them for the upcoming shrines.
- Sha Warvo – North from the Rito Village, in the area called Dronoc’s Pass, close to the road.
- Rin Oyaa – From Hebra Tower, glide northward. If you follow the road, you’ll have no difficulty finding it.
- Sha Gehma – This one is at the northernmost part of Tabantha Tundra. If you use the shield gliding, you’ll get there in no time.
- Qaza Tokki – To enter this shrine, you’ll have to find a secret entrance within the stone maze called North Lomei Labyrinth. The Shrine quest you get, once you land in the maze, is called “Trial on the Cliff”. If you don’t care about all the treasures in the maze, you can always land on it from the nearby mountain. From its top, search for the yellow glowing Electric Chuchu. Just a bit above their location is the entrance to the shrine. However, if you decide to do it properly, you’ll need to go around the maze, destroy the corrupted eye, find the gap in the upper wall, and the path to the Electric Chuchu and the shrine’s entrance. Be careful not to miss at least 4 chests found here.
- Hia Miu – At the absolute most northwestern point of the map, northwest of Icefall Foothills. You can reach it by paragliding in from the mountains.
- Maka Rah – on the western bank of Lake Kilsie, south of the Sturnida Basin, you’ll find a pier. You can just see the shrine through the crack in the wall. Use a bomb to blow up the rocks and ride the wind gust across the water to the next. Follow the trail of rocks and the last gust will fly you up to a torchlit entrance. You can also reach it by gliding from the top of the mountain opposite the entrance.
- Voo Lota – West of Rito Village, north of Passer Hill, in Warbler’s Nest. After defeating Vah Medoh and rounding up the kids, you’ll have to complete Recital at Warbler’s Nest shrine quest. Stand on the mound surrounded by five statues. Use a Kokoro leaf to blow the air into the rock rings, corresponding to the notes. Full guide to Warbler’s Nest riddle is here.
- Dunba Taag – In Tanagar Canyon, south of Tama Pond. Just paraglide down to the place where the canyon curves to the north, just underneath one of the windmills.
- Gee Ha’rah – south of Kopeeki Drifts, northwest of Hebra Tower. On the southeastern side of the gorge, there is a pair of huge stone doors. Head back from there up the hill until you find several large rocks. Throw one down the second path, to the right of the sharp rock.
- Lamno Kooh – west od Hebra Tower, southeast of Hebra Falls. There’s a hidden body of water to swim across. Beware, it’s deadly cold.
- Rok Uwog – West of North Tabantha Snowfield, just above the second I in Pikida Stonegrove, on one of the lower levels.
- Goma Asaagh – Paraglide down the southwestern side of Hebra Peak until you see the shrine. Light a fire to melt the ice blocking the entrance.
- Shada Naw – Just North of Selmie’s Spot, northwest from Hebra East Summit.
- Bareeda Naag – South of Rito Village, near the road. You can get the “Ancient Rito Song” shrine quest to complete this and it involves a shadow passing at the right time and lighting a torch over the center of the pedestal. Complete guide can be found here.
- Rona Katcha – East of Mount Drena, at the very end of the canyon. To get there, go from the southwest, through the Forgotten Temple.
- Kah Okeo – East of Rayne Highlands and the Ancient Columns. Move the large, flat rock on it using Stasis, then hitting it.
- Mozo Sheno – During the Bird in the Mountains quest, scope out the eastern side of Biron Snowshelf from the adjacent mountain. You’ll spot the shrine in the opening at you can paraglide into. Our Secret Shrines Quest Locations guide has more details if you need them.
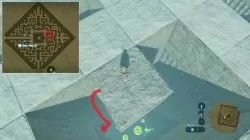
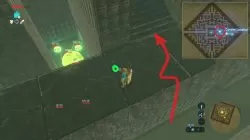
- To Quomo – The entrance is on the southeast slope of the Hebra North Summit (southeast of our marker on the map above). There are large, stone, doors you can’t blow up with your bomb. If you look opposite of the door you will see a slope on top of which are several big snowballs nearby. You have to roll down the snowballs in order to break open the door. You’ll need to create two Cryonis pillars in the water pond in the middle of the slope to roll down properly. Check out the screenshot bellow for exact location and setup.
Great Hyrule Forest Shrine Locations
There are no easy shrines to be found in northern part of Hyrule. This area consists of Great Hyrule Forest and Thyphlo Ruins. The first shrine is at the center of the forest. You’ll need to get here first. From the first shrine, you can find three Korok’s that start three shrine quests – trials. All three of them lead to one of the shrines.

- Keo Ruug – This is the first one, you can get inside the Korok Forest. It is on the path to the Master Sword. To reach it, you’ll need to overcome the danger of fog. If you get caught in it, it will reset you to the starting location. To go through the fog you need to follow the direction of the torch’s flame, or to take a few steps, and, if it is safe, continue, if not, run back.
- Maag Halan – East from Keo Ruug Shrine, you’ll find a hollow, dead tree with the NPC Damia there. Damia gives the shrine quest called “The Test of Wood”. Fight your way to the entrance in the Mido Swamp.
- Daag Chokah – Follow a path east from Keo Ruug Shrine. It will take you through a dead, hollow tree to Tasho, who stands on a rock. Talk with him to start “The Lost Pilgrimage”. You’ll have to follow another Korok to reach the shrine’s location.
- Kuhn Sidajj – Just like with the previous ones, you have to find Korok, start the quest and complete it to get to the shrine’s location. This Korok is located southwest from the first shrine, towards Lake Saria. “Trial of Second Sight” shrine quest is an easy one. Use the Magnesis rune to find the right path, put a Rusty Shield into the tree’s mouth, take the chest it gives you as a reward towards the other tree’s mouth.
- Ketoh Wawai – The final one is located north from the Great Hyrule Forest, in the area called Thyphlo Ruins (a large green tree). To reveal the shrine’s location, you need to complete the quest called “Shrouded Shrine”. Use the torch to light your way, and you’ll notice the stone braziers are shaped like birds. Go in the direction their beaks point to. You will have to fight a boss at the end and he holds the metal ball you need to reveal the shrine
Eldin Shrine Locations
Eldin is a region in the northeast. It consists of three larger areas, Eldin Canyon and Mountains and Death Mountain. There is a town called Goron City here, as well. You’ll need a Flamebreaker armor set to be able to traverse the Goron dominion..

- Mo’a Keet – Just east from the Foothill Stable and the road that takes you to Eldin. If you follow the road, once you pass the stable, climb the taller hill.
- Sah Dahaj – Glide east from Eldin Tower. Descend once you cross Lake Intenoch. Just below the tall enemy structure, close to Cephla Lake, on the lower ground.
- Tah Muhl – From the Mo’a Keet Shrine and the Foothill Stable, head southwest. At the southwest of the first, taller mountain formation, closer to the ground level than the top, tucked in between the rock formations. It is a part of the shrine quest “A Landscape of a Stable”.
- Mirro Shaz – Just north from the small Pico Pond, follow the beach from the nearby Woodland Stable.
- Qua Raym – In the southwesternmost lava lake, called Goronbi Lake, there is a small island. Glide toward it if you want to find it.
- Kayra Mah – South from Gorko Lake, in the area called Gorko Tunnel, on the greater plateau. Go to a hut in the west part of Goron City (first hut to the left as you enter the city) and talk to Bladon during the day to start the A Brother’s Roast side quest. He’ll tell you to go to Goron Tunnels (southwest of Gorko Lake) to find his brother Gonguron. Just follow the road to the southeast; there’s even road signs pointing you the right way. When you find the brother, you’ll just have to go and look for rock roast in the nearby Gortram Cliff area. Once you bring it to the brothers, they’ll smash down the wall barring the shrine entrance.
- Daqa Koh – Follow the path south from Goron City, toward the Goron Hot Springs and north from Gorko Lake. There is a railroad path you can also use as a reference toward the shrine. Just before the final ascending path toward Death Mountain, you can spot the orange glowing rocks and the shrine.
- Shae Mo’sah – Follow the road north from Goron City.
- Shora Hah – This is on top of the Isle of Rabac, deep inside the lava-covered area. You’ll need more than one piece of the Flamebreaker to get here. Use your bombs to propel a mine cart across the rails in the lava.
- Gorae Torr – On top of the large, tall rock in the Gut Check Rock area. You can use the the power of the winds to boost yourself up on the rock, but you’ll need better climbing gear if you want to enter the shrine. In order to enter it, you need to complete the quest “The Gut Check Challenge” that is given by Bayage, who is standing in front of it.
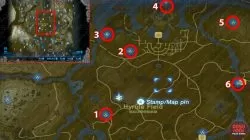
Akkala Shrine Locations
Akkala is the north-easternmost region of Hyrule. It stretches from the sea in the east to Death Mountain in the west, and from the far north of the map to Toto Lake and Ploymus Mountain in the south.
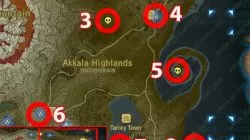
- Tu Ka’loh – This shrine is hidden in the maze on Lomei Labyrinth Island, in the northeast of the map, in the Akkala Sea. To solve the puzzle you enter it in the most northwestern point of entrance. Move the large metallic cube with your rune (there is a chest with great ancient core behind it) and follow the path to the right to reach the shrine. You can check out the screenshot bellow for reference..
- Zuna Kai – There’s a very tall stone pillar in the middle of Skull Lake (northwest of Tempest gulch, in the northwest of Akkala). Find a high spot, then glide over and finish the climb.
- Tutsuwa Nima – Located in the Spring of Power. It’s inside a very small body of water south of the North Akkala Valley, northeast of Orodorac Quarry. To enter, you must offer Dinraal’s scale (drop it in the water of the spring).
- Katosa Aug – It’s just to the east of East Akkala Stable, just south of North Akkala Foothill.
- Ritaag Zumo – At the very end of the spiral-shaped Rist Peninsula. To activate the shrine, pick up the orb where the spiral meets mainland (Into The Vortex side quest) and carry it over. Be careful, there’s a lot of enemies with ranged attacks.
- Ze Kasho – Paraglide off of Akkala Citadel Ruins to the northwest and search the hills.
- Dah Hesho – On the cliff south of the circular island in lake Akkala, northwest of Kaepora Pass.
- Kah Mael – In the center of Tingel Island, find a large, flat rock and move it with Stasis to reveal the shrine below.
- Ke’nai Shakah – In the norther part of Ulria Grotto, in the southeast of the region. This was a tough one to solve. There seems to always be raining in this region. Shrine is hidden behind breakable rock barrier on in inaccessible cliff side. You can drop from above it, slam into the breakable rocks, quickly drop your bomb and detonate it and if you have a fairy she will resurrect you and you can enter. If you don’t want to spend fairies you need to go to the cliff opposite of the breakable rocks. There are several large stones (some of them you can move with magnesis). Place them opposite of the breakable rock and use stasis and sledgehammers to launch them into the breakable rocks. Takes good positioning and about four hits with the sledgehammer to have it hit. Paraglide to the shrine cave from the cliff above. You can check the gif of me doing it by clicking here.
Lanayru Shrine Locations
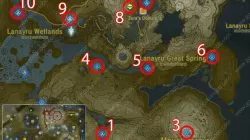
- Dow Na’eh – This one was placed here as I found it later on in the game. Some of you might even considered it as a part of West Necluda. It is well tucked in, behind a large waterfall. You can glide through the watefall, or simply go over the path beside it.
- Tahno O’ah – To make it easier, this part of the mountain is bare. There is no forest here, except in one spot. This is where you should go. In this area, the eastern part of Madorna Mountain, beside the forest, you can spot the breakable stones. Destroy them to reveal the entrance.
- Jitan Sa’mi – On top of Mount Lanayru, you’ll see the Spring of Wisdom, guarded by Naydra, the dragon spirit. Shoot it in the enormous, red eyes that are on its body to release it, then shoot three more times to get the Naydra Scale. For more detailed instructions refer to our Breath of the Wild Secret Shrines Quest Locations guide.
- Mezza Lo – This one is found in the area called Rabia Plain, up on the hill. It is one of Kass’s secret shrines. You’ll need to complete quest “The Crowned Beast”. In short notes, find and mount a deer and get him to stand on the ancient shrine pressure plate. If this doesn’t help, take a look here.
- Rucco Maag – In the northeast corner of Samasa Plain, south of Ruto Mountain.
- Shai Yota – Although this one is located in Horon Lagoon, first you need to find Kass just south of it, and complete the quest “Master of the Wind”. In case you need help with the quest, visit here.
- Ne’ez Yohma – In the very center of Zora’s Domain, behind the statue of Mipha, under the Throne Room of King Dorephan.
- Dagah Keek – From the city Zora’s Domain, find a bridge that takes you northwest. Follow the mountain range to the south until you reach a large waterfall called Veiled Falls. There, on the ground is the secret shrine pressure plate. To solve it, swim up the waterfall (you will need Zora Chest armor), paraglide, then press attack to do a diving attack onto the plate. This should reveal the shrine.
- Soh Kofi – Fly north of Lanayru Tower, across the water, near the place that you meet Prince Sidon at for the first time.
- Sheh Rata – There’s a small island just between Crenel Peak and Zelo Pond, in the northwest of the region. The island is overgrown with wild bushes, so you’ll need to burn them away to enter the shrine.
Central Hyrule Shrine Locations
Central Hyrule is a large area in the center of the map. It stretches from Castle Hyrule on the north to Lake Kolomo in the south. It’s surrounded by Hylia River in the east and Regencia River in the west. It’s a huge area, but there aren’t a lot of shrines.
- Kaam Ya’tak – From the top of Central Tower, paraglide to the southwest and look around the eastern side of Mount Daphnes.
- Katah Chuki – Northeast of Mount Gustaf, in the southeastern part of Quarry Ruins
- Noya Neha – On the island north of Quarry Ruins, on the southern slope of a hill in the southwest corner of the island. Find the side overgrown with thorns, burn them away and use a bomb on the breakable rocks and reveal the shrine.
- Saas Ko’sah – In the northern part of Castle Hyrule. You’ll have to go inside and find a large stone brazier and ignite it. To get inside the castle, watch it from the mountain on the northwest. You’ll notice a part of the moat where the water flows into the castle. That’s your point of entry.
- Namika Ozz – In the northeast of Central Hyrule, in the center of Crenel Hills. Look inside the huge rocky formation that looks almost like a volcano opening.
- Kaya Wan – Just head a little to the west of Wetland Stables, which are near a wooded area south of Crenel Peak, near the eastern bank of the Hylia River.
Kass Shrine Quests
Kass is an NPC you will come across every now and then and he gives you quests with riddles to solve in order to discover shrines. We made a comprehensive guide for every Kass Shrine quest in the game and how to solve their puzzles. If you are stuck use that guide to uncover the shrines. Here are the shrine quests covered:- Qukah Nata Shrine – A Song of Storms
- Shae Katha Shrine – The Serpent’s Jaws
- Sasa Kai Shrine – Sign of the Shadow
- Sheem Dagoze Shrine – The Two Rings
- Mijah Rokee Shrine – Under a Red Moon
- Mezza Lo Shrine – The Crowned Beast
- Shai Yota Shrine – Master of the Wind
Shrines in Zelda BoTW
UPDATE: What follows is information we had on this page before the game came out and gives general information about shrines in Zelda BotW.
The shrines we’ve seen so far have all been underground. Their entrances were easy to notice – imagine a cave mouth adorned with glowing, orange runes. You’ll be able to spot them from quite far away, so use any chance you get at higher ground to scout out your surroundings. You can plant map markers on places you deem interesting, in case you don’t want to visit them right away.
Once you reach the shrine, you’ll use your Sheikah slate to gain entrance. The runes will turn blue, and an elevator will appear. Inside, jumping puzzles and challenges await. Many of them include finding inventive ways to use your rune powers. Getting to the end of the shrine is usually not that hard, so you’re pretty much guaranteed a spirit orb. However, there are other treasures inside, and they’ll often require a bit of lateral thinking.
They may include enemies, but the focus is usually not on fighting, but on figuring out a solution to the puzzles inside. They’re all tied by a theme in each shrine, so there isn’t much guessing involved. In case you do get stuck, we’re going to list the shrines and the solutions to their challenges on this page.
Once the game launches, on March 3rd, we’re going to start updating this guide with more info. If you discover a shrine that isn’t here, feel free to share your findings in the comments.

How many rupees do you have. Also, does anyone have the house in Hatino?
This has helped me so much in my 100% obsession of botw
On your map you have #9 circled but there is no shrine there. What am I missing here. I have 119 shrines and ove tripled checked your map. The only missing shrine is the one you have marked 9 but no shrine ugh. I have no incomplete shrines either. Fml
There is a shrine on the inside of the cliff on the other side of the river and there are two different shrines on top of the peaks which have the answer to the other one inside.
You are missing Kee Dafunia Shrine just Southeast of Kah Mael Shrine in the Akkala section.
That’s a DLC shrine
How many new shrines have been added with the DLC?
I literally have 84 shrines
Can someone pls help me on the 105 shrine ?
i did all 120 shrines i’ve checked 5 times but it still shows only 118 shrine orbs left what do i do, start over?
You already have them all numbered in the big picture. Why would you RE-NUMBER them starting from 1 in each region instead of just using the same damn numbering from the map picture. I have 57 damn shrines done but on my list i only have 56 marked off. Would have made it easier to have kept the numbers the same.
I have Every single shrine on the map but I still only have 119. None of them are blue outer but orange inner.
#’s 4 and 5 in the Faron region are listed incorrectly on this guide. 4 is actually 5 and vice versa. Otherwise thanks!
I have just ONE more shrine! (excluding DLC) And my third & second to last I found just by sheer luck, somewhat, (well my map seemed kind of a bit too “open” in a region of my map, which was the Akkala, and those two shrines were actually decently near each other) But the pains of searching for the last ARGHH
Hi i am only counting 119 shrines am i missing anything
Why does the 1st shrine could be the Keh Namut Shrine?
Let me show you how a compass works.
More than half of your directions were wrong.
N
W E
S
Ke’nai Shakah I kept failing at stasis shooting the rock so I was going to try and use a remote bomb and take heart damage but then I on the left side at the bottom I realized you can just walk in as there is a little opening
9 of akala you can just use a bomb arrow
You need to add the Joloo Nah Shrine on Mount Nabooru
Never mind I found one that was still glowing orange! Must be that!
Some of the other users above also had that same problem. If you complete it, you’ll get them all that is for sure.
I am missing one shrine and can’t see where?! I have looked so hard and for so long atbthe picture trying to figure out which one I’m missing I fear I might never get shrines out of my brain. Help! Any way of uploading a pic of my map so people can help?
Have you checked the Joloo Nah Shrine in Mount Nabooru?
For Suma sahma (#13 gerudo region ) if you’re a dumbass like me and destroy all the snowballs, you can also crynosis the puddle then wait till 5 pm
your wrong about the 17 hours for the flown the coop quest I don’t know witch one you had that much trouble finding but I got all of them and had only been playing 3 hours and only looked for them for about half an hour.
I don’t mean to sound snappish, the info did help a lot. that 17 hour comment just freaked me out a bit.
thanks a lot
ok don’t worry, I found it on the picture with all the shrines
are all 120 shrines on the picture now, I am missing one and just wanted to know
#6 Joloo Nah Shrine is not in the picture
It was the watermark, blocking the number 6. Sorry about this, I’ve fixed it.
There is also one in this harbour of hyrule castle
Nah, 4th time checking through them all one by one. 118! This is so infuriating, it all adds to 120 and I have every single one but still only says 118. Anyone had this and fixed it?
In hyrule castles harbour is a not burning campfire that you have to let burn for example with a fire sword. then a shrine will appear maybe youve missed this one because it isnt listed here too
I had a similar issue with only 119 showing when everything matched the maps on this site. So eventually it turned out that I had one shrine ACTIVATED but not COMPLETE. Zoom in on your map and go through all your shrine icons. Any incomplete shrines will have an orange core with a blue outline. You will find the two incomplete but activate shrine. Complete those to get 120 orbs. Profit.
OMFG THANK MANNNN
Although I’ve completed almost all the shrines, I would like to see the chart you’ve made. Don’t worry about missing the link, it is probably our mistake for not making it visible enough, but due to the length of the guide, I don’t think it is even possible hehe. Enjoy your shrine-hunting trip, I hope it will be as exciting as it was for me.
Oh, your guide is awesome. Totally my miss. I have the chart in a Microsoft Word (2016) document, not published anywhere, just for my personal use. How would you like me to share it with you?
Hello Amber, sorry for the late response, if you still want you can send it to my gmail – exeuglyorder66 Looking forward to see it, maybe I can pick up some tips from it.
Speaking of late responses…! 🙂 I’ll send it right now. Sorry! (Got sucked into the game.) 😉
Do you still have this? I would love a copy. Thanks in advance
Thank you for this guide! You obviously put a lot of effort into this. It’s awesome! 🙂
I would, however, like to request that you add the titles of the shrines along with them, (example: “A Minor Test of Strength”) so we can seek out specific ones. (Or procrastinate certain ones….ha!) It would also be absolutely fantastic if you could include what rewards are given (in chests and dropped) for each shrine (example: Ancient Core) so that if we were looking for a particular item, we can seek out that shrine as well. It is my understanding that the drops are not randomized, so a reward should be something that would be found by others.
You’ve already done so much, but these additions would make for the absolute most perfect guide! Thanks again!
Thank you for the kind words. The additional information that you would like to see in this guide is already listed in the Shrine Rewards & Challenges Guide. We have this link in this guide, but due to the article size it is easy to miss. Now imagine adding a minimum of 120 rows for rewards and challenge names 😀 .
Awesome! (Sorry about missing that! I feel a little silly now….but I’m way too excited to go shrine hunting to feel too embarrassed!) The information you have here has allowed me to make a printable chart (checklist) that I keep with me as I discover the shrines and complete them. Very handy! (If you are interested, I can share the chart with you as well.) Thanks again! 😀
Could you please share with m? Stuck on 119!
I just solved my 119 shrines problem. I also thought this guide missed one.. after checking all the shrines like 10 times compared to this list I concluded I had to have 120 shrines found already. After wanting to checking them out 1 by 1, I read that on the map the middle will show orange in case the orb wasn’t obtained. It’ll be complete orange when you haven’t yet entered. So make sure you have all, you have to hover on all of the shrine icons to check they are all blue.
Hope this will help some of you..
you are a life saver
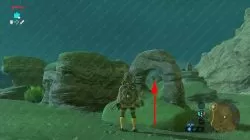
I think i figured out a simple solution for getting into the ke’nai shakah shrine. first locate the cracked area jump down from above and float under ridge, use bullet time bomb arrows then go back up using wind current and float inside.
For Shine 9 on Akkala Shrine Locations you can Just Jump of The Side and use Your Paraglider Once your A good Distance Pull out your Bow and Use bomb Arrows to take down the Rocks.
Off*
I’ve double checked my map a ton, and the only shrine I haven’t done is the one where you need to get the orb off of Impa- But I’ll still only end up with 119. I’ve gone through and checked every section and made sure I have all the shrines and as far as i can see I do, without having to count. Is there a hidden spirit orb or something?
I’m having the same issue I’ve gone back and counted them on my map with this guide and I ended up at 119. I know when you add all these numbers in the guide is 120 but I checked for myself a couple times so idk why I’m missing 1
Did you check the three shrines that are right next to each other in West Necluda? When counting I usually miss one of those three, cause they are so close together.
I ran into same issue where I tallied every thing with all the maps on this page and was coming up with 119 orbs/shrine. I got so frustrated that I recovered/delete all my markers and started tagging the shrines I had with one marker at a time to find out if there were any duplicates in the maps on the site. What i found was That I had ACTIVATED one shrine but NOT COMPLETED it.
So go through your shrines on the map with a zoom or two and try to find any shrines (on the map) that have a blue marker but with ORGANGE in the middle. This will tell you that the shrine is activated for fast travel but NOT cleared. Clear these and you should have full spirit orbs. Thanks Gosu Noob for the awesome map
Please tell me you almost found the last 2?
THEY ARE ALL IN THE LIST
Followed your guide to a “T” and made it to 116 shrines complete before I realized I am missing 4 shrines.
Two of which I had confirmed are accessible, post Divine Beast battles, but that left me to question if the other two where the same.
So I took a look at your complete map and realized it was #7 and #20 of Hebra region, xD man are those way out there.
Also am I the only one to find it odd that only two are post Divine Beast Battles?
Last note I’d like to mention #11 Tho Kayu Shrine of Gerudo Desert only appears visible under the “M” of Toruma Dunes if the player is viewing the map at 2x zoom.
I figured lots of people are probably confused and angry about the way you described that, other wise the guide was detailed enough for me to comprehend (despite others crying about details)
Thank you for the help and good job!
Thank you for your kind words. We were in a big rush to create this guide and it went through dozens of revisions as we were adding more detailed and better descriptions. I think it is in a good state right now, but we’ll go through a couple more to make it perfect)
Well I take it i’m not getting any help with my problem- But you also forgot to list that for the 6th Gerudo Highlands shrine you need to complete ‘The Test of Ultimate Endurance’. I wasted about 2 hours last night because I thought it was just sitting out in the open.
Um I found a 13th one in west necludia called Dow na’eth
We listed it under Lanayru Shrine Locations
The ‘Flown The Coop’ quest won’t activate, the guard just talks about the Yiga clan. I’m way past when you get the tunic, and i’m just getting everything (Except for Korok seeds.. Screw that.) before I head to Hyrule Castle. What am I doing wrong?
I can’t find #17 at Hebra location someon help??
#20 To Quomo Shrine North Hebra Summit
If you’re having trouble finding after checking this guide, please keep reading:
This guide is very helpful, however on some of the more important/easily missable shrines it’s very vague and time wasting. To the makers of this guide, if you don’t have complete/concise information on the location of a shrine, say so. For example: Saying that the shoe store is west of K-mart, versus saying; to get to the shrine first go north of J Street, to the right of the fire hydrant find the path leading to downward to the underground, traverse the labyrinth to find the store which ends up being west of K-mart on your map.
To relate this to the game, YES To Quomo is “north of Hebra summit” on the goddamn mini map, however you must first go south east of North Hebra Summit (just as it says on the map, and it’s literally just slighlty SE of it on the map), it’s below a cliff SE of North Hebra Summit. You’ll find two large stone doors at the bottom of a small valley in the cliff face. THIS IS THE ENTRANCE! To the writers of this guide, if you’re going to type something as vague as “North of hebra summit”, when in actuality that’s maybe 1/12 of the information needed, don’t type anything at all. Sometimes “too little” information can lead to a waste of time, ie. spending an hour+ traversing the northern cliff face looking for the shrine/entrance. If you’re going to make a guide – then make a guide, don’t post in haste of trying to get content out there before everyone which is incomplete.
There is a shrine you’re missing from the quest “Test of Will” which is west of the digdogg bridge and north of mount nabooru. Zoom in on the area and you’ll see a small circle being touched by ~10 smaller circles. That’s the logcation.
Nope, it’s been on the guide for a couple of days now. :<
Actually, it isn’t. I checked and rechecked and it isn’t there. It might be on the list, but it isn’t on the picture.
I can confirm that all shrines are there as I have followed this guide to get all 120. The arrangement or sections are of course mostly arbitrary so in some of the pictures you see a shrine missing but it is in fact present in another map/area. If you are missing shrines then please check everything with map and ensure that you do not have incomplete shrines that have an orange interior on the map marker.
Umm I’m at 119/120, without having to post them would someone maybe be able to tell me which two are missing on this list 🙁 Thank you 🙂
All shrines have now been added.
I counted through your list and checked it twice, you definitely only have 119 on here.
Learn to count
Definitely only 119. I’ve gone through this guide 3 times now
4 in the starting area
+ 12 west necluda
+ 7 east necluda
+ 9 faron
+ 14 gerudo desert
+ 6 gerudo highlands
+ 8 Hyrule Ridge
+ 20 hebra
+ 5 great hyrule forest
+10 eldin
+9 akkala
+10 lanayru
+6 central hyrule
(takes out calculator)
= 120
You missed 1 in gerudo desert west of #2. You must beat the gut check challenge before taking it. You must have counted a shrine twice by accident.
Thanks for the count. I can confirm that no shrines are missing. Go through each map and confirm that you have all the shrines on your map. Volkanis, that shrine you are talking about “gerude desert west of #2” is included in the Gerudo highlands map. I have confirmed it.
If you have everything on the maps and still have a couple of orbs missing then you have incomplete shrines. You can ACTIVATE shrines for fast travel but when you complete the puzzle and claim the orb only then it is COMPLETED. Look through your map for any shrine markers that are blue on the outside but orange inside (you may have to zoom as I kept missing one) and that will be the ones you need to COMPLETE.
Thanks Author(s) for an awesome detailed list.
Yesterday in the desert, on the way to yida clan, outside the clan i found a mural but not sure how to make to shrine pop out. It had a stone carving riddle in the front saying to offer a shiny blue stone. Couldn’t figure out what it meant by shiny blue stone. Anyone know the name of this shrine and how to solve it?
Probably a luminous stone
make it night and put down an luminous rock
I think that’s Sho Dantu Shrine. Just break any ore deposit nearby for a Luminous stone and place it at the pedestal, that should work.
Drop a luminous Stone on the platform
Its a “luminous stone” that you have to place on the allter. They actually give you a hint as to what stone you have to provide because they have breakable ore materials surrounding the glowing pad. I believe they specify shiny only because it glows at night.
The quote on quote shiny blue stone is a luminous stone
There are suppose to be 120 shrines in this game but I can count only 118 shrines from your list. Do I misunderstood anything?
We are working on the last two
Thanks.
How do you get into 12 of West Necluda? It seems to be underground.
I’ve updated the guide with detailed instructions on how to uncover it.
I just completed every shrine, the set is amazing.
Can anyone tell me how I find the shrine near gorko lake/tunnel in eldin south of Death mountain? It’s the only one missing and I just can’t find it. It drives me mad…
Go to Goron village, there is one Goron mentioned about his brother, this will triggers the shrine quest. Go back to the tunnel and it will automatically triggers the sequence.
Would you be able to share where the 2 that are not on this list are located then? Driving me nuts being this close.
All of the shrines are now in the list. There are 120 of them here.
I only count 116 by adding all the numbers on this list. What am I missing?
You are missing the first 4 shrines on the Great Plateau – there is a total of 120 on this page.
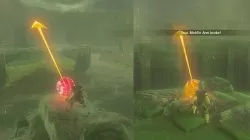
#20. look south east from the summit and you’ll see tiny water with trees around it. locate the stone doors, go up the slope, create a bridge with 2 ice blocks from your cryonis, then grab a snowball from higher on the slope and you should know what to do
Hyrule ridge #6 under the blood moon, Mijah Rokee shrine, a modest test of strength
Hedra nr16: need to wait until 13:00 so that the shadow heart of the rito rock shines on it and make a fire on the platform
Hebra Nr9 is part of a quest. Talk to one of the rito women and she will tell you to check on her kid, follow the quest and the 5 kids will sing a song for you in warblers nest. Then blow wind with a korok leaf into the stones in the order of the song (numbers on top of the stones) and the shrine will appear.
Ke’nai Aug Shrine isnt hard to get to. yup it is in Ulria Grotto. i jumped n flew n saw therocks hiding it. i flew n grabbed onto cliff and it hangs under the cliff, and theres a ledge on bottom where i could just stand, i used round bomb and threw it across, detonating it quickly, i didnt lose any hearts! i got in easily. now for battling is another thing 🙂
20 is called To quomo shrine, go north of hebra north summit downhill till you see two doors roll a snowball into them
Nr20 of hebra is behind a gate just in the middle of north summint, tundra and north crest. I don’t know how to open the gate tho
Roll a snow ball down the hill.
The entrance to the To Quomo shrine ( shrine 20 in hebra) is directly south from where you put the number 20 at the mini pond. Little puzzel at the entrance.
Also missing Toto Sah shrine in West Necluda. It is near the southern most waterfall at river level behind a bombable wall.
South west of the Wasteland Tower is a Shrine surrounded by 7 Statues ( you have to find all the balls and put them on the right statues plate, look for the correct symbols on the Balls and statues, one ball in on one of the statues and the rest are scattered around, use Magnesis to find them.)
Its called the “Korsh O’hu Shrine”.
What about Joloo Nah Shrine? It’s just above the Koukot Plateau.
You’re missing two shrines in the top left of Hebra
You’re missing Ya Naga Shrine on an island in the middle of Lake Hylia.