Crafting is as a very important feature in Alien: Isolation. Before you can craft an item you have to find the corresponding blueprint.
▼Article Continues Below▼
Every blueprint allows you to craft only one item, but each of them has up to three upgraded versions. When you find a new version, it will upgrade the previous blueprint with more power, radius of effect, duration and etc.
In addition to the most important blueprint schematic – Medikit that partially heals you, other blueprints are schematics for bombs, mine and a Molotov. These schematics are harmful to enemies and can be placed as a modified proximity devices, that allow you to plan your next move. Most blueprints are well hidden and usually you’ll not find them if you just follow the main story mission. Crafting materials required for crafting different blueprints can be found all over the station.
Gosu Tip: There is a limited number of crafting materials you can carry on with you. You can however cheat the system if you place crafting materials in schematics, but you don’t actually craft anything. This action opens more space and keep the materials safe (scraps are the only exception, you’ll spend them when crafting an item).
Note: This guide is still work in progress, and we will add more blueprint versions as we find new ones.
Medikit
In-game description: The Medikit can be used to partially heal yourself in moments of need. Crafting Materials: 1x SCJ Injector, Compound B, Bonding Agent, 10 Scraps Additional information: These items are must-have! Make sure that you have a couple of them before you start wandering throughout the station. The main reason for this is the fact that you won’t have time to craft, pick them up from inventory and use them when in trouble.
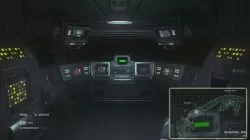
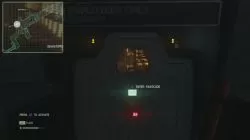
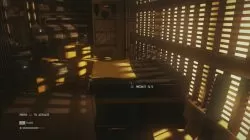
Version One (V.1) Mission: Mission N.2 – Welcome to Sevastopol Map Location: Sevastopol Spaceflight Terminal / Arrivals and Departures (Departures part) More specific Location description: This blueprint is behind the passcode locked door. The passcode can be found in the Personal Terminal in the first Archive Log called “Moved Our Stash” – passcode: 0340. Go back to the locked door in western Departures section, enter the Keycode and collect blueprint.
Personal Terminal with the keycode.
Enter the passcode here.
Blueprint Medikit Version 1 Location.
Smoke Bomb
In-game description: This device which detonates on impact will release a cloud of smoke that obscures visibility. Upgraded version creates smoke which lasts for a longer duration. Crafting Materials: 1x Ethanol, Sensor, Bonding Agent, 10 Scraps Additional information: Great device for hiding from 2 or more enemies.
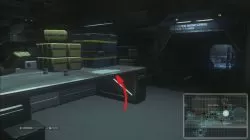
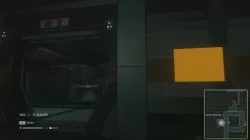
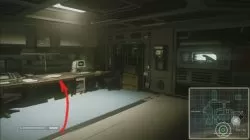
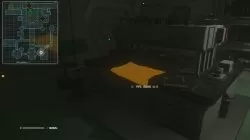
Version One (V.1) Map Location: Lorenz Systech Spire / Lower Level (Tech Support room) More specific Location description: On a silver metal table. Same table has a bunch of yellow and blue boxes on top of it.
Smoke Bomb Version One Location
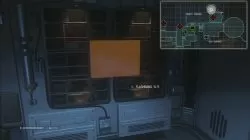
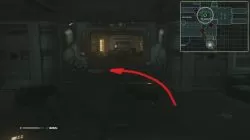
Version Two (V.2) Map Location: Seegson Synthetics / Facility Observation (Procedure Observation room) More specific Location description: On a wall, inside a small room with a save terminal.
Smoke Bomb Version 2 Location
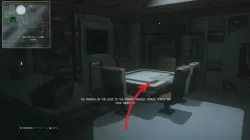
Version Three (V.3) Map Location: Seegson Communications / Monitoring Rooms (Close to Reception room) More specific Location description: On a wall, found during mission objective “Find Ricardo”.
Smoke Bomb Version 3 Location
Flashbang
In-game description: A Non-Harmful device which detonates on impact, stunning nearby humans and blinding humans and synthetics looking at the detonation. Upgraded version stuns humans over a wider area. Crafting Materials: 1x Blasting Cap, Sensor, Bonding Agent, 10 Scraps Additional information: Great resource that can be use for escape if enemy is alerted.
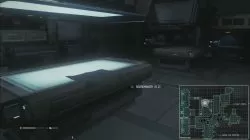
Version One (V.1) Mission: Map Location: Lorenz Systech Spire / Lower Level (North from Tech Support room) More specific Location description: On a wall, inside a small room. In order to enter this room use security access tuner to hack the entrance door.
Flashbang Version 1 Location
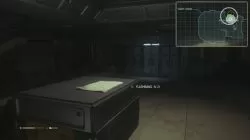
Version Two (V.2) Mission: Map Location: Sevastopol Scimed Tower / Maintenance Deck More specific Location description: On a larger grey metal box. You can find an elevator nearby, that is the goal for objective: “Get to Transit Control“.
The second Flashbang Version Location.
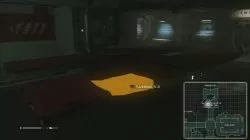
Version Three (V.3) Mission: Map Location: San Cristobal Medical Facilty / Primary Care Floor (Ambulance Bay). More specific Location description: On a red medical bay bed. Found during the mission objective “Find a Level 3 Upgrade for the Access Tuner“.
The last Flashbang Schematic Version
Molotov
In-game description: The Molotov is an incendiary device which detonates on impact. It is lethal to humans and other organics but synthetics are very resistant to fire. Upgraded version inflicts more damage over a slightly wider area. Crafting Materials: 2x Ethanol, 1x Blasting Cap, 2x Sensor, 2x Compound B, 25 Scraps Additional information: Use it to defeat a large number of enemies. Although synthetics are highly resistant to Motolov, they will slowly burn down.
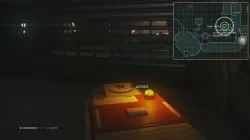
Version One (V.1) Mission: Mission N.6 – The Outbreak Map Location: San Cristobal Medical Facilty / Primary Care Floor (Security Desk room) More specific Location description: In a room where you will complete the mission objective: “Find Keycard to Access San Cristobal Medical Wards“, look on a table, next to a personal terminal.
Blueprint Molotov (V.1) Location
Version Two (V.2) Mission: Mission N.12 – A Synthetic Solution Map Location: Seegson Synthetics / Seegson Synthetics Administration (southeast of Synthetic Showroom) More specific Location description: On the ground, next to a dead body. This is the room you enter after being chased by 6 Synthetics. You will find it if you follow mission objective “Find Samuels“.
The second Molotov blueprint Location.
Noisemaker
In-game description: This home-made device continuously emits a high-pitched noise when triggered which will attract a lot of attention. Crafting Materials: 1x Charge Pack, Sensor, SCJ Injector, 10 Scraps Additional information: Great for distraction. Enemies drown to its noise don’t stay there for ever.
Version One (V.1) Mission: Map Location: Seegson Communications / Observation Deck More specific Location description: On a white desk, surrounded by 6 brown leather chairs. Doors that lead to this room are locked with Maintenance Jack remover lock.
Noisemaker Blueprint Version 1 Location
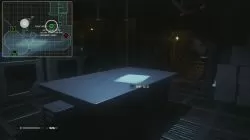
Version Two (V.2) Mission: Map Location: Lorenz Systech Spire / Upper Level More specific Location description: On a huge table that you’ll find during the mission objective “Lock Down the Server Farm“.
Noisemaker (V.2) Location
Pipe Bomb
In-game description: The pipe bomb is an explosive device which detonates on impact. It is lethal to humans and non-industrial synthetics in close proximity. Crafting Materials: 1x Ethanol, 2x Blasting Cap, Sensor, SCJ Injector, 25 Scraps Additional information: Great bomb.
Version One (V.1) Mission: Map Location: San Cristobal Medical Facilty / Crisis Stabilization Unit (east of Staff Quarters Room) More specific Location description: On a table.
Pipe Bomb (V.1) Location
EMP Mine
In-game description: The Emp detonates on impact to release an electromagnetic pulse that temporarily disables non-industrial synthetics. Upgraded version has a wider area of effect. Crafting Materials: 2x Charge Pack, Sensor, 1x SCJ Injector, 2x Bonding Agent, 25 Scraps Additional information: When you throw this mine on enemies it can be stopped by obstacles in the room.
Version Two (V.2) Mission: Mission N.11 – Hazard Containment Map Location: Solomons Habitation Tower / Galleria Upper Concourse (Close to the Spaceflight Terminal) More specific Location description: During the mission you’ll have to activate a service vehicle and follow it through a small tunnel. In the second room you enter, look for the blueprint on a table.
You can get MEDIKIT (V.2) early in mission 10. When you get to the Systech Lobby warn the friendly civilians that the alien is close; first the two men, then the woman upstairs in the lobby lounge and finally the coughing woman in the lower level tech support (the same location where you find SMOKE BOMB (V.1). She will then give you Archive Log #149 which is the code to get into the transit office, which is located between the transit station and the entrance to the lobby, the blueprint is inside.
I found Pipe Bomb V3 and a bug that let’s you get it very early. In the Scimed Towers up the left stairs (west according to the map) if you enter the door that leads to synthetic and medical there is a small locked room to your right when you first enter. I believe you need a level 2 or 3 tuner to properly enter the locked room (there is also a audio log inside). but if you walk back outside to the tram area and push up against the wall the schematic is hanging on, you can actually pick it up through the wall.

1. Is true that there are apparently 21 blueprints???
“Is it true”
There is also Molotov V3, locked behind door in Lorenz systec spire (in loby where u find access tuner) (requires access tuner lvl 3)
E.M.P. V.3 is found in the same room as the 10th & final Nostromo log. You need the Ion Torch to open the door panel.
You can get MEDIKIT (V.2) early in mission 10. When you get to the Systech Lobby warn the friendly civilians that the alien is close; first the two men, then the woman upstairs in the lobby lounge and finally the coughing woman in the lower level tech support (the same location where you find SMOKE BOMB (V.1). She will then give you Archive Log #149 which is the code to get into the transit office, which is located between the transit station and the entrance to the lobby, the blueprint is inside.
I found Pipe Bomb V3 and a bug that let’s you get it very early. In the Scimed Towers up the left stairs (west according to the map) if you enter the door that leads to synthetic and medical there is a small locked room to your right when you first enter. I believe you need a level 2 or 3 tuner to properly enter the locked room (there is also a audio log inside). but if you walk back outside to the tram area and push up against the wall the schematic is hanging on, you can actually pick it up through the wall.
the door to synthetics is locket at the beginning