AC Valhalla Hidden Ones Armor - Ratae Bureau Armor & Londinium key
AC Valhalla Hidden Ones Armor consists of six armor pieces in total, and you’ll need to collect them during the A Brief History of The Hidden Ones quest. You get this quest after you unlock the assassin bureau in your settlement. They’re hidden in a variety of ancient roman ruins. Finding them can prove too challenging for many. We’ve decided to write this AC Valhalla Hidden Ones Armor – Ratae Bureau Armor & Londinium Bureau key guide to help everyone who gets stuck with them.
You’ll get hints about the locations of the bureaus if you check the computer during the first modern day section, the one after you leave Norway. Log onto it, then go to Files and check the English Locales of Note document. It’ll list the modern day areas where they suspect bureaus used to be.
- Codex #1 – Londinium Bureau Key – Lunden
- Codex #2 – Jorvik
- Codex #3 – Glowecestrescire
- Codex #4 – Ratae Bureau – Ledecestre
- Codex #5 – Colcestre
- Codex #6 – Wincestre
- How to decipher codex
There’s a piece of the Hidden Ones gear set near each codex page, so make sure you loot the big glowing chests. The set bonuses provide you with increased headshot damage and higher assassination damage when you stay hidden for longer than 10 seconds.
Codex Page #1 – Londinium Bureau Key in Lunden
The first codex page is located in the Londinium Bureau, which can be found in the northeastern corner of Lunden. If you head through the forest of stone columns, drop down and turn around, you’ll find what looks like a cave entrance. It leads into the bureau.
Once you’re in, you’ll see a big pool in front of you. If you’ve already been exploring here, you might think you need to find a key, but you don’t. Dive into it and head left. Jump onto the hanging platform, then the rope farther ahead. Turn around and jump onto the farthest window. Shoot the red pots through the bars, then use the horizontal bars and ropes to get around the corner and into the room through the hole you just blew. The codex page will be in that room, on a desk. Looting the chest in the same room will give you the Hidden Ones’ Mask.
Codex #2 – Jorvik Assassin Eboracum Bureau
The second codex page can be found in Jorvik, in the Eboracum Bureau. You’ll find the entrance in the southwest, past Jorvik Theatre. Break the boards using an arrow, then drop down. Squeezing through the rocks, you’ll end up in a big room. Head left and jump into the water. Dive below the assassin’s banner and go into the tunnel.

Climb up the ladder go through the door. Once you’re in the office-like chamber, head left and climb up the bookshelf. Grab the key, then drop down and use it on the nearby door. Go into the brightly lit room, and grab the Hidden Ones Robes from the chest. You’ll find the codex page on a small table in the corner.
AC Valhalla Codex Page #3 – Glowecestrescire
You’ll find this codex page in the Temple of Ceres, in the southwestern corner of Glowecestrescire. Once you enter, go down the stairs and look for a hole in the wall on the left. Crawl through it, then use the torch to ignite the green gas. Break the floorboards in the next room and drop down.
Ignite the gas and head into the chamber on the left. Look for a bunch of red pots in a corner. Ignite the gas on the stairs, then grab a pot and climb them. There’s a room on the right on the upper floor with a weakened wall – use the pot to blow it up. In the chamber behind it, you’ll find the codex page on a table and the Hidden Ones Leggings in the chest.
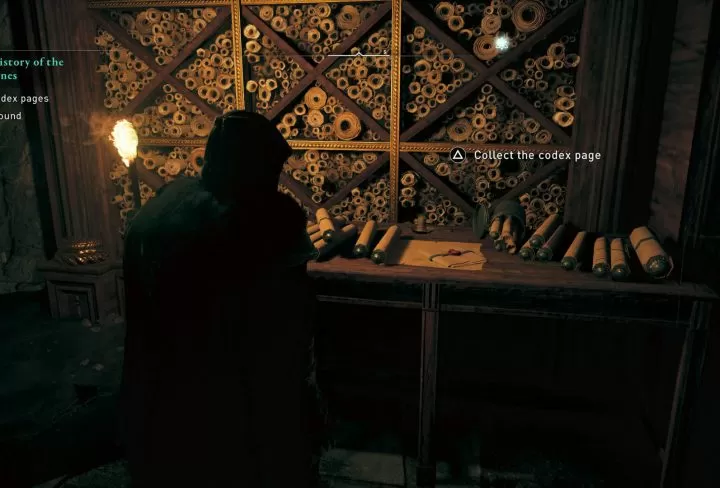
Assassin Codex #4 – Ledecestre – Ratae Bureau
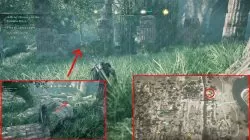
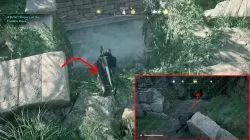
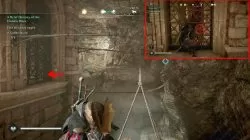
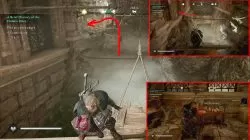
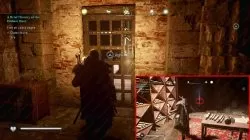
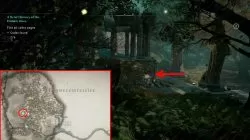
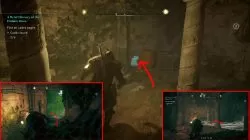
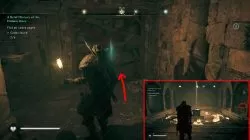
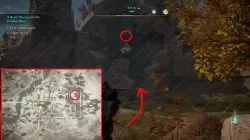
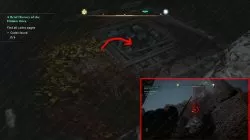
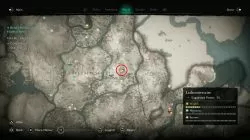
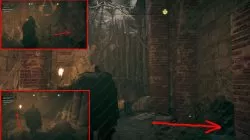
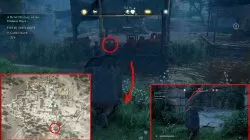
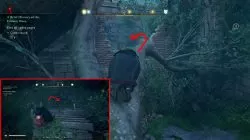
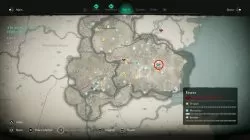
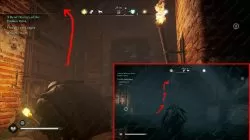
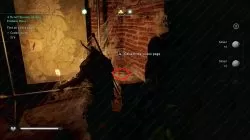
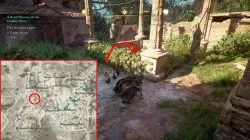
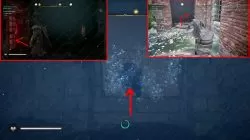
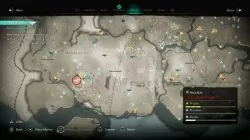
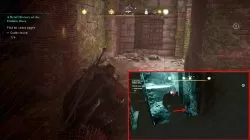
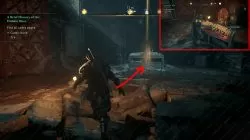
The codex page in Ledecestre is hidden in the Ratae Bureau, below the settlement. You’ll find the entrance in the northeastern corner of the area, in the tower ruins. Shoot the rope to drop the big load of rocks onto the boards, so you can drop down and get inside.
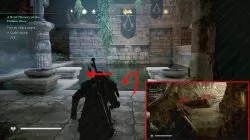
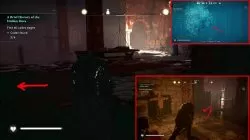
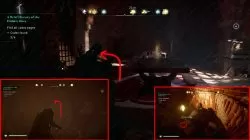
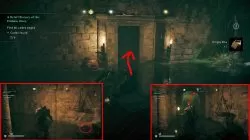
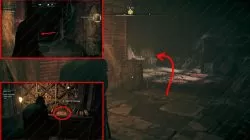
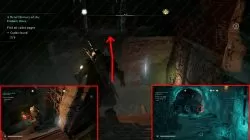
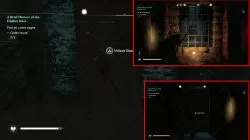
When you reach the barricade, crawl through the hole on the right. Face the big assassin banner, then head right and crawl through another hole. Go past the chest (remember to loot it, the Hidden Ones Gloves are inside) and behind the papyrus-shelf on the left, and you’ll see a big map. There’s a desk on the opposite side of the room from the map, by the shelf, and you’ll find the codex page on it.
Codex #5 – Colcestre – Camulondunum Assassin bureau location
You’ll find the fifth page in the Camulondunum bureau, a secret hideaway in Colcestre. The entrance is by the southern wall, southwest of the Earldorman’s House. You’ll need to take a red pot from the stall nearby, then climb up the tree and throw it onto the rocks in order to open up a hole.
Once you’re inside, follow the corridors and keep your eyes out for some scaffolding on the left. Climb it and you’ll end up on the upper floor of a big, half-submerged room. Cross the water and climb up to the platform on the right. Jump across the room to the platform on the other side. Drop down and dive into the water – you’ll find a key there. Once you’re out of the water, unlock the door next to you. Look through the grate and shoot the bar on the door on the other side, then go back to the main room, jump onto the platform on the right and follow the corridor to the door you just unbarred. Open it and you’ll end up in the room with the codex page, which is next to the map, and the Hidden Ones Hood, which is in the chest.
AC Valhalla Codex Page #6 – Wincestre
The sixth page of the Hidden Ones codex can be found in Wincestre, in the ruins south of Saint Peter’s Church. The entrance is through a well – just jump inside and you’ll end up in the Venta Belgarum bureau.
Dive into the tunnel and follow it until you’re on the other side. Destroy the bar to unblock the door, then move the shelf out of the way. Exit into the starting room and find a red pot, then carry it back to where you came from. Use it to destroy a pile of rubble down in the hole, then go into the big chamber. You’ll find the codex page there, on a table, and the Suttunger’s Claw flawless dagger in a chest.
How to decipher codex pages?
Once you’ve found all six, bring them back to Hytham, and you’ll get a new task. You’ll have to find someone who knows how to decipher them. It’s the traveling merchant from the Thousand Eyes, Reda – the one with the bright stall in the middle of the place. You’ll have to wait for him to show up at your village, which happens at some point during the story.
If you need help with anything else in the game, we've got a metric ton of other guides for you to check out. For example, we've written AC Valhalla Hidden Ones Armor Set Locations - Ratae Bureau Armor & Londinium Bureau Key for quest A Brief History of The Hidden Ones, that will reward you with the Hidden Ones armor. We can also help with whether you want to let Rued Live or Die - Kill or Spare Rued Choice Consequences, or who to give silver to in AC Valhalla War Weary quest , and a well hidden AC Valhalla Comb location for Bil Maiden's Missive Rygjafylke World Event. Puzzle that caused us big problems was Unseal The Well during the quest Well Traveled. And, yes, we do have many more coming, stay tuned.
I’ve already got the one the one in Wincestre
And I need one more were do I go