Blueprints are items you can collect in Dishonored 2. These schematics allow you to buy or upgrade weapons and equipment at the black market.
▼Article Continues Below▼
Getting them will slowly broaden your arsenal and open up more opportunities for both stealth and imaginative kills. They can be hard to find, as they blend in quite nicely in most places. In this guide, we’re going to show you all blueprint locations in Dishonored 2, what they unlock.
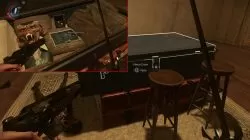
When you want to use up the blueprints you’ve collected, you’ll need to find a black market. The man at the counter can produce upgrades following the schematics you bring him, letting you enhance your outfit, weapons and other equipment. It’s gonna cost you, though, so make sure you’ve brought enough coin.
Mission 2: Edge of the World Blueprints
Name: Fire Hardening Treatment Location: In the Overseer Offices. Climb up to the third floor, where the safe is. The blueprint is on the desk in the large room with the terrace. Watch out for the Overseers.
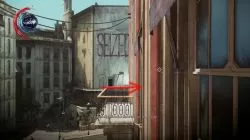
Name: Dispersed Incendiary Release Location: This one is in a building by the docks. It’s the one close to the whale carcass – you’ll recognize it by a couple of open windows on the second floor. Teleport inside and you’ll find the schematic in a safe. If you miss it, it will appear in the next mission.
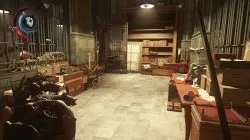
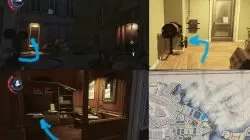
Blueprints in Mission 3: The Good Doctor
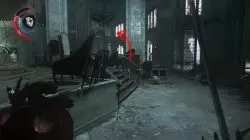
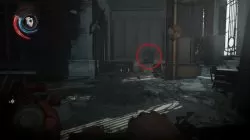
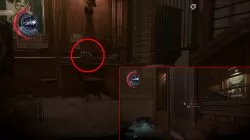
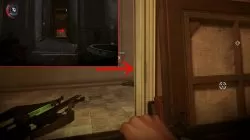
Name: Combat Sleep Dart Location: Go right from the main lobby, and teleport up to the balcony above the “consultation” sign. Go right into the large office. The schematic is in the safe on the far side of the room. The combination is on a nearby desk – keep your eyes peeled, it’s easy to overlook.
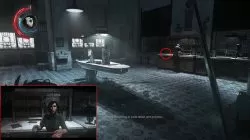
Name: Dispersed Incendiary Release Location: On the counter right next to doctor Hypatia, when you talk to her for the first time. It’s easy to miss, especially if you focus too much on the conversation. Make sure you explore the lab after you talk to her, and you’ll surely see it.
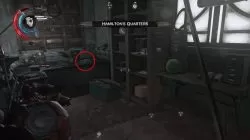
Name: Mercury Vapor Distillation Location: You can find this one on the bench in Joe Hamilton’s quarters, which is one floor above the room where you find him sobbing.
Mission 4: The Clockwork Mansion Blueprints
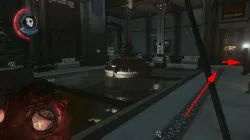
Name: Pyro-sonic Casing Location: In Lower Aventa District, go to Aventa Carriage Station. Go to the ticket booth. Unlock the door. There’s a safe inside. The blueprints are on the table to the right of the safe.
Name: Alloy Polarization Location: Go to the guard building in Upper Aventa District. Take the stairs to the third floor and enter the large office at the end of the corridor. The blueprints are waiting on one of the desks.
Name: Conductive Filaments Location This Blueprint is in the Clockwork Mansion. Adjacent to the Guest’s Waiting Room (the one with two potted plants with seats around), there is a large desk. The blueprints are on that desk. IF you moved the room previously, use the lever to get it back up.
Mission 5: The Royal Conservatory Blueprints
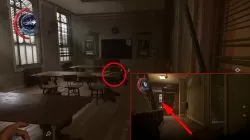
Name: Reverberation Tubing Location: Enter the building across the street from the conservatory’s side entrance (the one with the fountain nearby). Climb the stairs and enter the apartment. Turn left and look at the desk in the large room. The blueprint will be on it.
Name: Alloy Polarization Location: Go through the side gate, then into the room with the ghost hound. Go into the small office on the left (use the tiny window) and get the key from the wall above the desk. Go back into the previous room, then straight through the iron gate. Use the key to open the door by the gorilla portrait. You’ll find the blueprint on a table inside.
Name: Slug Splintering Vedges Location: In the fancy office at the top of the conservatory. Get to the top floor, then teleport onto the ledge above. Go through the window and down the stairs. The schematic will be on the desk.
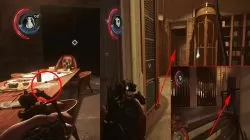
Mission 6: Dust District
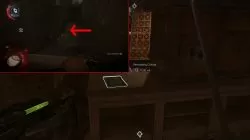
Name: Spiked Grenade Location: Go to the back entrance of Crones Hand Saloon and head upstairs. On the 2nd floor, you will find a Metal Crate. Open it, and you will find a Spiked Grenade Housing.
Go inside the Crone’s Hand through the back door and head to the 2nd floor.
You will find a blueprint for Spiked Grenades in a Metal Crate.
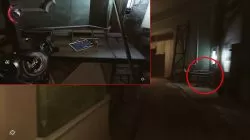
Name: Secondary Coiling Location: From the back entrance of the Crones Hand Saloon, pass through into to the back alley behind. Go through the small window to access Crone’s Hand Saloon basement. On the table will be Secondary Coiling blueprint.
Go through the back entrance of Crone’s Hand into the alley way.
Go to the basement through the open window and collect the blueprint from the table.
Name: Conductive Filaments Location This Blueprint can be found in this mission or in the Clockwork Mansion mission. We explained how to collect Conductive Filaments in the Clockwork Mansion mission (see above). If you didn’t found the blueprint there, check the top of the building before you pass the Wall of Light (it is near the beginning of the level). Climb on to the roof of the left building and search the workbench (it can be located on the lower shelf).
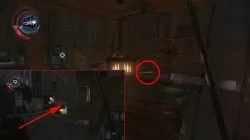
Mission 7: A Crack in the Slab
Name: Spiked Grenade Housing Location: From the tree in the center of the house, go up the stairs, and turn left. In that hallway there will be a workbench with a blueprint on it. (type of the blueprint may vary).
From the tree, go up the stairs and turn left.
Continue left down the corridor and you will find a workbench with a blueprint on it.
Mission 8: The Grand Palace
Name:Small-scale Combustion Refinement Go to the building closest to the entrance to the palace ground. Go up to the last floor. Find the mouse hole and use Shadow Walk to crawl to the other side. The blueprint is on the desk of the room you’ll crawl into.
Name: Firing Chamber Pivot This blueprint is near the Wall of Light early on in the mission. Basically, follow the metal tracks on the ground. Just after the Wall, there’s a small stall with a burning furnace inside. The blueprints are right there on the table, lying next to a pistol.
NameFolded Galvani Resin
Go down to Delilah’s shrine in the Grand Palace. To get there, go down the stairs from the dining room (to your right if you’re facing the big statue on the other side of the table). Go down the stairs into the Personnel Only section. Keep going until you reach a dead end and press the button on the left side of the wooden wall. Walk down into the hidden chamber. The blueprints are on the long table.
Name: Blade Conversion Location: This schematic can be found in the Palace, on the third floor. When you’re at the staircase, go right into the nearby office. The blueprint is hidden in a desk.
Mission 9: Death to the Empress
Name: Counter Blast Conversion Location: This blueprint can be found in Galvani’s lab. It’s in a building near the entrance to Dunwall tower, at ground level.
We’ll update the guide with more blueprints as we discover them. Feel free to share any discoveries of your own via the comments.
There is another blueprint in mission 5. The “triggered housing” upgrade can be found in a side room on the first floor of the conservatory. It is on a desk in the room with the inactive Wall of Light.
There is double folded galvani weave on the dreadful wale after the grand palace mission. It’s in the workshop area on the desk right before Sokolov’s office.
Many sites, including GosuNoob, seem to have the paintings, charms, runes, and blueprints numbers wrong for Mission 7. The mission end screen says six runes, six charms, four paintings, and two blueprints, which is exactly double what most guides say. Is this a bug?
They could have possibly just copy-pasted the information from the official guidebook, which is SO wrong (and SO disappointing of a purchase!) All of the missions in the guidebook have the wrong numbers of collectables for every mission.
Woop. Could be a bug? Just finished the mission for the second time (after finishing it the first with 1/2 blueprints, 1/2 paintings and going back to find them) now it is saying 1/1 blueprints :S could be a weird bug.
There is another blueprint in Mission 3 where you need to go to campbells office which can be found at the top floor of the complex by using the stairs. You can get his key when you are on your way towards making the Serum.


I Also want to confirm the blueprint Kenzie mentioned.
There is another blueprint in mission 5. The “triggered housing” upgrade can be found in a side room on the first floor of the conservatory. It is on a desk in the room with the inactive Wall of Light.
There is double folded galvani weave on the dreadful wale after the grand palace mission. It’s in the workshop area on the desk right before Sokolov’s office.
note that the ‘Slug Splintering Vedges’ can be found in mission 4 (Jindosh’s Laboratory Desk)
Many sites, including GosuNoob, seem to have the paintings, charms, runes, and blueprints numbers wrong for Mission 7. The mission end screen says six runes, six charms, four paintings, and two blueprints, which is exactly double what most guides say. Is this a bug?
They could have possibly just copy-pasted the information from the official guidebook, which is SO wrong (and SO disappointing of a purchase!) All of the missions in the guidebook have the wrong numbers of collectables for every mission.
Woop. Could be a bug? Just finished the mission for the second time (after finishing it the first with 1/2 blueprints, 1/2 paintings and going back to find them) now it is saying 1/1 blueprints :S could be a weird bug.
There is another blueprint in Mission 3 where you need to go to campbells office which can be found at the top floor of the complex by using the stairs. You can get his key when you are on your way towards making the Serum.