Zelda BotW Keo Ruug Shrine - How to complete constellation puzzle
Keo Ruug shrine in Zelda Breath of the Wild is located in Korok Forest. It is one of the most interesting challenges in the area. It has two rooms with two large gates. In order to unlock them both, you need to solve an interesting constellation puzzle. The first gate opens the path to the Spirit Orb, but the second allows you to reach the only treasure chest in the Shrine. In this guide, we’re going to help you complete Zelda BoTW Keo Ruug shrine, and show you how to complete the constellation puzzle.
Keo Ruug Shrine Location
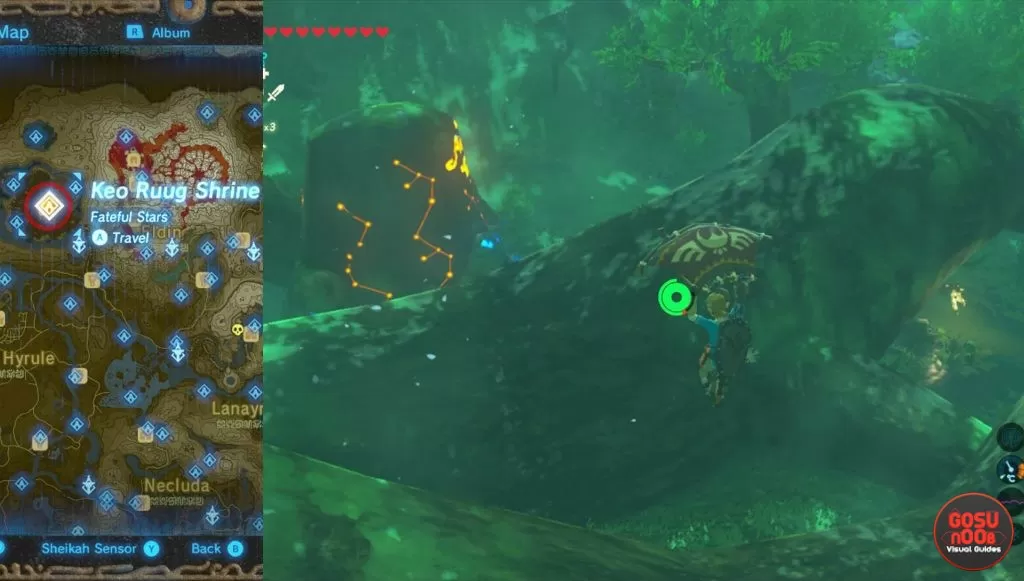
Keo Ruug Shrine is located in the center of the Korok Forest. Although you don’t need to climb on some huge mountain, break some obstacles, or solve quests for it to show up. You need to deal with the Forest Fog.
To deal with the fog, you need to approach the forest from the south. Be sure to bring one torch. In the southern part of the Forest, there are some braziers. Light them up and follow the trail of the torch’s fire. The wind will blow it into the safe direction, the one you should follow. If it’s extinguished for any reason, here’s what to do. Take a few steps into any direction. If you see the fog closing in, run back to the previous position quickly. Now pick some other path and take couple of steps in that direction, until you find the one without fog that closes in. You’ll know when you are on the right path as soon as you spot the giant stone mountain. There is a hidden pathway between two mountain sides that takes you to the Keo Ruug Shrine.
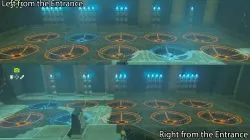
Keo Ruug Shrine Constellations Puzzle Solution
To get past the first large gate, you have to place four balls into the correct places. The only hint we get at the start is from the inscription on the stone in the center of the room. It says “Look to the stars for guidance. The constellations are the key.”
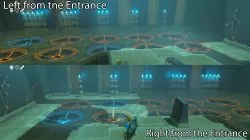
The solution is rather simple, if you don’t react like me and go outside to wait for dark and look for the stars. The constellations you need to look at are in front of the Shrine’s central platform. Although they are in the second room, you can see them from a distance.
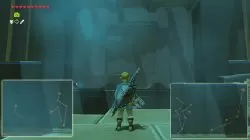
Next to the circles where you have to put the balls on the wall, there are same signs. You can tell them apart and count them with the help of the constellation map in the second room. From the first room wall signs, in the opposite direction from them, the balls spots are marked from one to five. You can also tell from the number of lamp posts that are next to them.
For the first gate, you have to place the balls in the following order. From the entrance of the shrine, from left to right, place balls in the following order, according to the number of lamp posts next to them: 5-3-1-2. Or if you like it this way:
oo—Xo
oo—oX
oX—oo
oo—oo
Xo—oo
Keo Ruug Chest
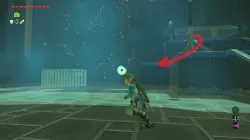
Once you are finally inside the second room, look to your right. There is another gate, and one more constellation map. You’ll have to re-arrange the balls in the first room to open this gate as well. The rules are the same. Check the signs on the wall, and their number on the constellation map. The solution is: 4-2-2-1, or if you like it this way:
oo—oX
oX—Xo
oo—oo
Xo—oo
oo—oo
The chest behind this gate contains one weapon: Knight’s Claymore (38 damage). If you are wondering what else you can find in these shrines, we’ve covered the entire 120 shrines reward list.

I’m sorry, there was some kind of gap in the explanation (I’m ADD, so certain things I don’t get if they aren’t put bluntly, unless I figure them out myself), both in your explanation and in theirs. So anyone wanting to figure it out themselves how this puzzle is supposed to be solved it’s like this:
The torches left to right represent the number of repetitions a constellation symbol shows up (1 to 5). So then you count the number of that symbol repeats (starting with the three dot constellation, then the paired constellation, then the treelike constellation, then the long constellation).
I was confused because I was looking at the dot number itself, and was like “Huh? These constellations have more dots than there are torches.” So even with this guide, I just dropped balls according to the numbers without seeing what I was doing. So anyone else who was confused, that’s how you do it. Count the number based on the near wall.
@Samantha thank you for that explanation because I wasn’t getting it either… I kept counting the number of balls in the constellation instead of how many times it repeats. Thank you everyone
It’s actuall 4-2-2-1 for the chest
You are absolutely right, sorry for the confusion. I’ve fixed it, thank you.