Sand Kingdom Moon Locations - Super Mario Odyssey Power Moons
Power Moons in Sand Kingdom are Super Mario Odyssey collectibles crucial for you progression in the game. There are sixty nine moons for you to find the first time you visit Tostarena, and twenty additional ones get unlocked once you finish the main story. You can choose to skip most of them at the beginning because you will only need a few to progress to the next kingdom. Being one of the early levels, a lot of the moons are easily collected, but some of them are quite tricky and will require you to scour the land to find them all. Being important for unlocking all the content in the game, we wanted to help you with our guide and map to all Sand Kingdom power moon locations.
We will also help you find all the power moons in Cascade, Sand, Lake, Wooded, Lost Kingdom, Metro Kingdom, Snow Kingdom, Seaside Kingdom, Luncheon Kingdom, Bowser’s Kingdom, Moon Kingdom, Mushroom Kingdom and Dark Side.
| Previous: Cascade Kingdom Power Moons | Next: Lake Kingdom Power Moons | ||
Story Moons in Sand Kingdom
#1 Atop the Highest Tower
Near the three crates described in point 14, you’ll see a pair of goggles you can use. You’ll notice that there’s a Power Moon on top of the nearby tower (Tostarena Ruins Round Tower). Possess one of the Bullet Bills and fly over to the staircase leading to the base of the tower. Circle around until you find a pipe you can go into to access the 2D platforming section. Make your way to the top and collect the Power Moon.#2 Moon Shards in the Sand
Once you reach the Moe-Eye Habitat, you’ll have to collect five Moon Shards to get a Power Moon. The first one is just next to the checkpoint flag. Another shard is on the highest dune in the area, next to a tall cactus. Shard Three is on the other side of the small pillar area, between two tall cacti, on the edge of the cliff. The fourth one is also nearby, seeming floating in the middle of the purple water. Possess a Moe-Eye, put the shades on, and you’ll see the invisible blocks that you can walk over and collect the shard. While you’re possessing the Moe-Eye, find the pillar that has a small elevator platform going up and down. Travel to the top and put on the glasses to see the hidden bridges, and make your way to the opposite side and the final shard. The Power Moon is yours for the taking.#3 Showdown on the Inverted Pyramid Multi Moon
To obtain this Super Mario Odyssey Power Moon, you’ll have to defeat Harriet at the top of the Inverted Pyramid.#4 The Hole in the Desert Multi Moon
Head into the ice caves below the Inverted Pyramid. At the end of it, you’ll face the boss Knucklotec. Your reward for defeating it will be another Multi Moon.Sand Kingdom Power Moon Locations
#5 Overlooking the Desert Town
Climb up on top of the northernmost building in town and you should see it inside a little overlook.#6 Alcove in the Ruins
located in Tostarena ruins. Explore the east side of the ruins, and you’ll find a small alcove with the collectible inside.#7 On the Leaning Pillar
Jump on top of a pillar marked on the map, or possess the nearby Bullet Bill to fly over there.#8 Hidden Room in the Flowing Sands
In Tostarena Ruins, in the quicksand just north of the three gushing sand pillars, there’s a small section of wall that is a bit elevated from the ground. Now, here’s where it gets hard. You need to approach that part of the wall. Then, you have to allow Mario to sink almost all the way down, then quickly and repeatedly jump forwards to squeeze into the hidden room. There’s a Power Moon in there, and, thank god, a warp pipe to lead you out.
#9 Secret of the Mural
As your climbing Tostarena Ruins Round Tower (first Sand Kingdom Power Moon), you’ll come across the two horizontally moving platforms. Instead of jumping up to the top of the tower, go through the wall on the left into a secret little room with the Moon inside.#10 Secret of the Inverted Mural
While you’re climbing the Inverted Pyramid, there will be a 2D section on the outside of the pyramid, with you hanging upside-down. Instead of hopping into the warp pipe, you need to jump through the little hole in the rocks just beyond the pipe. The moon is waiting for you there, along with a bunch of coins.#11 On Top of the Stone Archway
The archway is the entrance to Tostarena ruins. To get up on top of it, you can posses a Bullet Bill nearby and fly there.#12 From a Crate in the Ruins
Climb the ruins above the alcove, and you should see three wooden crates you can destroy. The Moon will jump onto the rooftop of the nearby building. Possess the cannon bullet and fly over there.#13 On the Lone Pillar
While you’re on top of Tostarena Ruins Round Tower (after you’ve finished the story part), look for the lone pillar left of the small purple pond. It is the same pillar where the warp picture that takes you to Metro Kingdom is at. Possess the Glydon that’s standing there, and fly over to pick up the moon. Alternatively, you can attempt to do it with a nearby Bullet Bill, but we don’t recommend it, because he tends to explode on the way to the pillar.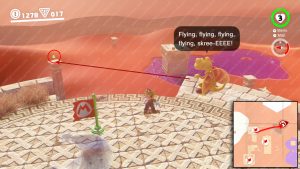
#14 On The Statue’s Tail
Getting this moon requires you to revisit the top of the Inverted Pyramid (to get there quick, go to the top of Tostarena Ruins Round Tower and use the Spark Pylon). The tail on one of the statues positioned at the edges of the plateau is glowing. Throw Cappy on that tail to get the Power Moon.#15 Hang Your Hat on the Fountain
Once you’ve removed the cold from Tostarena, head to the town. Climb up the fountain in the city square and throw Cappy onto the top. Collect the moon.#16 Where the Birds Gather
At the oasis east of town, there’s a small sand hill with a bunch of birds on it (on the eastern shore). Smash the ground on top of it to reveal the moon.#17 Top of a Dune
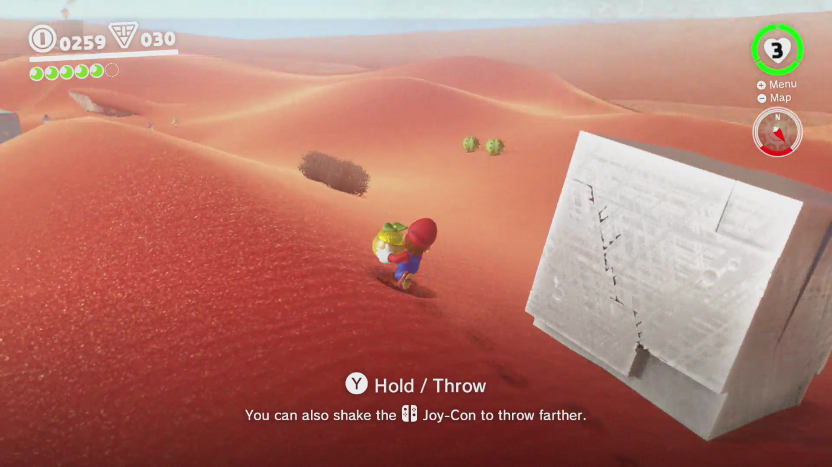
As the name suggests, you should smash into the ground on top of the dune northwest of the town.#18 Lost in the Luggage
Smash the ground at the sunken pyramid among the cardboard boxes. (hint – the spot glows)#19 Bullet Bill Breakthrough
In Tostarena Ruins, left of the Sand Pillars, there’s a Moon in a cage. Drop to the lower level, possess Bullet Bill, and fly through the big gap in the wall to smash the cage open.#20 Inside a Block Is a Hard Place
Destroy the stone block with a possessed Bullet Bill in the area left and below of the Sand Pillars flag. The block you need to destroy is the one in the top left corner.#21 Bird Traveling the Desert
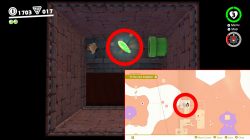
There’s an eagle flying around the area. He should pass the building where you picked up “Overlooking the Desert Town” moon. Wait for him to approach and hit him with Cappy to get the collectible. You can also do the same in the Desert Oasis area.#22 Bird Traveling the Wastes
The easiest way to shoot this bird down is to go travel to the Jaxi Ruins checkpoint, and jump down. Then, all you have to do is wait for the bird to circle around and hit it with Cappy.#23 The Lurker Under the Stone
If you climb to the very top of the Inverted Pyramid after defeating the boss, you’ll notice something strange moving under the stones like they were a carpet.#24 The Treasure of Jaxi Ruins
There are two chests on top of the Jaxi Ruins, right next to the checkpoint flag. Open the one on the left to reveal a Power Moon.#25 Desert Gardening: Plaza Seed
There are three pots next to the wall of a building left of the fountain. You can pick up a seed and plant it. Plant it in the middle pot and wait for a while, then break the flower open with Cappy to find the moon.26. Desert Gardening: Ruins Seed Location
Head over to the Tostarena Ruins Sand Pillar checkpoint flag, then go east. Drop down to the sand and look for the alcove in the wall of the ruins to find the seed. Then, take the seed to Tostarena town, and plant it in the right flower pot. The pots are next to a huge potted cactus, in front of a yellow-green house, left of the fountain.
27. Desert Gardening: Seed on the Cliff Location
The seed is located far west of the Tostarena Ruins Entrance, in the desert. Go to the place where the map juts out, southwest of the Moe-Eye Habitat. Looking down from the cliff, you’ll notice there’s a lower section that you can drop down to. Find the seed, then head the other way until you find the flower. Drop the seed, hit the flower with Cappy, then quickly pick the seed back up and use the platform to get back on top of the cliff. Plant the seed in the flower pot in Tostarena Town, near the building left of the fountain.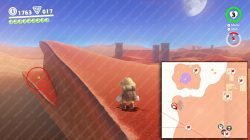
#28 Sand Kingdom Timer Challenge 1
There’s a scarecrow that you can find on the top of the building in the furthest northwest of the map. The easiest way to get up there is to take the Spark Pylon up to the Inverted Pyramid, then use the other Pylon to get to the roof you want. Capture the scarecrow and complete the mini puzzle to reach the Power Moon.#29 Sand Kingdom Timer Challenge 2
When revisiting the Moe-Eye Habitat, capture one of the Moe-Eyes and step on the P-button in the south part of the purple puddle. This will reveal an invisible little path (put the shades on to see where to go) that will lead you to a key. Since you have to be quick, have a quick look with the glasses on, then take them off again and run for the key. When you get it, it will reveal a Power Moon.#30 Sand Kingdom Timer Challenge 3
On the east side of the purple lake surrounding the Jaxi Ruins, there’s another scarecrow for you to find. When you capture the scarecrow, another timed platforming puzzle will begin. To make it easier for you, make sure you ride a Jaxi to the scarecrow. Then, quickly mount the Jaxi again and run over the purple sludge to the power moon.#31 Found in the Sand! Good Dog!
Left of the entrance to Tostarena Town, you’ll find a cute little dog. Approach it, and it’ll start running into the desert. Follow it around until it starts digging in the sand. Ground Pound the spot where the ground starts glowing, and collect the Moon.#32 Taking Notes: Jump on the Palm
Get to the oasis east of town. Jump on the palm trees and start the notes collecting minigame. If you succeed, you’ll get the collectible.#33 Herding Sheep in the Dunes
Warp to the Tostarena Northwest Reaches flag. Walk southeast in the direction of the Sphynx, and you’ll come across a poor shepherd that has lost his sheep. The first two sheep are close by, and the third one is around the luggage (see point 18). Shoo them back to the shepherd by hitting them with Cappy, and you’ll be rewarded with another Moon.#34 Fishing in the Oasis
Warp over to the Desert Oasis and possess the Lakitu there. Float over the pond and look for the largest Cheep Cheep. When the fish gets hooked (put the hook just in front of the shadow without scaring them), reel it in carefully to get the Power Moon.#35 Love in the Heart of the Desert
Make your way to the Tostarena Ruins Entrance and possess one of the Goombas. Climb the stairs and head right, then cross the floating platform. Don’t let the Bullet Bill hit you. Then, when you reach the trampoline flower, de-possess the Goomba, activate the flower, then quickly re-possess the Goomba and jump up. Then, find the girl Goomba, and you’ll get the moon.#36 Among the Five Cactuses
Go to the Tosatrena Northwest Reaches checkpoint and hop on the Jaxi. Ride it across the northern edge of the map towards the east until you come across a row of five cactuses, four smaller ones and a bigger one in the middle. Knock them down with the Jaxi and collect your new Power Moon. Don’t knock them off the cliff!#37 You’re Quite a Catch, Captain Toad!
Head back to Desert Oasis and possess Lakitu again. Float over to the north to where the large red pond is. Fish for the largest shadow, and voila, you’ve caught Captain Toad and another moon.#38 Jaxi Reunion
Saddle up on Jaxi, and hitch a ride to the northeast of the Desert Oasis. There’s a statue of Jaxi there, with one of the pedestals empty. Ride Jaxi to the empty pedestal, and that’ll get you another Moon (and some pretty sad backstory implications for Jaxi).#39 Welcome Back, Jaxi!
Head to the top of the Inverted Pyramid and call for a Jaxi. Then, ride it to the empty statue pedestal for another collectable.#40 Wandering Cactus
Go north of the little oasis, and you should come across a cactus with several yellow birds on it. Possess it with your hat and make a few jumps. Smash the ground where you uprooted the cactus.#41 Sand Quiz: Wonderful!
– After you’ve answered the first question of the Sphynx (see entry 51), you can interact with it again for four more questions. The answers are 30, Ice, 5, Sphynx.
#42 Shopping in Tostarena
Buy it at the local vendor for 100 coins43. Employees Only Power Moon Location
Located inside the town’s shop. Follow the left-hand side wall (left of the entrance into the shop) until you come across a small opening in the bottom of the wall with some iron bars. Enter the opening and move right to get inside the back of the shop. The power moon is next to the right employee.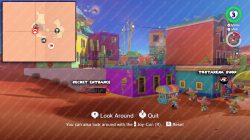
#44 Sand Kingdom Slots
In Tostarena Town, enter the building right of the fountain that has three moons sign next to the door. Play the slot machine game for 10 coins and make sure you hit all three moons with your hat (you can do all three at the same time if you let the hat fly when all moons are showing).#45 Walking the Desert
Talk to the Koopa at the location marked on the map and walk in the best circle you can manage. If you collect 80 points, you’ll get the power moon.#46 Hidden Room in the Inverted Pyramid
Once again, our road takes us to the top of the Inverted Pyramid. From the top, go inside the pyramid. From the part with the cacti, leap over to the conveyor belt that’s moving the rock pillars. That’ll take you to a hidden room with a Power Moon and a bunch of gold for you to pick up.#47 Underground Treasure Chest
Go down the hole under the Inverted Pyramid. Play through until you get to possess the Bullet Bill. Go to the right and around the corner of the large stone tower. Use the flower trampolines to the top. Then, carefully walk across the narrow stone bridge. At the end of it, jump up to reveal the invisible blocks. Jump on them and to the top of the building. Open the treasure chest to earn another moon.#48 Goomba Tower Assembly
Like in the previous entry, go down the hole under the Inverted Pyramid. Keep going until you run into a huge Goomba tower that you can capture. Then, walk a bit back, and jump onto the platform. From there, you can jump on another, smaller tower, which you can then join with the first tower, to create a truly huge Goomba tower. Then, walk towards the floating Power Moon, and jump to collect it.#49 Under the Mummy’s Curse
Return to the place where you’ve defeated Knucklotec. When the enemies start popping up, capture the Coin Coffer (the little green coin purse) and use it to kill all the other enemies that appear. When they’re all dead, you’ll get another moon.#50 Ice Cave Treasure
Drop into the hole in the quicksand in the Tostarena Ruins area. From there, head over to the flower trampoline, then go towards the pillars that move up and down. Wall jump up to the upper, stationary pillars. You should be able to see the Power Moon from there, so make your way over.#51 Sphynx’s treasure vault
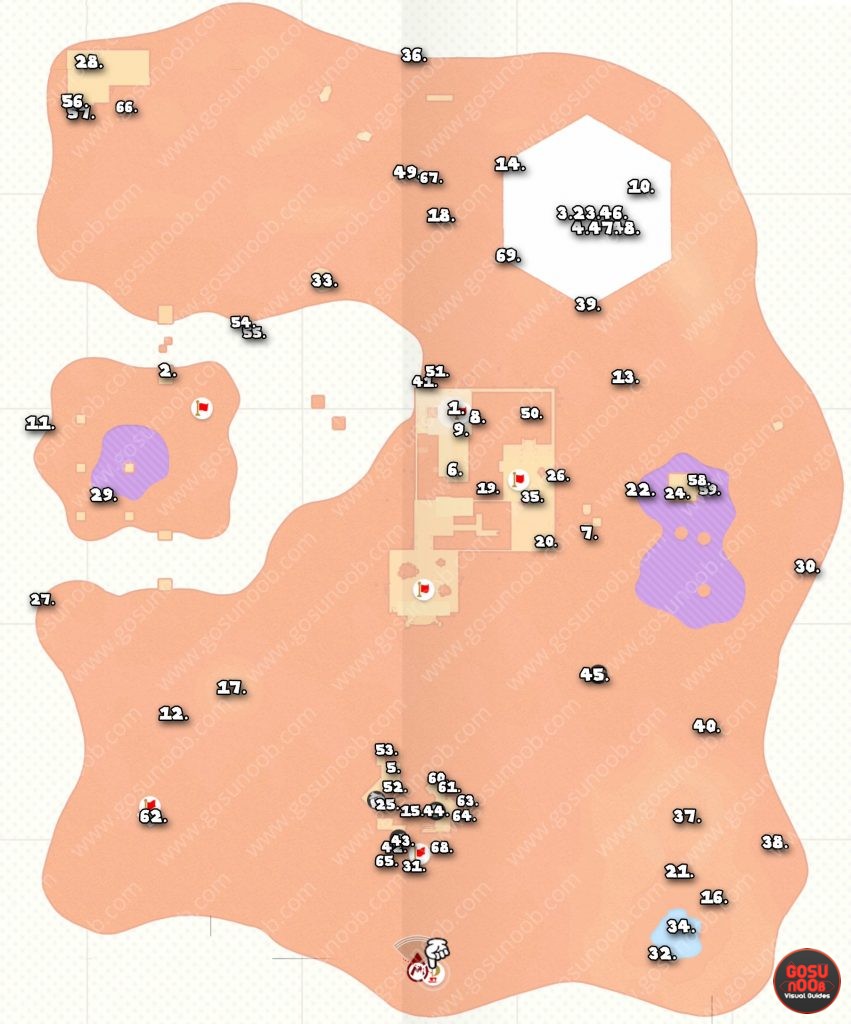
Solve the Sphynx riddle “What does the thieving monster desire from this land?” – The answer is ring.#52 A Rumble from the sandy floor
Below the tower where you picked up “Overlooking the Desert Town” power moon is a green pipe. Once you enter it, there will be a tiled room. Smash the ground at about the second row from the top and the third tile from the left to reveal your prize.#53 Dancing with New Friends
Go to the Crazy Cap and buy the sombrero and poncho (15 Regional Coins total). Then, go to the northwestern corner of the town, and you’ll find a guy guarding a locked door. However, if you’re wearing the sombrero and poncho, he’ll let you in. Stand in the middle of the podium for a while. Mario will play the guitar for a couple of seconds, and you’ll get the Power Moon.#54 The Invisible Maze
In the new area, follow the cliff edge right of the binoculars. You’ll see a trail of coins leading down to a secret door. Inside, there’s a small maze that you have to solve. Simply possess the Moe-Eyes to see where the hidden platforms are, and they’ll lead you across the pools of deadly liquid. It’s best if you possess the Moe-Eyes only to see where to go, then hop out and make your way further. Once you’ve collected the Power Moon in the final room, hop over to the warp pipe to get back outside.#55 Skull Sign in the Transparent Maze
Enter the secret red door described above. Walk over to the Skull Sign and throw Cappy onto the top of it, hold for Cappy to spin, and then go collect the moon.#56 The Bullet Bill maze: break through
continue on the straight path in the maze, past the spinning blades, and you should pick this one up just before the rooftop exit.#57 The Bullet Bill maze: side path
at the very north of the level is Bullet Bill’s place. Enter it and posses a bullet. The goal is to turn into the first left path instead of going straight.#58 Jaxi Driver
Mount the Jaxi on the roof of the Jaxi Ruins. Jump down, and circle the ruins until you find the entrance to the underground. The Jaxi can run across the purple sludge, so head on inside. There, you’ll have to reach the end of the section to earn a Power Moon. Be careful not to fall off the narrow paths. Don’t be afraid to use the brakes.#59 Jaxi Stunt Driving
Enter the section described above. This time, instead of going to the end of the course, navigate to the area in the center. There, you’ll find a treble clef. Run through it, collect all the notes on one side of the course, hang a tight turn around the pillar, then collect the rest of the notes. You have to collect them all in one perfect go to get the collectable.#60 Strange Neighborhood
There’s a rocket that you can possess on top of a building in the southeast corner of Tostarena Town. Just find the flower trampoline and head up to the rooftops. Capture the rocket, and you’ll find yourself in a weird place, full of rotating, colorful houses. Carefully navigate through the section to find the Power Moon at the end.#61 Above a Strange Neighborhood
Play through the Strange Neighborhood section (see above entry) until you reach the three-Goomba tower. Head to the right, where the Question Block is. Don’t destroy the normal blocks. Jump on top of the Question Block, then jump up again to reveal a hidden block. Jump on top of that, then once again to get the collectable.#62 Secret Path to Tostarena
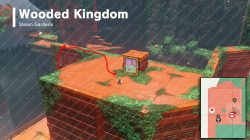
UPDATED! Turns out that reaching this Power Moon depends on the choice you made at the first kingdom fork – Lake or Wooded kingdom. If you chose Lake first – find Lakitu (the turtle in the cloud) fishing in The Courtyard. There’s a painting in the pool. Go through it, and you’ll be back in Sand Kingdom, right on the Southwestern Floating Island.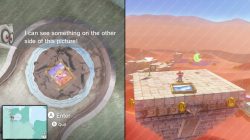 If you chose Wooded kingdom as your first destination, go there. Find the Forest Charging Station. If you finished the main story here there should be a scarecrow left of where all the robots are charging. This starts Timer Challenge 2. (if you complete it you get a power moon for Wooded kingdom, but you need to go up from there). Jump up from where the power moon of the timer challenge is. (You need to do a backward flip or ground smash jump to reach the ledge). Walk on the rooftop and you should see the painting that takes you to Sand kingdom.
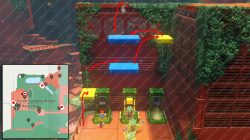
#63 Found with Sand Kingdom Art
Technically, this moon is located in Bowser’s Kingdom. On a building in the southeast of Tostarena, you’ll see a hint. Once in Bowser’s Kingdom, head to the souvenir shop. Count six walking stones in the garden from Crazy Cap, then execute a Ground Pound move to receive a moon.#64 Jammin’ in the Sand Kingdom
Find Toad jamming out to music in Tostarena Town. He’s on one of the roofs in the southeast part of town. He want’s to hear some battle music, so play him any track that has the word Battle in it to earn a moon.#65 Hat-and-Seek: In the Sand
Near the entrance to Tostarena Town, after you’ve played through the game, you can find a Bonneter disguised as a local. He’s the one wearing a sombrero over his entire face. Talk to him, and he’ll let you have a Power Moon in exchange for not blowing his cover.#66 Sand Kingdom Regular Cup
After defeating Bowser, go to Tostarena Northwest Reaches and take part in the Freerunning activity. To even out the odds, simply ride a Jaxi to victory. The finish line is near the Crazy Cap.#67 Binding Band Returned
Another ring you can get after you’ve completed the main game. West of the Inverted Pyramid, there’s a hole leading you to the Deepest Underground section. Use the slingshot to reach the next level, then ground pound the Binding Band (the huge ring).#68 Round-the-World Tourist
After the main game, talk to the Tostarean that’s chilling near the taxi. You’ll have to follow him through a bunch of locations in different kingdoms. Each time you meet him, you’ll get a new power moon. In the end, his long odyssey (see what I did there?) will lead him back home, and earn you another Power Moon in the Sand Kingdom.#69 Peach in the Sand Kingdom
Once you’re done with the main game, head back to Sand Kingdom and talk to Peach to get the Power Moon. She’s chilling on the top of the Inverted Pyramid.Sand Kingdom End Game Power Moons
 There is a Moon stone located northwest of the town, and you will not be able to break it until you finish the main story. Once you do that, come back and break it to reveal 20 more power moon locations.
It seems you’ve missed a treasure east of 58 and 59 on your map there is a lone pillar very close to the poison lake that has a box on top of it that can be broken by a bullet. I haven’t figured out how to get up there yet and nobody seems to know.
Check #76 in the guide, I think that’s the one you’re referring to.
How am I suppost to grab #76?
by far one of the best guides so far.
your #62 is wrong, I went there and it takes you to a secret location in the luncheon kingdom, not the sand kingdom
I’ve double checked it now and in my game it is still going to Sand kingdom from Lake Kingdom. Maybe the pictures change based on which kingdom you went to first? Where did you go first – Lake or Wooded?
after the sand kingdom? I went to the wooded kingdom first
I updated the guide with Wooded Kingdom painting portal location. Thanks for pointing that out.
ahhhh cool, thanks for the update, and that’s really interesting too, just another cool thing about this game i guess lol