Destiny 2 Garden of Salvation Raid - Consecrated Mind, Tether Puzzle, Underbrush Tower
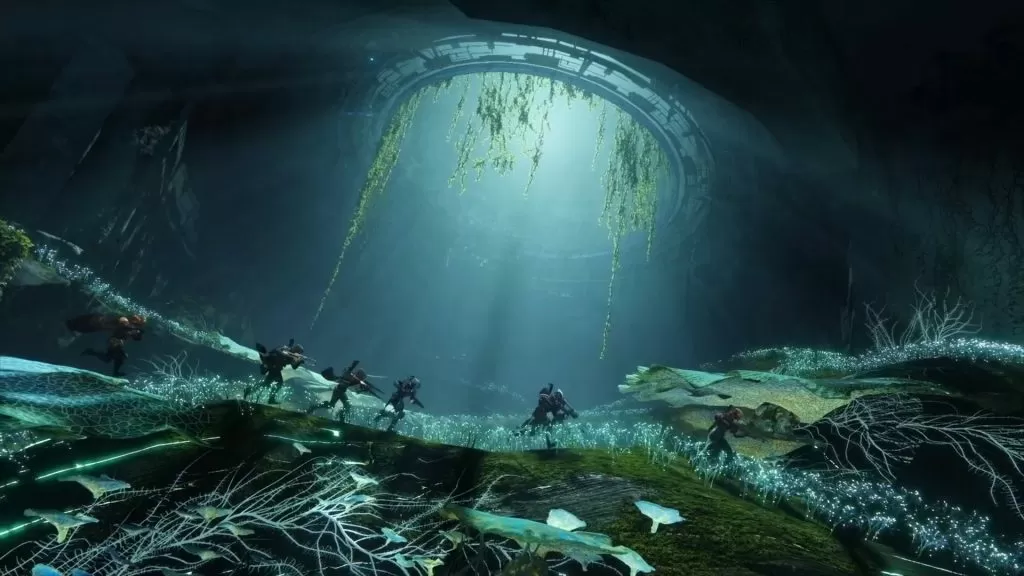
Garden of Salvation is the new Destiny 2 raid. It takes place on the Moon, and it was added in the Shadowkeep expansion. As always, it’ll feature puzzles to solve, bosses to beat, secret chests to find and loot to obtain. In case you get stuck at any point during the raid, we’ve decided to write a Destiny 2 Garden of Salvation raid guide, which will explain every step in detail.
How to start Garden of Salvation
The Garden of Salvation is a entered through a new icon in the upper left corner of the Moon map. The recommended level is 940, so make sure you’re beefed up before you go. You’ll get to the first boss almost immediately. Before you start the fight, there’s a secret ledge you can jump onto with a mysterious receptacle which asks for an Empowered Decryption Core.
Consecrated Mind, Sol Inherent – Tether Puzzle
The first boss is a giant harpy called Consecrated Mind, Sol Inherent. It’ll be immune to damage at first, but it’ll roam the arena and put down glowing cubes. Every time you collect one, you’ll get a Voltaic Overflow buff. You mustn’t take more than one, or you’ll die. You also mustn’t leave it on the ground, or it’ll wipe you.
In order to progress, create a chain from the floating cube to the blue barrier. If the connection turns red, you’re too far away from the source or each other. If you do it right, it’ll open up the barrier.
In the second room, the box will be protected by a glowing shield. You’ll have to kill the two big Cyclopses in order to take down the shield. Now you can unlock the door using the same technique as before. You’ll need less people than in the first room. The team will have to split, with at least two people without the buff waiting for the cubes to drop from the boss, to protect the team from wiping.
Once you unlock the third room, the boss will move into the second. Platforms will appear over the chasm, so the ones who stayed behind can bridge the gap more quickly. Clear the third room of enemies and the Angelic boss will spawn. Kill him, and you’ll get access to the box. It’ll spawn in a random spot, but you won’t need more than 3 people to tether it.
The next room (the one where you climb up a cliff) has three cubes and three locks. You’ll need to tether them separately, one by one. You’ll need to kill the Angelic to use the first one. When you tether that one, the second will unlock, then the third.
The last section doesn’t have a lock and key, but you’ll have to run through a gauntlet with a bunch of enemies, and the Consecrated Mind running away from you and spawning debuff cubes you have to pick up.
Secret chest in Garden of Salvation
After the first phase, you’ll have to complete a jumping puzzle in a dark, dank tunnel. There’s a secret chest you can find there, but you’ll have to venture off the beaten path. If you want precise instructions on how to reach it, check out this video.
Draw Out the Consecrated Mind – Underbrush, Alcove, Thicket, Hedges
After the jumping puzzle, you’ll get into a place with several corridors and a tower. Tether the tower to the cube and you’ll get the Enlightened buff – it’ll let you kill enemies with white shield. A bunch of enemies will appear and try to attack the tower – you need to defend it.
There are four such towers across the map. Once you activate the first, split up and have part of the team rush towards the second one. Once you’ve activated the second tower, a portal will appear connecting the two.
You’ll need to do this with all four (Thicket, Underbrush, Alcove, Hedges), but as you progress, you’ll have more and more teams with less and less people. Some will have to rotate, helping others refresh their buffs when they need it.
When you clear all four, the gates will open, allowing you to go into the center (Pavillion). You’ll have to defend a single tower from an onslaught of enemies there. Once you do, the last cube will spawn. When you tether it to the tower, the boss will appear – don’t stand in the middle, or he’ll kill you.
How to kill Consecrated Mind
Once the boss spawns, clear the adds until he runs away. Three people should chase him. One needs to walk into the glowing cube he spits out. They’ll become detained. The other two should keep their distance. Once the boss spreads his flaps, the detained player should tell the other two which lights on the flaps are red – inner or outer. All three need to shoot the lights called out or the detained person dies.
Once the detained person is free, they’ll get the Voltaic Overflow debuff – this means someone else needs to be detained in the next round. The boss will run away, and you’ll have to repeat the process. After a few times, you’ll enter the damage phase – you’ll recognize it by the multitude of red lights. Everyone needs to be on board for this, because if you don’t kill him fast enough, he’ll wipe you.
Sanctified Mind – how to beat Boundless Horizon boss
There are two towers in this fight – a black and white one. If you look at the boss, you’ll notice two red lights. Those are weak spots. Shoot them, and two portals will appear in front of him. Jump through them and kill enemies to collect motes. Once another player spawn a new portal and enters it, you’ll be booted back to the arena. Make it so that you leave when you have 10 motes – you can’t carry more than that. You can then deposit the motes into the towers. The rest of the team has to protect the towers from the monsters – if they get to them, you’ll wipe.
The two picking up the motes will get the Enlightened buff. They should stay behind in the next round and use the buff to kill the shielded enemies. You can tether the towers to the locks behind them to return the platforms after the boss destroys them.
Once you’ve banked enough motes in both towers, a glowing cross will appear in front of the boss. Tether it to the appropriate tower (white to white, orange to black), and the boss will enter the damage phase. Nuke him with everything you’ve got, then repeat the process.
Keep in mind you can damage him even before he floats up, it’ll help. Once he’s up, aim for the weak spot in his stomach. If you execute the DPS phase correctly and your aim is true, you shouldn’t need more than 4 damage phases to finish him off.Watch live video from Phammy on www.twitch.tvIf you need further help with Destiny 2 Shadowkeep, check out our guides on Dead Ghost Locations, Jade Rabbit Locations, and Eyes on the Moon - How to Start Vex Invasion. If it's Exotic Weapons that you're after, we've got you covered with our Pain And Gain Exotic Quest and Deathbringer Exotic Rocket Launcher - Symphony of Death guides. Going back in time for new players, we can offer you guides like Ikelos Weapons - How to Get SMG, Sniper Rifle, Shotgun, or, if you're playing Forsaken content, guides like Corsair Down & Badge - Dead Body Locations.
I like to come and read these ‘guides’ after doing the raid to get new perspectives. It seems you left out a lot, most importantly, the mote collectors during the 3rd phase. Also, the colors are red and blue during the boss fight and the mote target is 30, with each team picking up 15 on both sides to get an extended damage phase. The 30 motes on either side won’t take much longer and you can easily kill the boss is 2 phases. During the 2nd phase, you can more easily understand where to go with either North South East and West, or treat it as a baseball field (since its a diamond). After all angelics spawn and are killed, the whole team meets in the center and runs the same routine (kill angelics, adds, tether, repeat). This guide just seems incomplete to me.